Blog
DIY Spray Foam Insulation Cost: A 2026 Price Guide
DIY kits for closed-cell spray foam usually cost about $1.15 to $1.75 per board foot, and that number sounds cheaper than it often is in real life. The problem is that this sticker price can overlap with professional installed pricing once you account for waste, safety gear, setup, and whether the foam goes on at the right thickness.
A lot of popular advice treats diy spray foam insulation cost like a simple trip to the home center. Buy a kit, spray a wall, save on labor. That's not how it plays out on most real jobs, especially in South Florida where moisture control matters as much as insulation value.
Spray foam is not just fill-in-the-gap material. It's a chemical product that has to expand, cure, and seal correctly. If it doesn't, you haven't just overpaid for a kit. You've paid for a weaker building envelope, and in a humid climate that can turn into a much bigger repair.
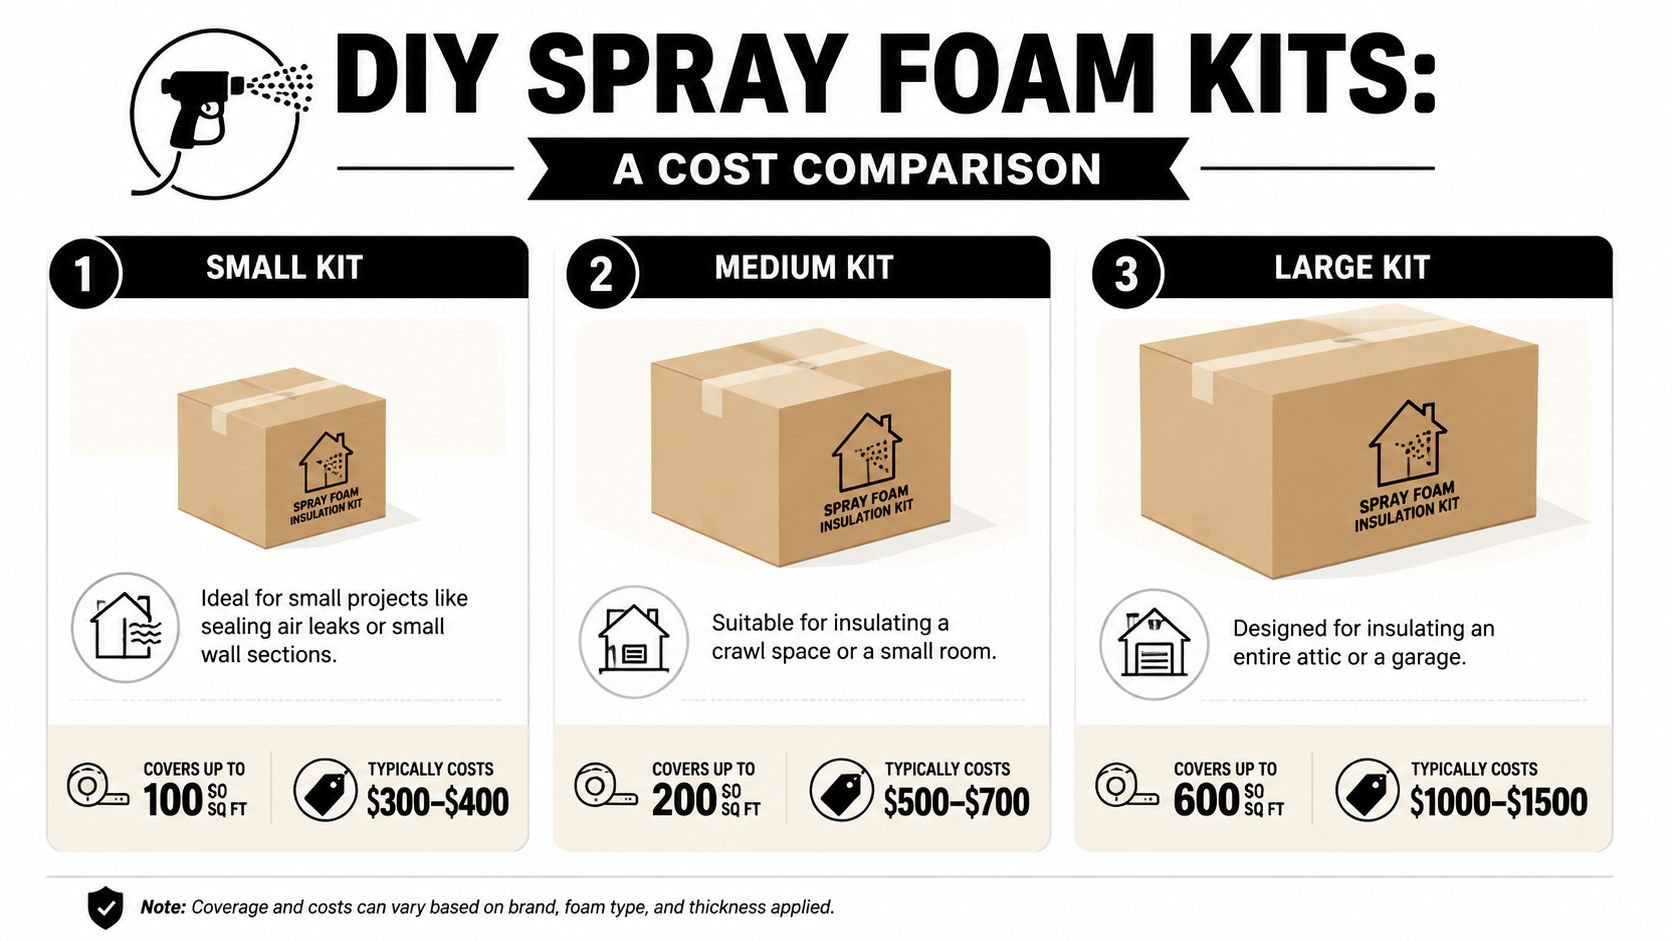
The Price on the Box Decoding DIY Kit Costs
The number on the kit box is usually the least useful number in the whole decision.
Homeowners get into trouble when they compare one kit to another by retail price instead of by coverage at the thickness the job needs. Spray foam is sold in board feet because thickness drives cost fast, and thin foam that misses the target does not buy you much.
A board foot is 1 square foot at 1 inch thick. That is the math that matters on a real project.
Board foot math that actually helps
Use this formula:
- Square footage × thickness in inches = board feet
- 100 square feet at 1 inch = 100 board feet
- 100 square feet at 2 inches = 200 board feet
- 500 square feet at 2 inches = 1,000 board feet
That simple calculation is where many DIY budgets fall apart. A small-looking area can eat up a lot of foam once you spray to a practical depth, especially if the assembly needs more than a light flash coat to air seal and control moisture.
The next pricing mistake is treating open-cell and closed-cell like they are interchangeable products with different labels. They are not.
Open-cell and closed-cell are not interchangeable
Market pricing published by Angi's spray foam insulation cost guide shows DIY open-cell kits at about $0.25 to $0.75 per board foot. Open-cell is usually the cheaper option up front, which is why it gets a lot of attention from homeowners trying to cut labor costs.
Closed-cell sits in a different cost bracket and a different performance bracket. It generally costs more per board foot, but it also gives you a denser product, more R-value per inch, and better resistance to moisture movement. In South Florida, those are not minor details. They affect whether the job holds up.
For homeowners comparing the two materials more closely, this guide to open-cell foam insulation cost helps show why the lower-priced foam is not automatically the lower-cost choice once the assembly and climate are part of the decision.
Here is the practical takeaway. If the project is a small rim joist, a minor touch-up, or an isolated cavity with easy access, the kit price may be reasonable. If you are pricing a garage ceiling, attic slope, crawl space, or a larger wall area, the coverage claim on the box starts to look optimistic very quickly.
Manufacturers rate kits under controlled conditions. Real houses are messier. Substrate temperature, hose temperature, spray angle, stop-and-start application, and beginner waste all affect yield. In a humid climate, poor adhesion or off-ratio foam is not just a cosmetic problem. It can leave you with voids, shrinkage, or trapped moisture where you were trying to fix the building envelope.
That is why I tell homeowners to read the box price as a starting point, not a project budget. On larger jobs, the real question is not whether you can afford the kit. It is whether the kit gives you enough usable coverage, at the right thickness, with enough margin for mistakes, to finish the job once.
Beyond the Kit Uncovering the Hidden Costs of DIY Foam
Most homeowners budget for the foam and forget the rest. That's why diy spray foam insulation cost often looks good right up until the credit card bill arrives.
One current DIY cost guide says spray foam kits run about $0.50 to $2.00 per square foot, and a 1,000 square foot kit may cost $750 to $2,000, while also noting extra spending on proper tools and safety gear, according to VB Insulation's DIY spray foam cost guide. The same guide compares that with professional install pricing of $1.50 to $4.50 per square foot.
That sounds like DIY wins. Sometimes it does on paper. Then the add-ons start.
Costs that don't show up on the product page
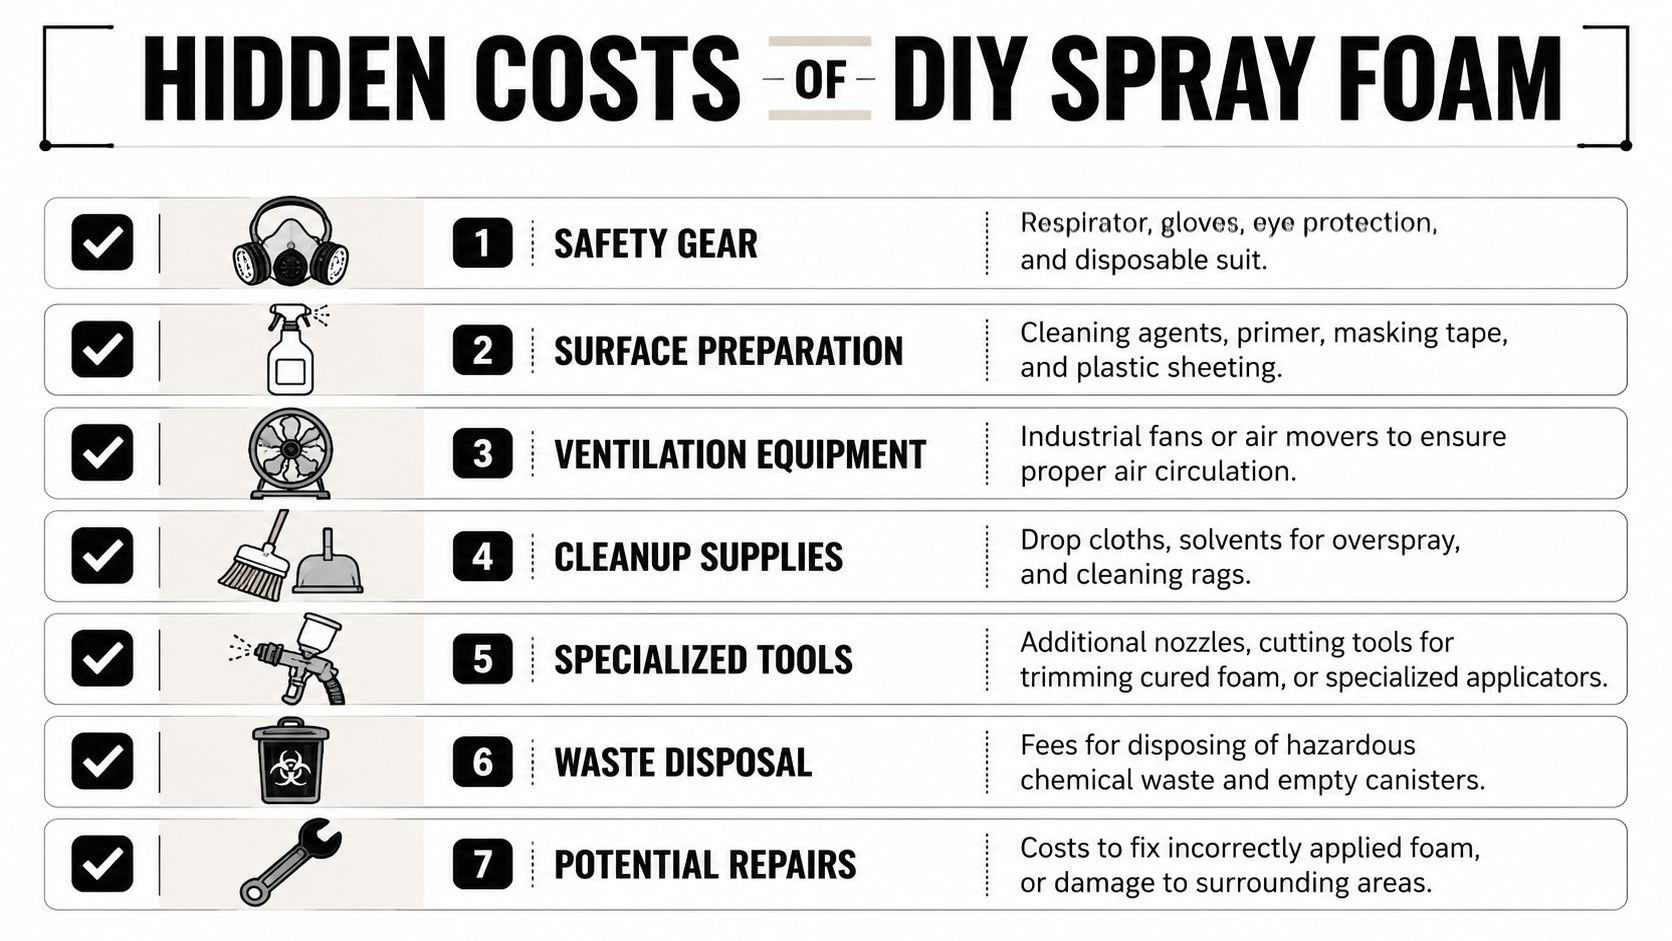
The hidden cost list usually includes:
- Safety gear: respirator, gloves, eye protection, and disposable protective clothing
- Masking materials: plastic sheeting and tape to protect floors, windows, wiring, and fixtures
- Ventilation setup: fans or air movement to manage fumes during and after application
- Extra nozzles and trimming tools: especially if you stop and restart
- Cleanup supplies: overspray cleanup is rarely free
- Waste: bad yield, over-application, or partial kit leftovers
- Repairs: cutting out bad foam costs time and money
If you're researching indoor air concerns before taking on the work, this guide to spray foam insulation off-gassing is worth reading because the safety side of the project isn't optional.
Here's a useful walkthrough of what a DIY setup and application process can look like in practice:
Yield is where budgets blow up
The biggest hidden cost is usually lost yield. A kit might advertise coverage based on ideal conditions and perfect application. Real jobs aren't ideal. Surfaces may be warmer or cooler than expected. Cavities may be irregular. First-time users tend to spray unevenly, pause too long, switch nozzles late, or build too much thickness in one area and not enough in another.
When a homeowner says, “The kit should cover it,” the first question is whether they're talking about box yield or actual installed coverage. Those are not the same thing.
Fixed kit sizes make this worse. If you're just short, you may have to buy another kit to finish a small remaining area. If you underestimate thickness, you can end up with foam on the wall but not enough performance to justify the job.
That's the part generic articles skip. The true cost isn't the purchase price. It's the amount you spend to get a finished, safe, correctly sealed assembly.
DIY vs Professional Installation A True Cost Showdown
The box price is usually the least useful number in this comparison.
A fair way to judge diy spray foam insulation cost against a contractor quote is to use one simple job size. Take 500 square feet sprayed to 2 inches. That is 1,000 board feet. On paper, that sounds straightforward. In the field, it rarely is, especially once you add waste, prep time, cleanup, and the cost of getting one bad pass wrong.
Side by side for a 500 square foot area
| Cost Factor | DIY Project Estimate | Professional Installation |
|---|---|---|
| Foam pricing basis | Kit pricing may look competitive at first | Installed pricing often lands closer than homeowners expect |
| Coverage target | 1,000 board feet if spraying 500 sq ft at 2 inches | 1,000 board feet if spraying 500 sq ft at 2 inches |
| Safety gear | Homeowner buys it separately | Usually built into contractor overhead |
| Prep and masking | Homeowner supplies labor and materials | Commonly included in scope |
| Waste risk | Homeowner absorbs overbuy, under-yield, and misfires | Contractor carries more of that burden |
| Thickness control | Depends on homeowner technique and pace | Part of the installer's process |
| Corrections if foam is wrong | Homeowner pays to fix it | Installer responsibility usually applies, depending on the contract |
That table is the correct comparison. Homeowners often compare a kit to a labor line item. The better comparison is a kit plus PPE, masking, disposal, cleanup time, touch-up material, and the chance you have to buy more foam to finish the job correctly.
That is why DIY does not automatically win on price.
Professional installation can cost more at the quote stage, but the all-in number is often tighter than expected once the job is complete. If you want a clearer picture of how contractors build pricing, this breakdown of spray foam insulation installation cost shows what is usually included besides the foam itself.
What homeowners usually miss in the math
The cheapest input is not always the cheapest outcome. That is true in construction, and it is true in any buying decision tied to performance. Transactional LLC's CPA guide explains that same principle from a cost-efficiency angle. The idea carries over well here. A lower checkout total means very little if the finished result misses the target.
Here is how that plays out with spray foam:
- DIY can look cheaper before the job starts
- Installed work can be cheaper per completed result
- A failed DIY application can become the most expensive option of all
I have seen homeowners save a little on materials and lose far more on corrections. The usual problems are thin spots, voids around penetrations, foam pulled away from framing, or overspray that turns cleanup into another bill. None of that shows up on the box.
A contractor quote is buying more than chemicals. It is buying setup, application control, cleanup, and someone else owning the mistake if the foam goes in wrong.
That last point matters more than many homeowners expect. If a DIY job underperforms, the next expense is still yours. If a pro job underperforms, there is at least a contract, a scope of work, and a responsible party to call back. In a climate where moisture control matters as much as insulation value, that difference has real financial weight.
The South Florida Factor Why Humidity Changes Everything
In South Florida, spray foam is a moisture-control job as much as an insulation job. Homeowners who price this project by the kit often miss the part that carries the biggest financial risk. A cheap box of foam does not stay cheap if the assembly starts holding moisture.
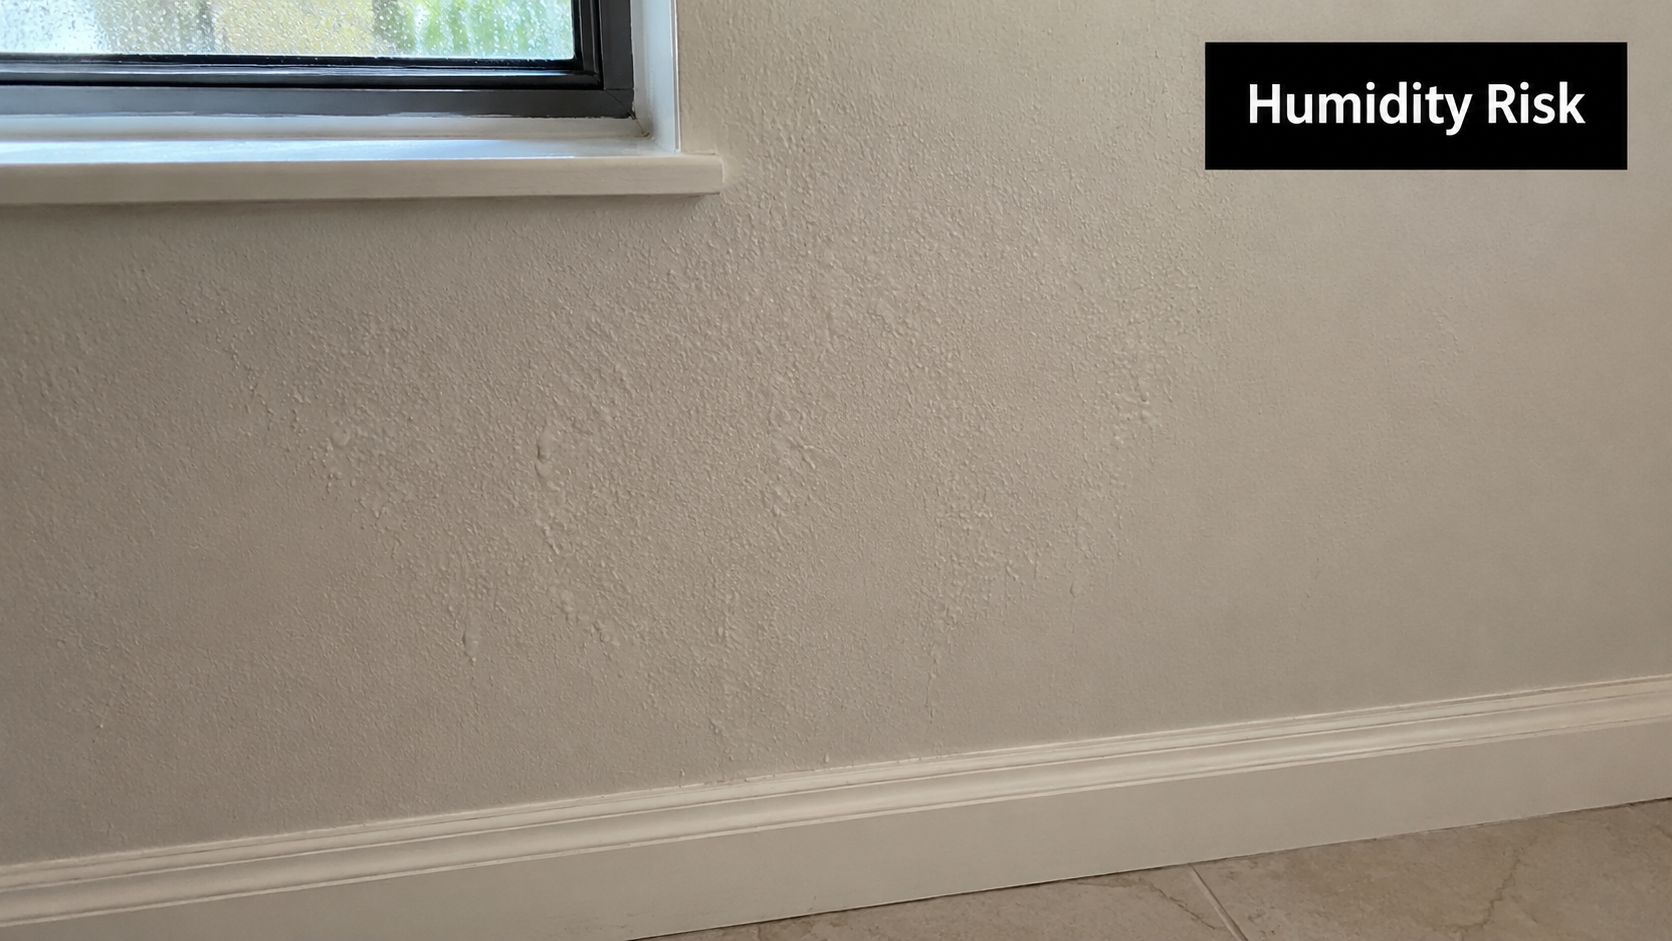
Humidity changes the margin for error. In a dry climate, a small miss on coverage may cost some efficiency. In South Florida, the same miss can let humid air reach cooler surfaces inside a wall, roof deck, or crawl space. That is where the full all-in cost shows up. Not at checkout. Later, in callbacks, tear-out, mold cleanup, or a second insulation job to fix the first one.
Thickness and continuity decide whether the foam works
Spray foam has to be installed at the right depth and as a continuous air barrier. Those are field conditions, not marketing claims. If one cavity is full and the next has a skip behind wiring or around a penetration, humid air will find that weak spot.
Closed-cell and open-cell foam do not behave the same way in these assemblies. Product choice matters. So does where you are spraying it. An attic roof deck, block wall, garage ceiling, or crawl space each brings a different moisture profile. Generic DIY advice rarely covers that well, and that is one reason homeowners in South Florida get into trouble.
Where DIY jobs usually go sideways here
The pattern is familiar:
- Uneven lift thickness: one area gets enough foam, another ends up thin
- Voids at framing and penetrations: the air seal breaks in the places that matter most
- Poor substrate or chemical temperature: foam can shrink, cure poorly, or pull away
- Wrong foam for the assembly: the insulation is there, but the moisture strategy is wrong
- Bad sequencing in attics or crawl spaces: a hard-to-fix area becomes the source of the problem
I see this most often in roof decks and other enclosed areas where homeowners cannot easily monitor what is happening after the job is done. The foam may look acceptable from the room side and still leave hidden paths for humid air.
In South Florida, a spray foam miss is not just an R-value problem. It can become a condensation problem inside an assembly you do not open again until there is damage.
Why the risk changes the real cost
A small price gap between DIY and professional installation matters less than homeowners think. The expensive part is failure. If a kit job has to be scraped out, supplemented, or covered by other repairs, the original savings disappear fast.
That is the part many cost guides skip. South Florida raises the stakes because moisture problems stay active for long stretches of the year. If the foam is not installed with the right thickness, continuity, and assembly plan, the all-in cost can end up far above the quote you were trying to avoid.
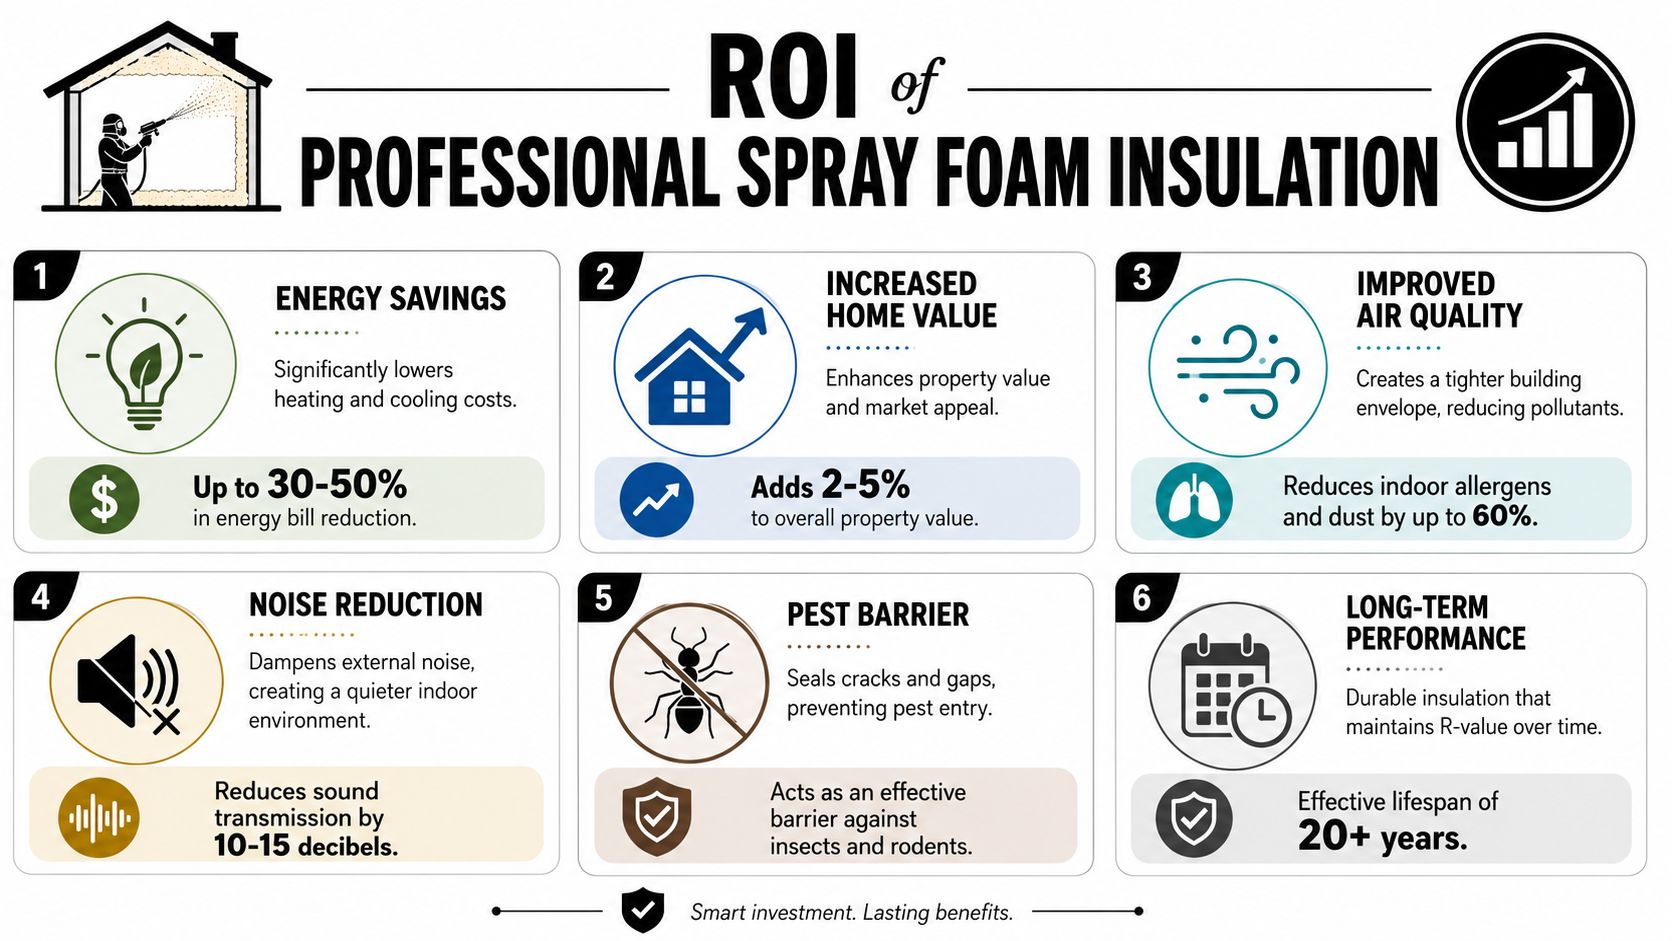
The ROI Equation Savings Safety and Performance
The cheapest spray foam job often has the worst return.
Real ROI comes from three things working together. The foam has to save enough energy to matter, it has to be installed safely, and it has to keep performing without creating a moisture or repair problem later. If one of those pieces fails, the low kit price stops mattering.
DIY math usually starts with the box price and expected yield. That is too narrow. The real calculation includes waste, protective gear, prep time, cleanup, disposal, missed areas, and the cost of fixing work that does not cure or adhere the way it should. In a dry climate, a minor miss may stay minor for a while. In South Florida, warm humid air keeps testing every weak spot in the assembly.
ROI depends on getting the assembly right the first time
A clean, open new-construction job and a retrofit attic are not priced the same for good reason. Retrofits are slower, messier, and less forgiving. Access is tighter. Surfaces are inconsistent. Existing wiring, mechanicals, and framing details create places where a first-time installer tends to leave thin spots or voids.
That matters for return because spray foam is not just insulation. It is part of the air control layer and, depending on the assembly, part of the moisture strategy. If the depth is uneven or the coverage is broken, the homeowner may still pay the full cost and get only part of the benefit.
I tell homeowners to judge ROI by outcome, not by kit count.
Safety has a dollar value
A lot of DIY articles treat safety as a side note. It belongs in the budget.
Spray foam means respirators, skin and eye protection, ventilation planning, masking, and a realistic plan for keeping other people out of the work area. If the application goes wrong, cleanup is not light handyman work. Removal can be slow, dirty, and expensive, especially in a confined attic or crawl space.
Here is the version that matters financially:
- Best case DIY: you save some labor and get an acceptable result
- Typical first-time DIY: you save less than expected after gear, waste, and extra time
- Failed DIY in a humid assembly: you pay for the kit, the correction, and sometimes damage repair
That third line is why the ROI equation changes fast.
Performance over time is where the winner shows up
Homeowners usually compare installation cost because it is visible. The expensive part is often what happens six months or two summers later. If foam pulls away, leaves air paths, traps moisture in the wrong place, or has to be supplemented with other work, the original savings disappear.
Professional installation costs more up front because you are not buying foam alone. You are buying substrate evaluation, temperature control, proportioning, lift management, and someone who knows when the assembly itself needs a different plan. On larger closed-cell jobs, or in roof decks and crawl spaces, that judgment is often worth more than the labor line on the quote.
For a small patch in a simple area, DIY can make sense. For a larger South Florida attic, garage ceiling, crawl space, or roofline, the smartest financial move is usually the one that avoids redo work, moisture trouble, and performance you cannot verify after the foam is covered.
Your Decision Checklist Should You DIY or Hire a Pro
Some projects are small enough for a homeowner to consider. Most whole-area spray foam jobs are not. The right answer depends on size, location, risk, and whether you can afford a mistake.
Use this checklist truthfully. If several items push you toward professional installation, don't fight the answer.
Consider DIY if these conditions are true
The area is small and isolated. A tiny rim joist section, a limited patch area, or a minor air-sealing repair is very different from an attic, garage, crawl space, or roof deck.
You understand board foot calculations. If you can't confidently convert area and thickness into board feet, it's easy to underbuy, overbuy, or apply the wrong depth.
You're comfortable with protective gear and chemical handling. This isn't the same as rolling paint or setting batt insulation.
The assembly is simple. Open access, limited obstacles, no sensitive finishes nearby, and no complex moisture concerns give you a better chance.
You can accept waste. First-time users rarely get perfect yield. If some product loss won't wreck your budget, the risk is easier to tolerate.
Hire a professional if any of these apply
You're spraying closed-cell over a larger area. Once you're paying closed-cell kit prices, the value gap between DIY and pro often gets narrow fast.
The project is in a humid or moisture-sensitive location. Roof decks, crawl spaces, garages, block walls, and coastal homes need better judgment and tighter execution.
Thickness has to be right. If under-application means you lose the air seal or moisture control, guessing is expensive.
You need the job done once. Homeowners usually price the first attempt. Contractors price the finished result.
You want accountability. If something goes wrong, you need someone other than yourself to own the correction.
“Can I spray foam this myself?” is the wrong first question. Ask, “Can I get this assembly right without turning a moisture-control product into a repair project?”
A short decision matrix
| Your situation | Better path |
|---|---|
| Small patch, easy access, low consequence area | DIY may be reasonable |
| Full attic, garage, crawl space, or roof deck | Hire a pro |
| You're choosing closed-cell for moisture control | Hire a pro |
| You don't have protective gear or ventilation planning | Hire a pro |
| You need a hard number before deciding | Get a quote and compare |
What usually works and what usually doesn't
What works:
- Small, contained jobs with clear access
- Homeowners who understand thickness and yield
- Projects where cosmetic overspray or small waste won't create a major problem
What doesn't:
- Large enclosed areas
- Projects where moisture control is the main goal
- Jobs where one missed cavity undermines the whole assembly
- Any situation where the homeowner is trying to save money solely on labor
If you're on the fence, the smartest next step isn't buying a kit. It's getting a real quote so you can compare the all-in DIY number against professional installation on the same scope. That gives you a hard benchmark instead of a guess based on box pricing.
If you want a clear number for your specific home in Jupiter, Palm Beach Gardens, West Palm Beach, Wellington, or Stuart, Airtight Spray Foam Insulation can give you a free estimate based on the actual area, foam type, and moisture demands of the project. That's the easiest way to see whether DIY really saves money, or just looks cheaper until the full costs show up.