Blog
Spray Foam Insulation and Mold: Stop Problems
The worst advice homeowners get about spray foam insulation and mold is also the most common. One side says spray foam solves mold by itself. The other says spray foam causes mold by itself. Both claims miss the actual problem.
Mold problems come from moisture moving where it shouldn't, staying where it shouldn't, and drying too slowly. Spray foam can help control that. Spray foam can also hide a problem if someone installs it over wet materials, over a roof leak, or into an assembly that was never detailed to dry correctly. In South Florida, that difference matters more than the product label on the drum.
I've seen homeowners focus on the foam type and ignore the installer's process. That's backwards. In a hot, humid climate, the installer's judgment before the first pass of foam often decides whether the job helps prevent mold or sets up a hidden moisture problem.
The Great Debate on Spray Foam and Mold
Here's the part a lot of online advice gets wrong. Spray foam does not create mold on its own, and it does not prevent mold on its own. In South Florida, the result usually comes down to who installed it, what condition the assembly was in that day, and whether the installer understood how that part of the house was supposed to dry.
I've seen good foam jobs keep humid air out of rooflines and wall cavities for years. I've also opened up bad jobs where foam was sprayed over damp decking, active leaks, or dirty surfaces, and the foam ended up concealing the problem instead of solving it. Same material category. Very different workmanship.
Why the online advice feels so contradictory
The argument stays muddled because people talk about mold as if the foam itself is the whole story. It isn't. Mold shows up when moisture gets into a building assembly, stays there, and finds a food source nearby. Foam changes air movement, drying potential, and vapor behavior, so installation quality matters as much as product choice.
That is why one homeowner says spray foam fixed comfort and moisture problems, while another says it caused a nightmare. Both reports can be accurate. A dry, well-detailed assembly behaves very differently from one with a roof leak, wet sheathing, or a crew that sprayed before checking substrate conditions.
Practical rule: Ask three questions before any foam job starts. Is the area dry? Has bulk water been ruled out? Will this assembly still be able to manage humidity after the foam goes in?
What matters most in South Florida
South Florida is hard on buildings. Outdoor humidity stays high for long stretches, rain gets driven into assemblies by wind, and air conditioning keeps interior surfaces cooler for much of the year. That combination creates a steady pressure for moisture to move into hidden spaces.
In that setting, the debate is not really about whether spray foam is good or bad. It is about whether the installer used it to block humid air where it needed blocking, and avoided trapping moisture where the assembly needed to dry. Hidden leaks are the true enemy.
R-value still matters, but moisture control usually decides whether the job performs well over time. A careful installer checks for leaks, verifies the substrate is dry, matches the foam type to the assembly, and sprays with the drying path in mind. A careless one can turn a small moisture issue into a concealed mold problem.
That is the center of the debate. Spray foam works well against mold risk when the installer treats it as a building-system decision, not a product sale.
How Spray Foam Actually Interacts with Moisture
Spray foam itself isn't mold food. The material is an inert polymer, so mold doesn't feed on the foam the way it feeds on wood, drywall paper, or dust. The risk starts when moisture gets trapped against those surrounding materials and can't dry.
A simple analogy works well here. Spray foam over a damp surface is like putting on a high-end raincoat over already-wet clothes. The coat may keep new rain off you, but it doesn't fix the moisture already inside. In fact, it can make drying slower.
The good side of air sealing
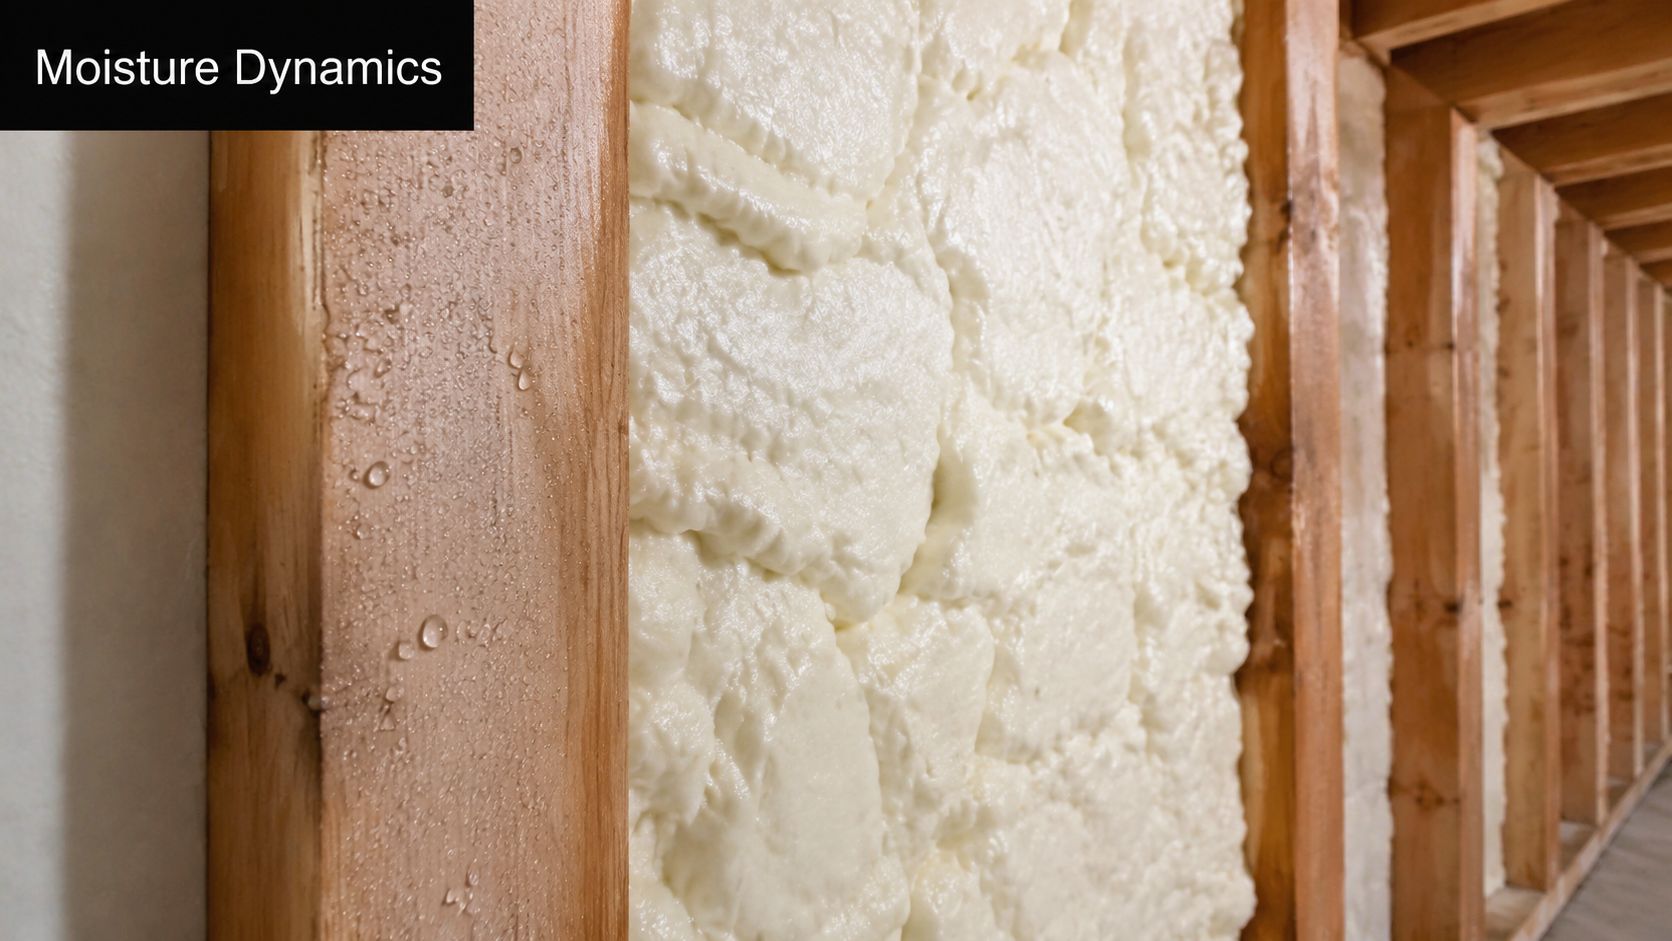
When foam is installed on dry, sound substrates, its air-sealing ability helps reduce one of the biggest mold drivers in humid climates. Air leaks don't just waste energy. They carry water vapor. When humid air slips into a cooler cavity and meets a surface below the dew point, condensation can form.
Think of a wall or roof assembly like a cooler. If warm, wet outdoor air finds even a small path into that cooled space, moisture can collect where you never see it. Spray foam helps by shutting down those hidden air pathways.
Where things go wrong
The same air seal that helps a building can work against it if the installer traps moisture inside the assembly. That happens when someone sprays over damp roof sheathing, wet framing, a hidden plumbing leak, or residual moisture left after storm damage.
According to the discussion in this guide on mold behind spray foam, spray foam itself is not a mold food source, but mold can still develop on adjacent materials if moisture is trapped behind the foam. The same source notes that mold needs moisture, an organic substrate such as wood, drywall, or dust, and suitable temperature conditions. If foam is installed over damp substrates or hides a leak, it can create an air-sealed cavity that prevents drying and allows mold to colonize the underlying surface.
Foam doesn't create mold out of nowhere. It can, however, hide the exact conditions mold needs if the installer ignores moisture before spraying.
What homeowners should take from this
If someone tells you spray foam “prevents mold,” that statement needs a condition attached. It helps prevent mold when the assembly starts dry and stays managed. If someone tells you spray foam “causes mold,” that also needs a condition attached. The material isn't the root cause. The root cause is usually water intrusion, wet substrates, or poor assembly design.
That's why a good spray foam conversation starts with leak history, moisture readings, roof condition, and drying potential. It should not start with a sales pitch.
Open-Cell vs Closed-Cell Foam for Mold Prevention
Open-cell and closed-cell foam both insulate. They do not handle moisture the same way. In South Florida, that difference often matters more than the headline R-value.
If you want a quick rule, use this one. Closed-cell is usually the tighter rain jacket. Open-cell is the more breathable sweater. Neither is automatically right or wrong. The assembly decides.
The moisture properties that matter
For spray foam insulation and mold, the key differences are air leakage reduction, vapor permeance, and water absorption. A low perm rating means the material slows vapor movement more aggressively. Lower water absorption means the material takes on less water if exposed.
Building Science Corporation data cited in this spray foam moisture comparison shows closed-cell spray foam reduces air leakage by 50% to 90% compared with traditional insulation methods. The same source reports closed-cell foam vapor permeance at about 0.8 to 1.5 perms and water absorption below 2%, while open-cell foam is about 15 to 20 perms and 5% to 10% water absorption.
That's why closed-cell is often selected for attics, rooflines, and other assemblies in humid climates where condensation control is a serious concern.
Open-cell vs. Closed-cell Foam Moisture Control Properties
| Property | Open-Cell Foam | Closed-Cell Foam |
|---|---|---|
| Air sealing role | Can function as an air barrier at typical thicknesses | Can function as an air barrier |
| Vapor behavior | More vapor-permeable | Lower vapor permeance |
| Water absorption | About 5% to 10% | Below 2% |
| Vapor permeance | About 15 to 20 perms | About 0.8 to 1.5 perms |
| Typical South Florida concern | Can be useful where drying potential matters, but needs careful assembly design | Often chosen where stronger moisture and condensation control is needed |
Where each type tends to make sense
Open-cell foam can be a valid choice in the right assembly. It's lighter and more vapor-open, which can be useful where the design depends on some drying potential. But that same permeability means it isn't the first answer for every roof deck or moisture-sensitive location in a hot-humid climate.
Closed-cell foam is often the safer call where you need stronger resistance to vapor movement and lower water uptake. Rooflines, attic transitions, rim areas, and certain retrofit conditions often push the decision in that direction. That doesn't mean closed-cell is a free pass. A bad install with closed-cell is still a bad install.
For homeowners comparing systems, this open-cell vs closed-cell guide is useful because it frames the decision around application, not just product labels.
If the assembly has a history of humidity trouble, don't choose foam by price alone. Choose it by how the assembly handles wetting, drying, and hidden condensation.
The mistake people make
The common mistake is asking which foam is “better” in the abstract. That's like asking whether boots are better than sneakers without asking if you're walking through mud or on dry pavement.
Questions are these:
- Where is it going? Roof deck, wall cavity, garage ceiling, crawl space, or interior partition all behave differently.
- What moisture load does that area see? Outdoor humidity, interior cooling, and leak exposure all matter.
- How can it dry if something goes wrong? Every assembly needs a plan for imperfections because buildings aren't built in a laboratory.
Why Proper Installation is Critical in Humid Climates
Spray foam does not cause mold by itself. In South Florida, bad installation does most of the damage people blame on the foam.
Hot, wet air is persistent here. It looks for every gap, cool surface, and overlooked leak. If the installer reads the building correctly, spray foam can help control that moisture. If the installer sprays over wet materials, ignores a roof leak, or chooses the wrong assembly for the space, the foam can hide a problem long enough for mold and rot to spread out of sight.
That is why I put the installer ahead of the product debate in this climate. Foam is only as good as the decisions made before the trigger is pulled.
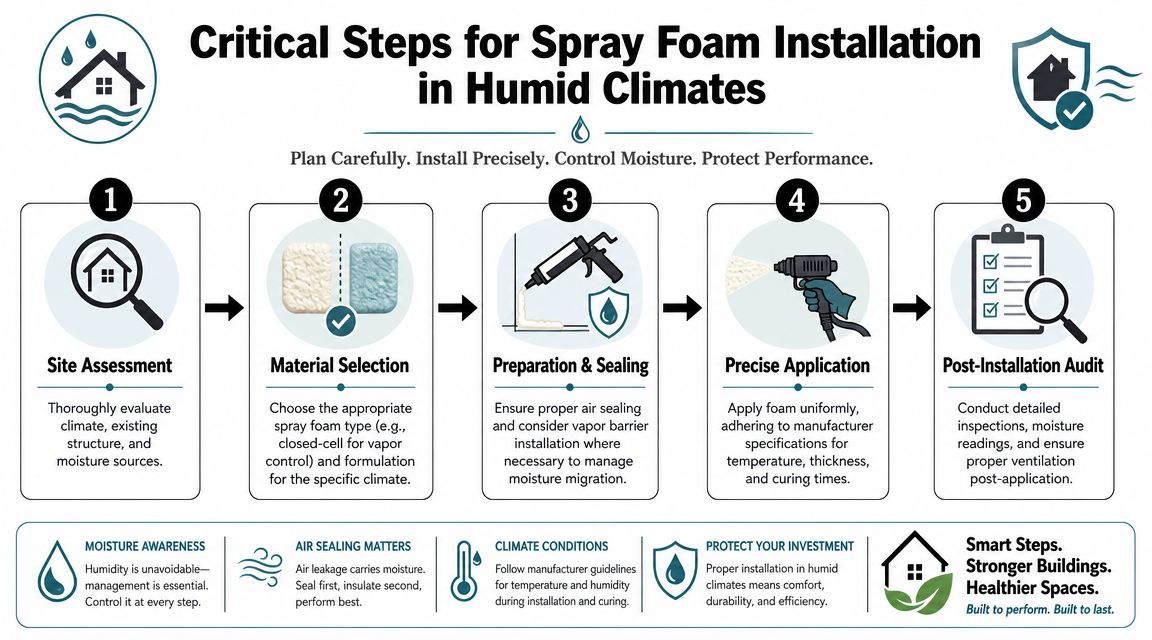
What a competent installer checks before spraying
Good crews inspect first and spray second. That sounds obvious, but plenty of failures start with someone treating foam like a cover-up layer instead of part of a moisture-control system.
A proper pre-spray review should include:
- Leak history: Past roof leaks, window failures, plumbing drips, flood events, and prior mold cleanup all matter. Old moisture problems have a way of becoming current moisture problems.
- Dryness of the substrate: Framing, sheathing, masonry, and transition areas need to be dry before they are buried. Foam applied over damp materials can lock in the very condition that feeds mold.
- Assembly design: Some areas are good candidates for foam right away. Others need repairs, better air control, or different insulation details before spray day.
- Surface condition: Dust, oil, rust, and deteriorated materials affect adhesion and can hide signs of water entry.
- Application conditions: Temperature, lift thickness, and cure quality affect whether the foam bonds properly and performs the way it was intended to.
Homeowners often ask how soon the crew can start. A better question is how they verify moisture, what they inspect before spraying, and what makes them stop a job.
Hidden leaks are what turn a foam job into a mold job
The dangerous problems usually begin before insulation is installed. A small roof penetration leak, failed flashing, or sweating line can keep feeding moisture into an assembly. Once foam covers that area, the leak does not disappear. It just gets harder to see.
In humid climates, air movement creates trouble as often as bulk water. Humid outside air slipping through a small crack is like warm breath hitting a cold drink glass. Once that air reaches a surface below its dew point, water shows up where no one expected it. If the installer misses the path that air is taking, the foam can end up concealing the evidence instead of preventing the problem.
This homeowner-focused report on hidden spray foam risks describes how foam can conceal water leaks and damage for years. That is why pre-installation inspection and drying matter so much in South Florida.
A contractor who skips moisture checks is asking the foam to fix a water-management failure. It cannot.
Before hiring anyone, review their process for how spray foam insulation is installed. The sales pitch matters less than the sequence of inspection, prep, spraying, and post-install review.
Here's a useful technical overview of the process homeowners should expect to hear discussed in plain terms:
What professional application looks like in practice
Professional application is slower than many homeowners expect. That is usually a good sign.
A disciplined crew checks for roof staining, rusty fasteners, soft sheathing, damp framing, plumbing penetrations, and signs that conditioned air has been leaking into cavities. They use moisture meters where needed. They stop when the substrate or assembly raises questions. In South Florida, that pause can save a building from years of hidden moisture trouble.
Sometimes the right move is delaying the job. If drying, repairs, or mold remediation need to happen first, insulation waits. That delay costs less than tearing out foam later because someone buried a wet problem.
One local option homeowners may evaluate is Airtight Spray Foam Insulation, which provides open-cell and closed-cell applications in South Florida. What matters with any provider is whether they inspect, verify conditions, and match the application to the assembly instead of treating every house like the same box.
Recognizing Signs of a Mold Problem with Spray Foam
Spray foam can hide the most obvious sign of moisture trouble. You may not see the classic brown water stain because the leak path or condensation point is buried behind an insulated cavity. That means homeowners need to look for secondary clues.
The biggest mistake is waiting for visible mold to show up on the room side. By the time that happens, the moisture problem has often been active for a while.
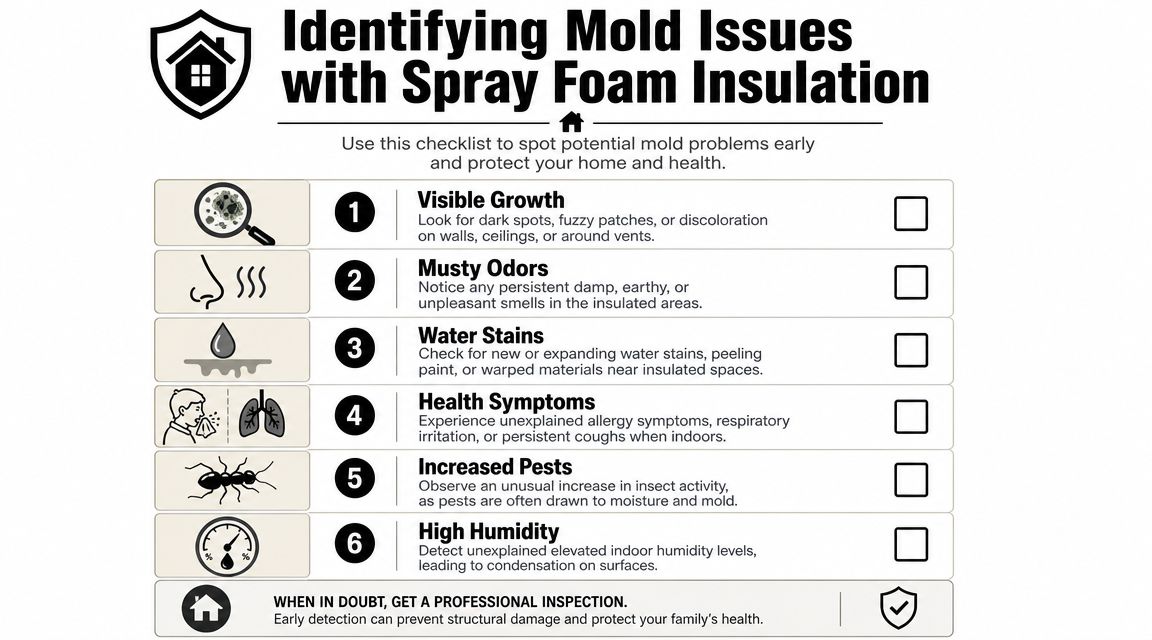
The clues that deserve attention
- Musty odor with no visible source: This is one of the most common warning signs. If a room smells damp or earthy near a foamed wall, ceiling line, or attic access, don't ignore it.
- Paint changes near insulated areas: Bubbling, peeling, or repeated repaint failures can point to hidden moisture behind the surface.
- Warping or soft drywall: A wall that feels slightly soft, uneven, or swollen deserves inspection.
- Recurring condensation patterns: If nearby surfaces sweat in a way that seems new or localized, the assembly may be handling moisture poorly.
- Indoor comfort changes: Some homeowners notice a room feels clammy or carries a stale smell before they see any damage.
- Health complaints tied to one area: Unexplained irritation, especially when spending time in one part of the house, is worth investigating along with the building conditions.
How professionals investigate hidden moisture
Professionals usually work like detectives, not demo crews. They start with non-invasive tools, then open the assembly only where the evidence points.
Common tools include:
- Moisture meters: Used on drywall, framing, and sheathing where accessible.
- Thermal cameras: Helpful for spotting temperature irregularities that may suggest moisture or air leakage pathways.
- Targeted openings: Small inspection cuts can reveal whether the substrate behind foam is clean and dry or dark and deteriorated.
A musty smell without a visible stain is often the signal that pushes a good inspection from “optional” to “schedule it now.”
Don't confuse every smell with mold
Not every odor around spray foam means microbial growth. A chemical odor after installation points the investigation in one direction. A damp, earthy odor points it in another. Either way, persistent odor is not something to shrug off.
If you suspect a problem, document when you notice it, where it is strongest, and whether it changes after rain or HVAC use. That pattern helps narrow down whether you're dealing with a roof issue, humid air leakage, or another moisture source.
Remediation Steps and When to Call a Professional
If you suspect mold behind spray foam, start with restraint. Don't assume more foam, paint, or sealant will solve it. If moisture is trapped behind the insulation, the fix usually requires exposing the affected area, correcting the water source, and rebuilding the assembly properly.
What remediation usually involves
Most real remediation jobs follow this sequence:
- Confirm the moisture source. That may be a roof leak, plumbing issue, condensation problem, or humid air pathway.
- Open the assembly. The foam in the affected area often has to be cut out so the substrate can be inspected.
- Remediate damaged materials. Mold growth on wood, drywall, or debris needs proper cleanup and, in some cases, material replacement.
- Dry the area completely. Reinsulating before the assembly is dry just recreates the problem.
- Reinstall insulation with the air seal restored. The air barrier function is part of the fix, not an extra.
The U.S. Department of Energy explains that spray foam's value comes from its function as an air barrier, so when remediation requires foam removal, the reinstallation has to restore that air-sealing capability to reduce future moisture transport through air leaks, as outlined in the DOE Building America spray foam guidance.
When a homeowner can assess and when to bring in specialists
You can do basic observation yourself. Smell the area, look for changes in finishes, and note whether symptoms appear after rain or heavy AC use. Beyond that, caution is smart.
Call a qualified professional promptly if:
- The odor is persistent and localized
- You see finish damage or soft materials
- The area has a history of leaks or storm intrusion
- You're dealing with attic, roofline, or concealed cavity conditions
If foam removal is likely, review the process before work begins. Homeowners often find it helpful to understand what foam insulation removal involves so they know how access, containment, and reinstallation are typically handled.
If you're vetting the remediation side, this insurance guide for remediation contractors is a practical resource because it gives homeowners another way to evaluate whether a mold contractor operates like a real professional business.
The key is to solve both halves of the problem. Remove the mold. Fix the moisture path. If only one gets addressed, the problem usually comes back.
Frequently Asked Questions About Spray Foam and Mold
Can spray foam be installed over existing mold after it's been treated
It shouldn't be used to cover questionable material just because the visible staining looks better. The substrate needs to be properly cleaned or replaced as needed, the moisture source needs to be corrected, and the area needs to be dry before foaming. Foam is not a lid for unresolved contamination or damp framing.
Is closed-cell foam a guarantee against mold
No. Closed-cell is often chosen where stronger moisture control is needed, but it is not a guarantee. A roof leak, wet substrate, or bad assembly detail can still create mold conditions on surrounding materials.
Does open-cell foam always mean higher mold risk
Not automatically. Open-cell can work well in the right assembly. The risk depends on where it's installed, how the assembly manages vapor and drying, and whether the installer matched the product to the building conditions.
Can mold grow on spray foam itself
The bigger concern is usually not mold feeding on the foam. The concern is mold developing on nearby organic materials such as wood, drywall facing, or dust if moisture gets trapped in the assembly.
How do I tell the difference between a foam odor and a moisture problem
A moisture problem often presents as a musty, earthy smell. Homeowners usually describe it as damp or stale. If the odor appears after rain, near a known problem area, or alongside peeling paint or soft drywall, hidden moisture moves higher on the list of suspects.
Should I worry if my house had a previous leak before spray foam was installed
Yes. Previous leaks matter even if they seem old. Ask whether the damaged area was opened, dried, and verified before insulation was applied. Leak history is one of the first things a careful contractor should ask about.
What's the best homeowner question to ask a spray foam contractor
Ask this: How do you verify the substrate is dry and the assembly is ready before you spray? That one question tells you more than a polished brochure ever will.
If you're dealing with questions about spray foam insulation and mold in South Florida, Airtight Spray Foam Insulation is one company that can help evaluate the assembly, discuss whether open-cell or closed-cell fits the application, and explain the installation process before work begins. For homeowners in Jupiter, Palm Beach Gardens, West Palm Beach, Wellington, and Stuart, the right next step is a site-specific assessment, not a generic yes-or-no answer about foam.