Blog
Attic Insulation Vacuum: A Guide to Removal and Prep

If you're standing at the attic hatch because the house feels damp, dusty, or harder to cool than it should, the insulation up there may be part of the problem. In South Florida, old attic insulation doesn't just lose performance. It can hold moisture, trap odors, hide rodent activity, and make mold problems harder to spot until they've spread farther than they should.
That's why an attic insulation vacuum matters. This isn't just a cleanup tool. It's the practical way to clear out old loose-fill material with better containment, less mess, and a much cleaner starting point for whatever comes next. In many homes, removal is the step that finally exposes roof leaks, darkened framing, duct issues, and the actual condition of the attic floor.
If the long-term plan is better comfort and humidity control, removal is often the first honest step before upgrading to spray foam. You can't seal and improve an attic properly when it's buried under dirty, compacted, or moisture-damaged insulation.
Why Vacuuming Your Attic Insulation Is a Smart First Step
You open the attic hatch and get hit with warm, musty air. In South Florida, that usually means the insulation has been sitting in a rough environment for a long time. Heat, humidity, roof moisture, and pest activity all wear it down. Even when it still looks passable from the hatch, loose-fill insulation can be holding dust, debris, and moisture that keep the attic from performing the way it should.
Vacuum removal is usually the cleanest way to reset the space.
For loose-fill fiberglass or cellulose, a commercial insulation vacuum pulls material out through a long hose and collects it in containment bags outside or at the truck. That matters for one practical reason. It limits how much contaminated material gets dragged through the house by hand. It also removes the old blanket evenly, so the attic floor, wiring runs, duct lines, and framing are exposed for a real inspection instead of a partial guess.
That inspection is a big part of why removal comes first, especially in South Florida. I have seen plenty of attics where the insulation was only part of the problem. Once the old material is out, you can finally see water staining around penetrations, darkened roof decking, mold on framing, disconnected ducts, and areas where humid air has been leaking into the attic for years. If the plan is to upgrade to spray foam, covering those conditions would be a mistake.
Removal and replacement are two separate jobs. They should be treated that way.
Homeowners sometimes want to add new insulation over the old layer to save time. That can work in a clean, dry attic with no contamination issues. It is a bad shortcut when the existing insulation smells musty, looks matted, has pest droppings, or has been exposed to moisture. In those cases, leaving it in place often means trapping the source of the problem under new material and making the next repair harder and more expensive.
A vacuum does not solve every attic problem by itself. It gives you access. That access is what lets you dry the space, address mold or leak issues if they are present, and prepare the attic for a higher-performing insulation system instead of stacking new material on top of old problems.
Inspecting Your Attic for Removal Red Flags
Before anyone brings in a vacuum hose, inspect the attic like you're looking for reasons not to leave the old insulation in place. South Florida attics tell on themselves if you know what to watch for. The warning signs usually show up as smell, staining, texture changes, and contamination around the insulation surface.

Start with smell and surface condition
A musty attic is never a good sign. In this climate, that odor often means the insulation has been exposed to moisture long enough to support mold growth somewhere nearby, even if you don't see obvious colonies from the hatch. Wet insulation can also darken, mat down, or form uneven low spots where it used to sit fluffier and more uniform.
Look at the attic framing too. Dark stains on rafters, truss members, or roof decking can point to previous leaks or high humidity exposure. If the insulation underneath those spots looks clumped, discolored, or heavier than surrounding areas, removal usually makes more sense than trying to work around it.
A quick field checklist helps:
- Musty odor: Often points to moisture, mold, or long-term poor attic conditions.
- Darkened wood or staining: May indicate roof leaks, condensation, or repeated humidity exposure.
- Compacted insulation: Old loose-fill that has settled unevenly often isn't doing the job it once did.
- Visible debris mixed into insulation: Roofing grit, insect remains, droppings, and wood fragments all make cleanup more urgent.
- Unusual temperature zones: Hot rooms below a dirty or thin attic section often signal that the insulation layer is no longer reliable.
Check for pests and contamination
Rodent or insect activity changes the whole conversation. If you see droppings, nesting material, chewed duct insulation, or tracks through loose-fill insulation, you're not dealing with a simple efficiency problem anymore. You're dealing with contamination.
That's one reason many homeowners underestimate attic work. Old insulation can hide waste, dead pests, food debris, sharp objects, and damaged wiring. In South Florida, once humidity gets into a contaminated attic, odors tend to linger and spread more readily into the living space.
Later in the inspection, it helps to watch a walkthrough of what damaged attic conditions can look like in the field:

Measure before you guess
Homeowners often underestimate how much material is sitting in the attic. For planning, jobs are commonly estimated by area and waste volume. One removal guide recommends measuring attic length × width for square footage, then multiplying by insulation depth in feet to estimate cubic feet to remove and the number of disposal bags needed. That matters because bag handling is often what slows the job down. The same guide notes that a 1,500-square-foot attic can take 6 to 15 hours to clear, largely because crews still have to manage hoses and bags through the whole process, as explained in this attic insulation removal planning guide from Tough Bags.
Don't inspect only from the hatch. Move carefully and look at multiple attic sections. Problems almost never show up evenly.
Know when inspection alone is enough to call a pro
Some attics can be assessed by a careful homeowner. Some shouldn't be. If you find widespread staining, obvious mold, heavy contamination, unstable walking surfaces, or signs of a long-term leak, that's no longer a casual weekend project. The inspection has already done its job. It told you removal is likely necessary, and that safety and containment need to be taken seriously from the first bag onward.
DIY Removal vs Hiring a Professional Crew
Most homeowners approach the idea of DIY insulation removal practically. Can you remove insulation yourself with an attic insulation vacuum? Sometimes, yes. Is it always the smart decision? No. The answer depends on attic size, material type, contamination level, access, and how much labor you're really prepared to take on.
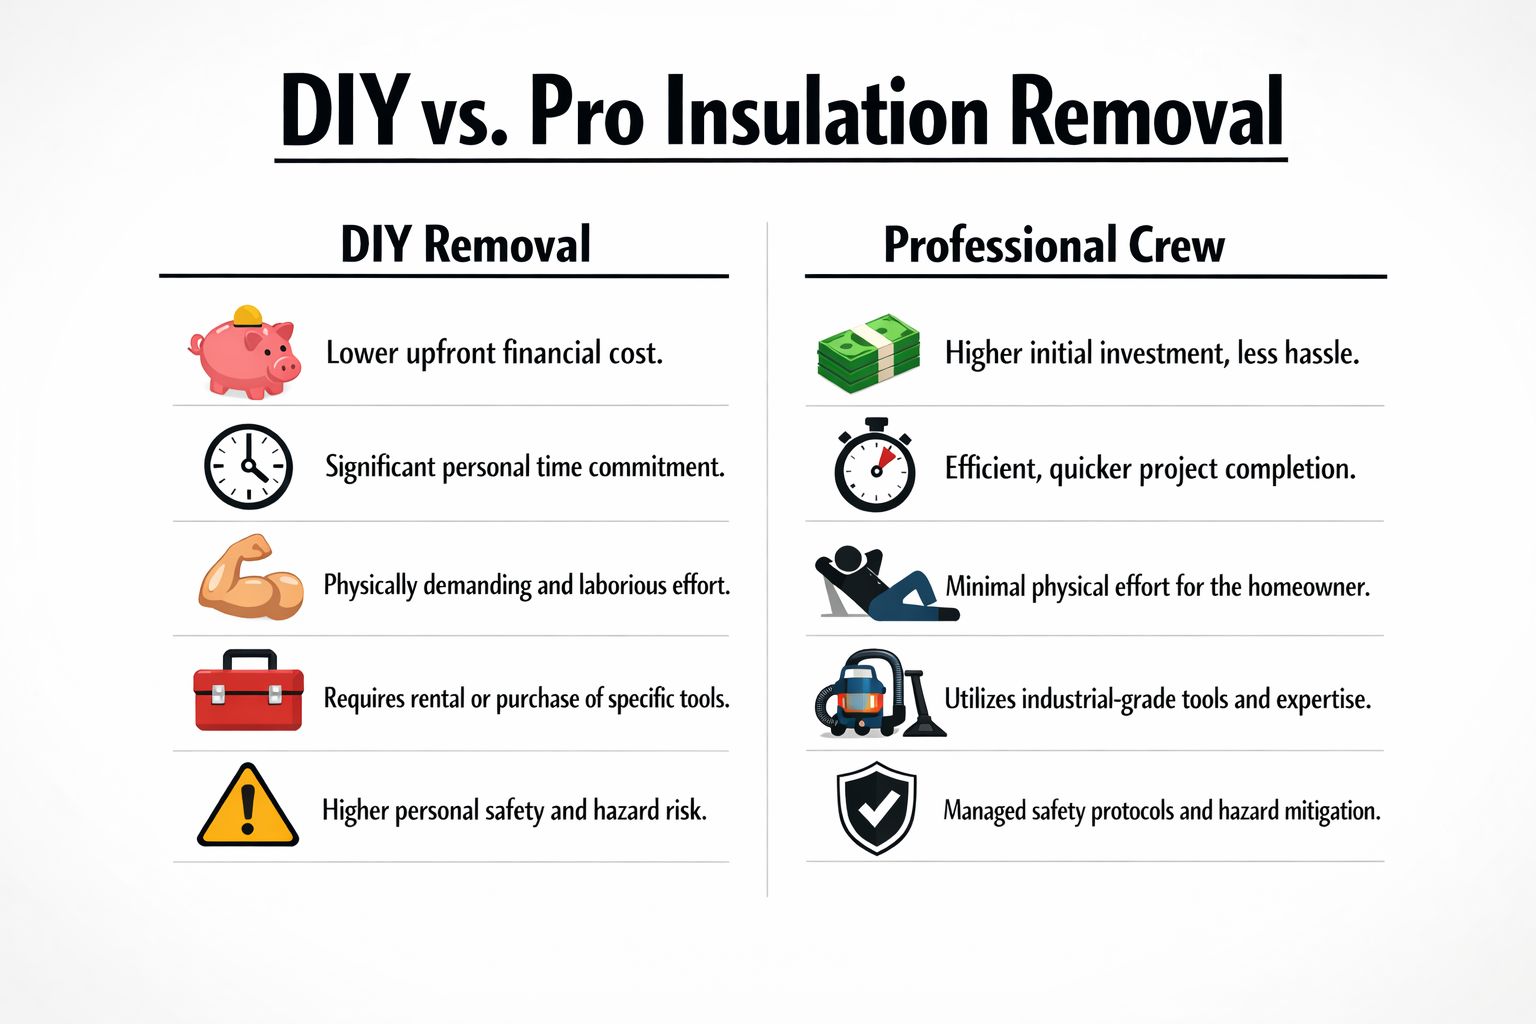
What DIY gets right
DIY removal appeals to homeowners who want more control and lower upfront spending. If the attic contains mostly loose-fill material, access is decent, and there's no heavy mold or pest contamination, the job is physically possible for a careful homeowner with the right equipment and disposal plan.
The upsides are straightforward:
| Option | Main advantage | Main drawback |
|---|---|---|
| DIY removal | Lower upfront cash outlay | You take on the labor, mess, and hazard exposure |
| Professional crew | Faster, more controlled execution | Higher initial cost |
DIY also makes sense for people who already know what they're walking into. If you've worked in attics before, understand containment, and can spend the time crawling truss bays and managing bags, the project may be manageable.
Where DIY usually gets harder than expected
The hard part isn't just suctioning material into a hose. It's everything around that. You're dragging hose, checking footing, avoiding ceiling damage, dealing with heat, replacing loaded PPE, and moving waste continuously. If the insulation includes old batts mixed with loose-fill, progress slows down fast.
Published field examples give a realistic benchmark. One contractor says attic removal rates often start at $1.50 to $1.75 per square foot, with an average removal time of about 4 hours for a typical home, though some attics can take two days. The same source notes that a 1,500-square-foot attic can take 6 to 15 hours with proper equipment, which is a good reminder that “renting the machine” is not the same thing as finishing quickly. Those benchmarks are laid out in this attic insulation removal cost and time guide.
Here's the main trade-off:
- You save money on labor: But you pay with your own time and physical effort.
- You control the pace: But the job often takes longer than expected once bag handling starts.
- You decide how thorough to be: But homeowners are more likely to leave material behind around eaves, wiring, and tight corners.
- You avoid scheduling a contractor: But you also take on the risk if mold, sharp debris, or contamination is worse than it looked at first.
For homeowners comparing service options, this blown-in insulation removal page is a useful reference point for what professional removal work typically includes.
When a professional crew is the better call
A crew makes more sense when the attic is large, the insulation is contaminated, or the home has obvious moisture issues. In South Florida, humidity shifts the calculation toward professional removal more often because wet or suspect insulation shouldn't be handled casually. Once mold, rodent waste, or water-damaged material enters the equation, containment and disposal matter as much as speed.
Jobsite reality: Homeowners usually underestimate the bagging, crawling, and cleanup. That's where the project stops feeling like a rental and starts feeling like a labor operation.
A professional crew also tends to work more systematically. That matters when the goal isn't just to empty the attic, but to prepare it for repairs, air sealing, or spray foam installation afterward.
The Professional Insulation Vacuum Removal Method
A clean insulation removal job follows a sequence. When crews skip steps, that's when dust spreads through the house, debris escapes the work zone, and homeowners end up with a bigger mess than they started with.
How the equipment is staged
A proper workflow starts by confirming access and the attic's basic dimensions. Then the vacuum unit is set outside the living space, not in the hallway or garage entry where dust can migrate back into the house. A long flexible hose is run from the machine into the attic, and loose-fill material is fed directly into the hose so the debris moves into a sealed bag or dumpster.
That setup matters because it's a more contained system than hand-raking and bagging inside the attic itself. A field guide on modern removal methods describes this closed-loop approach as reducing airborne dust and improving containment compared with manual methods. It also notes that loose-fill cellulose and fiberglass are the best candidates for vacuum extraction, while batt insulation often needs to be rolled, broken apart, or partly handled by hand before it can be vacuumed efficiently. That full workflow is outlined in this modern insulation removal method guide.
What good removal looks like in the attic
Once the hose is in place, the crew works methodically rather than randomly. They don't just grab the easy center sections and call it done. They work across the attic in passes, paying attention to corners, truss bays, and low-clearance areas where old material tends to hang up.
A quality removal job usually includes:
- Protecting access points so debris doesn't spread into finished areas.
- Running the hose with minimal bends so material flows cleanly.
- Working from the farthest section back toward the exit to avoid trampling cleaned areas.
- Watching the bagging operation constantly because full bags slow everything down.
- Checking what's left behind after the bulk removal is done.
If the attic has mixed materials, the pace changes. Loose-fill usually moves well. Old fiberglass batts are another story. They often snag, bunch up, or need to be torn into manageable sections before the vacuum can handle them. That's why a homeowner may hear “vacuum removal” and assume every inch will be sucked up the same way. It won't.
For anyone hiring this out, it helps to know what professional service should involve. A solid benchmark is a process that prioritizes containment, exterior staging, and complete material removal before new insulation work begins, as shown on this insulation removal services page.
Common mistakes that create extra mess
The biggest failure point is poor containment. If someone tries to vacuum insulation without a sealed collection setup, fine dust can spread through the home quickly. The same goes for staging the vacuum near openings, entry doors, or busy paths where debris can escape and property can get damaged.
Other mistakes are more basic but just as costly:
- Starting without a disposal plan: Full bags pile up fast.
- Dragging hoses carelessly: That can scrape walls, damage trim, or snag wiring near access points.
- Ignoring attic layout: Tight truss spaces slow progress and leave missed sections.
- Treating batt insulation like loose-fill: It won't move the same way through the hose.
A clean attic removal job looks boring. That's a good sign. The hose runs steadily, the bags are managed, the house stays contained, and the crew isn't improvising halfway through.
Why this matters before spray foam
Removal is the point where the attic gets stripped back to a workable surface. That's when roof deck condition, framing moisture, penetrations, duct leaks, and contamination become visible enough to address properly. If the end goal is a higher-performing attic, vacuum removal isn't an extra step. It's what gives the next step a chance to work.
Critical Safety Gear and Hazard Management
You open an attic hatch in South Florida and get hit with heat, damp air, and that stale smell old insulation carries when it has taken on moisture. That is the point where safety stops being a checklist item and becomes the job.
PPE has to match the attic condition
Clean, dry loose-fill insulation is one thing. Damp insulation, rodent waste, or visible mold growth is a different exposure level entirely. I treat those as separate jobs because the protection standard changes fast once moisture and contamination are involved.
A workable PPE setup usually includes:
- Respiratory protection: Use a respirator that can handle fine dust and fibers. If the filter loads up and breathing gets harder, change it.
- Full eye protection: Dust, fiberglass, and debris get around basic safety glasses.
- Cut-resistant gloves: Attics hide splinters, fasteners, metal edges, and broken roof nails.
- Coveralls or dedicated work clothes: Old insulation sticks to skin and keeps irritating you long after the job.
- Headlamp or area lighting: Good light prevents bad footing and missed hazards.
- Knee protection: A lot of attic work happens low and awkward, especially near eaves.
For homeowners comparing reusable options with disposable masks, the Living_air personal air mask can be part of that research. For any attic with suspected mold, heavy droppings, or water-damaged material, I would not rely on a casual homeowner setup alone.
The hazards that injure people
Dust gets the attention. Sharp debris and bad footing cause plenty of injuries.
Vacuum hoses can pull in nails, screws, wood chips, and other hidden debris mixed into old insulation. If the work area is sloppy, those materials can damage the hose path, the equipment, or the area around the access point. The person running the hose is also working in a cramped space with truss webs, low rafters, loose boards, and ceiling drywall below. One bad step can turn a removal job into a ceiling repair.
South Florida adds another layer. High attic humidity often means insulation is heavier, clumped, and harder to remove cleanly. It also raises the chance that what looks like dirty insulation is mold-affected material. Once that gets disturbed, the breathing zone changes immediately.
Heat and moisture change the risk
A hot attic wears people down faster than they expect. Judgment slips. Water breaks get skipped. Footing gets sloppy.
Moisture is the bigger issue in this market because it changes the job from simple removal to contamination control. If the insulation feels damp, smells musty, or sits under roof leaks, stop and inspect further before continuing. Removal can spread mold particles through the work area if containment and PPE are not handled correctly.
That matters even more if the attic is being cleared for spray foam. Foam should only go into a dry, stable assembly, and the timeline after installation matters too. Homeowners planning the full upgrade should understand how long spray foam takes to cure so removal, drying, and installation are scheduled properly.
When to stop and call a professional crew
Some attics are still reasonable for a careful homeowner. Others are not.
Call a pro if you find widespread mold staining, active roof leaks, strong urine or feces contamination, dead animals, damaged wiring, or insulation that has clearly been wet for a while. Call a pro if the attic is tight enough that hose control and safe footing are a problem. Call a pro if anyone in the home has respiratory sensitivity and you cannot isolate the work area properly.
The machine helps remove material. It does not make a contaminated attic safe. In South Florida, that distinction matters because moisture damage is often the actual problem hiding under the old insulation.
Preparing Your Attic for Spray Foam Insulation
Once the old insulation is out, the attic finally becomes workable. That's the moment to deal with the things the old material was hiding. In South Florida homes, that often means moisture staining, air leaks, duct issues, and humid outside air finding its way into the attic assembly more easily than it should.
A clean attic matters because spray foam performs best when the surface condition is known and the space has been properly prepared. If old loose-fill insulation is still scattered across the attic floor, or if dirty batt fragments are left tucked into corners, you don't have a true reset. You have a partial cleanup.
Why removal helps the upgrade work better
Spray foam isn't just another layer of fluff. It's used when the goal is to seal and insulate, not merely cover the attic with more material. That distinction matters in coastal and high-humidity markets where moisture control is part of the comfort problem.
Once the attic is cleared, you can evaluate:
- Where outside air is entering
- Whether previous roof moisture has been corrected
- What needs sealing before insulation goes in
- Whether the attic is ready for a full performance upgrade
That's why homeowners who plan to move from old, dirty insulation to a tighter attic assembly usually get better results when they treat removal as prep, not as the finish line.

The South Florida payoff
In this region, the payoff isn't just lower cooling strain. It's a drier, more controlled home environment when the attic system is handled correctly. Old insulation that has absorbed years of humidity often can't support that goal anymore. Once it's gone, you're in a much better position to install a system designed for air sealing and moisture resistance.
If you're weighing timing and project planning, it also helps to understand what happens after installation. This overview of spray foam cure time gives a practical look at what homeowners should expect once the attic is ready for the next step.
The short version is simple. If your attic insulation is old, contaminated, damp, or clearly underperforming, vacuum removal is often the right first move. And if the bigger goal is a cleaner, tighter, more humidity-resistant attic, removing the old material before installing spray foam is usually the smartest path.
If your attic in Jupiter, Palm Beach Gardens, West Palm Beach, Wellington, or Stuart needs a full reset, Airtight Spray Foam Insulation can help you move from dirty, outdated insulation to a properly prepared attic and a high-performance spray foam solution. Request a free estimate to get clear guidance on removal, prep, and the right insulation approach for your South Florida property.