Blog
Wall Insulation Board: South Florida Guide 2026
Your air conditioner runs all afternoon, the thermostat says one thing, and the house still feels clammy by dinner. In South Florida, that usually isn't just an HVAC problem. It's often a wall assembly problem.
A lot of homes and light commercial buildings leak heat and moisture through the walls long before anyone notices obvious damage. The result is familiar: uneven rooms, indoor humidity that won't settle down, and cooling equipment working harder than it should. If you're already tackling humidity in Palm Beach homes, it helps to look beyond the air handler and start thinking about the building envelope.
Wall insulation board matters here because our climate punishes weak wall systems. South Florida isn't mainly a winter-heating market. It's a cooling, dehumidification, and moisture-control market. That changes what “good insulation” really means.
Your Shield Against South Florida Heat and Humidity
A wall that only relies on cavity insulation leaves the framing as a series of heat highways. Wood and especially metal move heat through the wall much more easily than the insulation between them. That's why a house can have insulation in the stud bays and still feel hot near exterior walls.
Wall insulation board changes that by creating a more continuous layer across the outside of the structure. It's like putting a weather jacket over the whole wall instead of stuffing a sweater between the studs. The jacket covers the weak spots.
Why South Florida needs a different mindset
In cold climates, people often talk about keeping indoor heat from escaping. Here, the bigger issue is controlling heat gain, humid air movement, and moisture accumulation in an air-conditioned building.
That means the best wall strategy usually does three things at once:
- Cuts thermal bridging: It limits heat moving through studs, plates, and sheathing transitions.
- Supports air sealing: A better wall assembly reduces the humid outside air that slips into cavities.
- Protects durability: It lowers the chance that hidden moisture turns into mold, swelling, or material breakdown.
South Florida homes don't just need more insulation. They need wall assemblies that stay dry while the interior stays cool.
What works in practice
For most projects, the question isn't whether a wall insulation board can help. It's whether the board is the right material, right thickness, and right part of a full wall system.
Done well, it improves comfort in a way homeowners notice quickly. Interior wall surfaces feel less hot. Rooms become easier to keep stable. The AC system doesn't fight the structure all day.
Done poorly, it can trap moisture, leave air leaks at every seam, and create the illusion of an upgrade without delivering real performance.
That's why the board itself is only part of the answer. Material choice, thickness, seam sealing, flashing, and vapor control all matter more in South Florida than many generic insulation guides admit.
What Are Wall Insulation Boards
Wall insulation boards are rigid panels installed on or within wall assemblies to improve thermal performance. In modern exterior wall design, they're most valuable when used as continuous insulation, which means they form an uninterrupted layer across the face of the wall rather than stopping at each stud bay.
A simple way to explain it is this: cavity insulation is the layer inside the wall. A wall insulation board can act like the outer shell over the framing and reduces the weak points.
Continuous insulation versus cavity insulation
Fiberglass batts, open-cell spray foam, and closed-cell spray foam all work inside framing cavities. They can help a lot, especially when installed well. But they don't fully solve thermal bridging because the studs still connect the interior side of the wall to the exterior side.
Continuous insulation does a different job. It covers those framing members and sheathing joints with a more uniform thermal layer. That's one reason these systems became mainstream after energy-efficiency rules and code requirements pushed better envelope performance. Modern codes in many jurisdictions now require continuous insulation on exterior walls, and wall insulation boards became widely adopted after mid-century energy-efficiency regulations, with the category growing into a multi-billion dollar global market through building insulation standards and adoption history.
Common board types you'll see
Those involved in residential and light commercial work will run into a few main categories:
- XPS and EPS foam boards for exterior continuous insulation
- Polyiso or PIR-type rigid boards where high thermal resistance in a thinner profile is a priority
- Mineral wool boards where vapor openness and non-foam characteristics matter
- Wood-fiber and similar specialty boards on projects that prioritize diffusion-open assemblies
If you're comparing exterior board insulation to insulation placed only inside the wall, it also helps to understand how interior wall insulation options change the assembly from the inside out.
Why the outside layer matters so much
South Florida walls perform better when the exterior layer does more than add nominal R-value. It should also support water management, reduce heat transfer through framing, and fit the drying strategy of the wall.
That's where many homeowners get mixed messages. A product sheet may focus on thermal performance while barely mentioning vapor behavior, fastening, joint treatment, or compatibility with cladding details. Good installers don't stop at “what's the R-value per inch.” They ask how the board behaves once rain, solar load, interior cooling, and humid outdoor air all start interacting.
For a broader homeowner-friendly overview of practical insulation upgrades, Atomic Exteriors' insulation expertise is a useful companion read.
Field view: The best wall insulation board is the one that fits the whole assembly. A strong product used in the wrong wall can still create a weak result.
Comparing Common Insulation Board Materials
No single board wins every project in South Florida. The right choice depends on your cladding, wall thickness, drying potential, budget, and how aggressively you want to control air leakage and heat gain.
The table below gives a practical starting point.
Wall Insulation Board Materials Compared
| Material | Typical R-Value (per inch) | Moisture Resistance | Vapor Permeability | Relative Cost |
|---|---|---|---|---|
| XPS | About R-5 per inch | Strong moisture resistance | Lower permeability than more vapor-open boards | Mid to higher |
| EPS | Within the broader range of about R-4 to R-7 per inch for rigid boards | Good, but assembly details matter | More vapor open than XPS in many applications | Lower to mid |
| Polyiso | Within the broader range of about R-4 to R-7 per inch for rigid boards | Good if kept within a well-detailed assembly | Generally more vapor variable depending on facer | Mid to higher |
| Mineral wool | About R-4 per inch | Handles wetting differently from foam and can dry more readily | More vapor open | Mid to higher |
If you want a side-by-side look at thermal performance across insulation categories, this insulation R-value comparison guide helps place boards in context.
XPS and EPS foam boards
XPS is familiar on a lot of jobs because it offers about R-5 per inch in exterior continuous insulation applications, and it resists moisture well. It's often a practical choice where space is tight and the installer wants a durable rigid board that can handle exposure during construction.
EPS can also be a strong option, especially when the wall design benefits from a somewhat more vapor-open foam approach. In practice, I'd rather see the right EPS assembly with disciplined detailing than a premium board installed carelessly.
Polyiso and related high-R rigid boards
Polyiso attracts attention because rigid boards as a category commonly deliver about R-4 to R-7 per inch depending on polymer and facings, and that makes thinner assemblies possible in some designs. On paper, that sounds ideal.
But South Florida jobs aren't won on paper. The facer, the moisture profile of the wall, and the cladding strategy all matter. A board with excellent thermal resistance can still be the wrong fit if it pushes the wall toward a drying bottleneck.
Mineral wool boards
Mineral wool boards bring a different set of advantages. They're often chosen when a project needs an exterior insulation layer that's more vapor open and more forgiving in assemblies where drying potential matters.
That doesn't mean they're automatically better for every humid-climate wall. They still need proper support, weather-resistive detailing, and integration with the rest of the enclosure. But when the assembly needs to breathe outward more easily, mineral wool deserves a serious look.
What matters most in South Florida
For this climate, I'd rank the decision criteria like this:
- Moisture behavior of the full wall
- Air sealing quality at seams and penetrations
- Compatibility with cladding and flashing
- Thermal performance
- Material cost
That order surprises some people. It shouldn't. In a hot, humid, air-conditioned building, a wall that can't manage moisture will underperform no matter how attractive the brochure looks.
How Thick Should Insulation Board Be in South Florida
Thickness isn't just about hitting a target R-value. In South Florida, thickness affects whether the wall stays dry enough to age well.
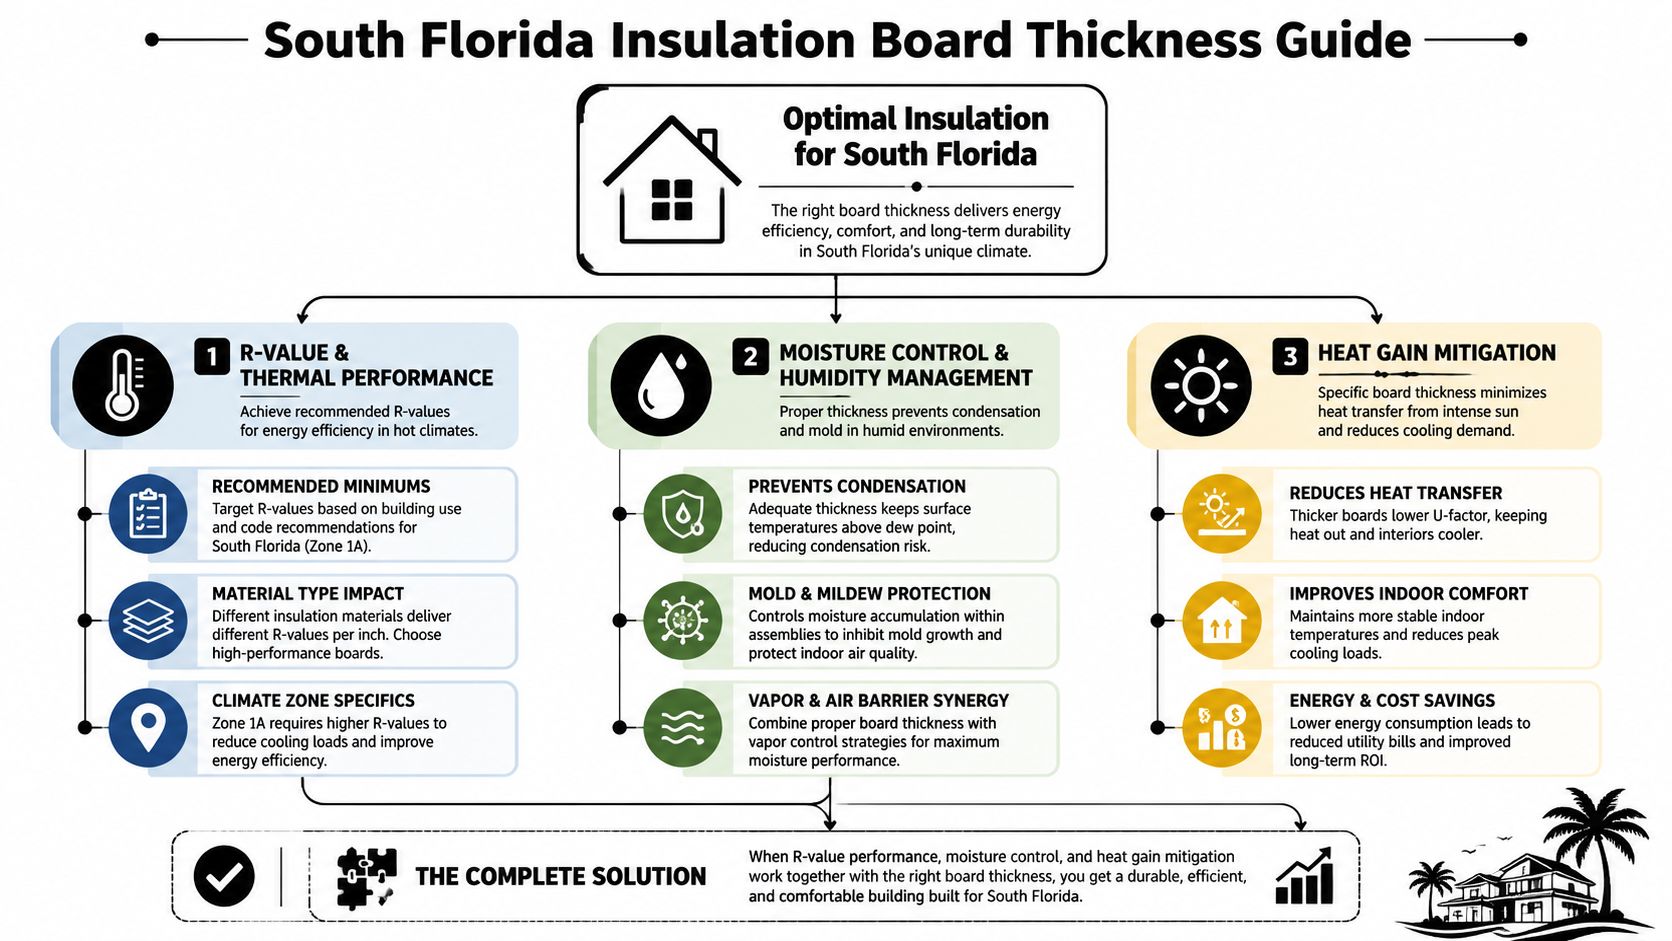
The dew point problem in an air-conditioned house
When outdoor air is hot and humid and the inside of the house is cool, moisture wants to move. If parts of the wall assembly get cool enough in the wrong place, that moisture can condense within the assembly or linger long enough to feed mold and material damage.
That's why exterior insulation thickness matters. In humid climates, specifying enough board thickness to contribute at least R-5 to R-10 on the exterior helps keep the sheathing above the dew point and limits moisture accumulation from inward vapor drive in air-conditioned homes, as noted by the U.S. Department of Energy's insulation guidance.
Minimum versus smart thickness
A thin board may help somewhat, but there's a difference between “better than nothing” and “thick enough to change wall behavior.” Best practices for mechanically attached continuous insulation often call for at least 1 inch (25.4 mm) to achieve meaningful reductions in thermal transmittance, and thinner layers may still allow significant heat transfer through framing and fastener paths.
Continuous rigid insulation in cold and mixed climates can reduce framing-related heat loss compared with cavity-only walls, but in South Florida the thicker-board conversation is just as much about condensation control and durability as it is about heat flow.
Use thickness to move the risk line. If the exterior layer keeps the sheathing warmer and drier, the wall gets much more forgiving.
A practical way to think about it
If you're reviewing a wall assembly for South Florida, ask these questions before choosing thickness:
- Where will the sheathing sit relative to the conditioned interior?
- How vapor open is the interior finish?
- What cladding and drainage strategy sits outside the board?
- Will the wall have cavity spray foam, batts, or something else inside?
The “best” thickness depends on the whole assembly, not the board alone. But the broad rule holds. In this climate, enough exterior R-value is often your best defense against inward-driven moisture and hidden wall problems.
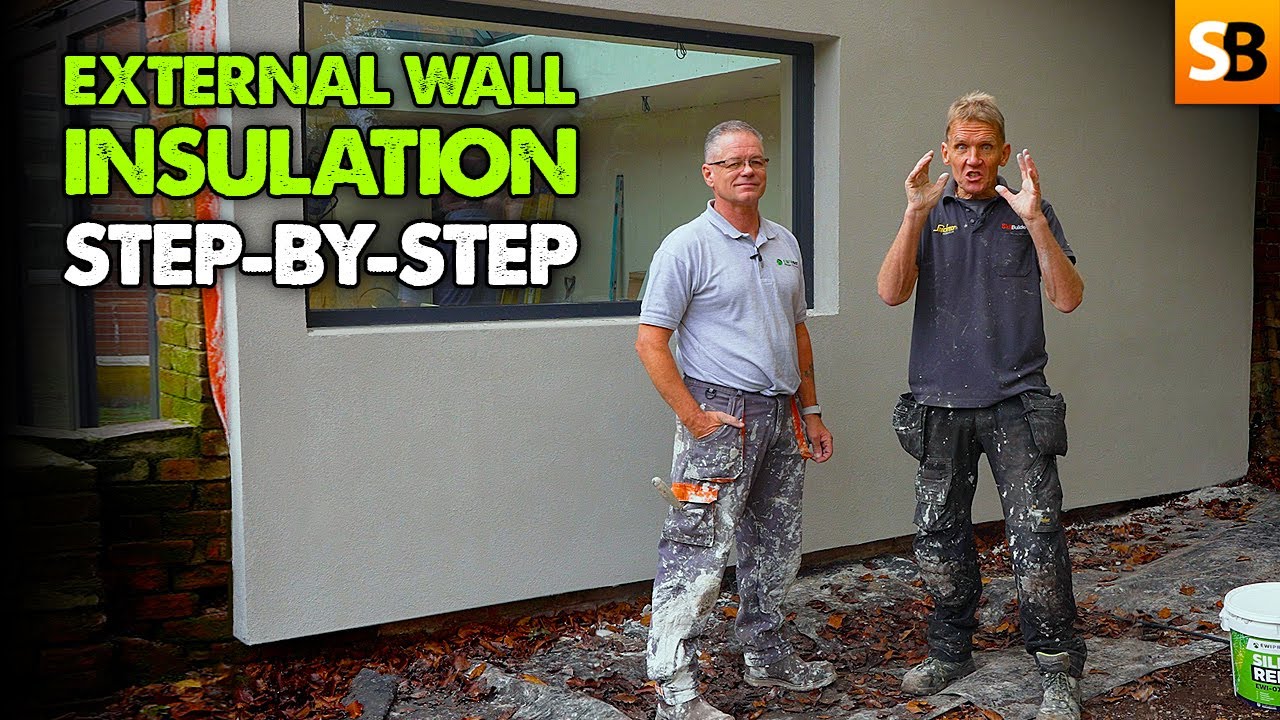
Installation and Compatibility with Spray Foam
The biggest installation mistake is treating a wall insulation board like a simple add-on panel. It isn't. It's part of a layered enclosure system that has to handle heat, air, bulk water, and vapor.
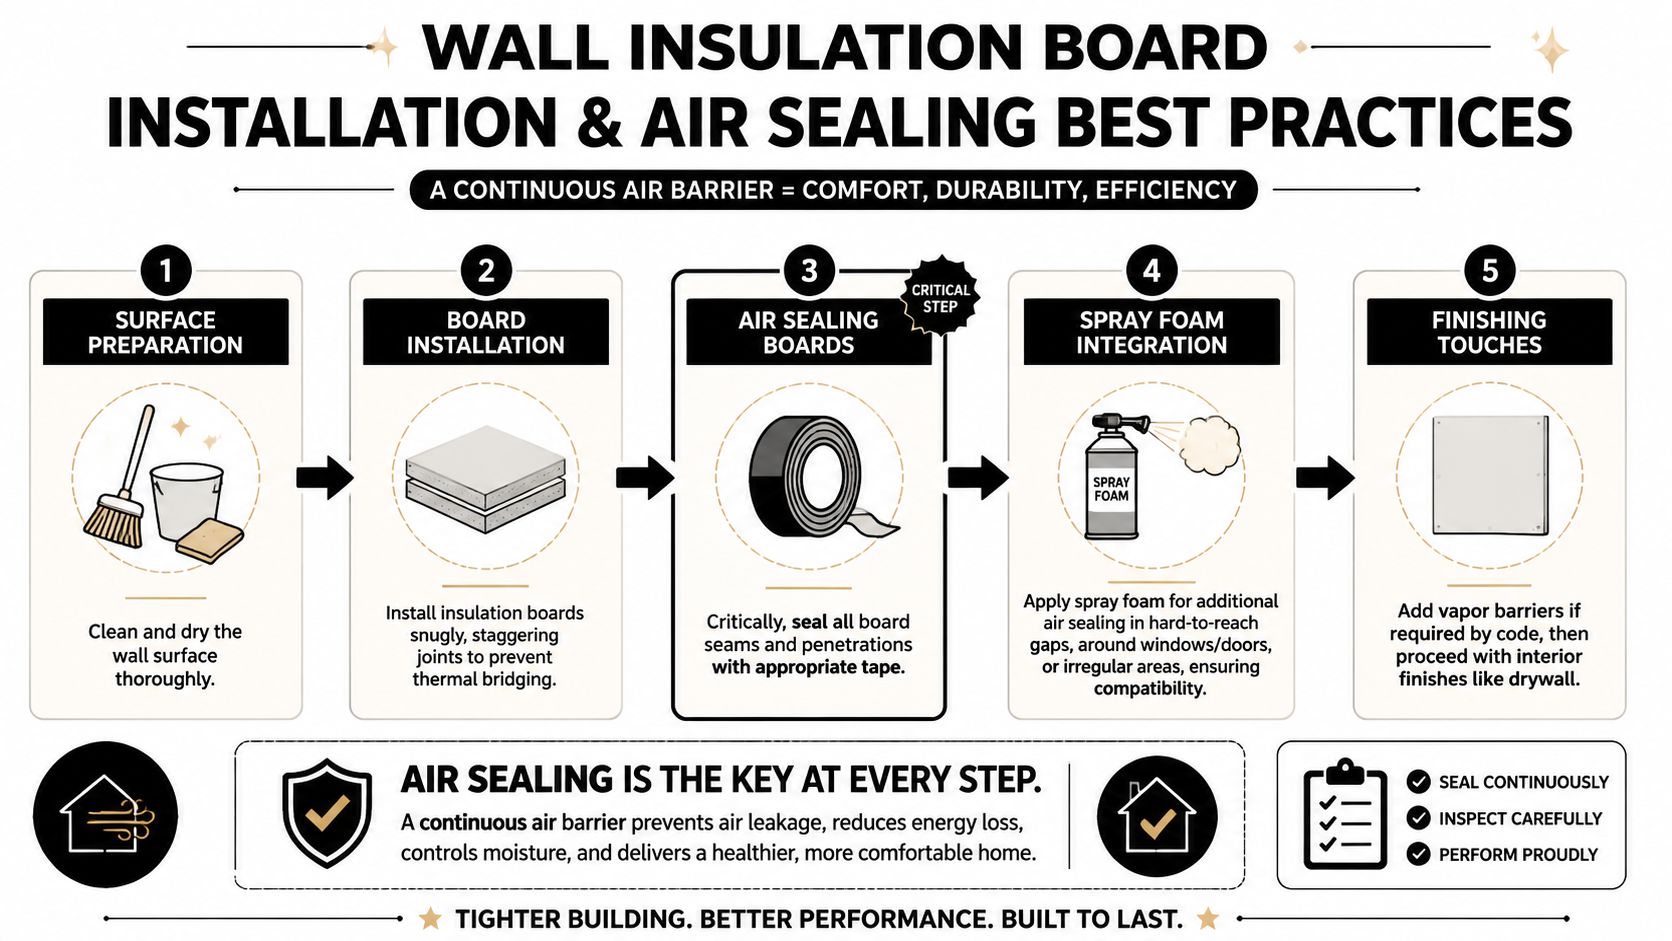
What good installation looks like
A proper installation starts with a flat, dry substrate and a clear plan for the water-resistive barrier, flashing transitions, and cladding attachment. Boards should fit tight, joints should be laid out intentionally, and penetrations should never be left as afterthoughts.
For exterior XPS continuous insulation, fastening patterns are tied to service loads and exposure. Typical schedules call for about one fastener per 0.19 m² (about 2 ft²) or a minimum of four fasteners per furring channel length, with spacing no more than 600 mm (24 in) on center in higher-demand assemblies. Those details matter because attachment isn't just about keeping the board from falling off. It's about resisting wind-induced loads and preserving long-term stability.
Air sealing is where performance is won
The board itself doesn't deliver its full value unless the installer closes off the air paths around it. Taping seams, sealing penetrations, and dealing carefully with windows, doors, and mechanical openings keeps humid air from sneaking behind the insulation layer.
Later in the build sequence, it helps to see the full workflow in motion:
Proper installation is critical because taping all board edges and sealing penetrations can prevent convective loops that reduce effective R-value by 10 to 15%, and in South Florida those airtight details are essential for limiting moisture paths that lead to mold.
A rigid board with open seams is not continuous insulation in any meaningful field sense.
Where spray foam fits
Hybrid assemblies prove valuable. Exterior board insulation handles thermal bridging and moves the control layer outward. Spray foam in the stud cavities can then handle irregular gaps, air sealing around penetrations, and cavity-level thermal performance.
A good hybrid wall might use:
- Exterior rigid board for continuous insulation across framing
- Closed-cell spray foam at key cavity locations where extra air sealing and moisture resistance are useful
- Careful sealing at rim areas, rough openings, and service penetrations
- A coordinated vapor strategy so the wall can still dry in the intended direction
That combination often outperforms either approach used carelessly on its own. The board solves one problem. Spray foam solves another. Together, they can produce a tighter, more durable wall.
Common Mistakes to Avoid With Wall Insulation Boards
Most wall insulation board failures don't start with a bad product. They start with a wall that was never fully thought through.
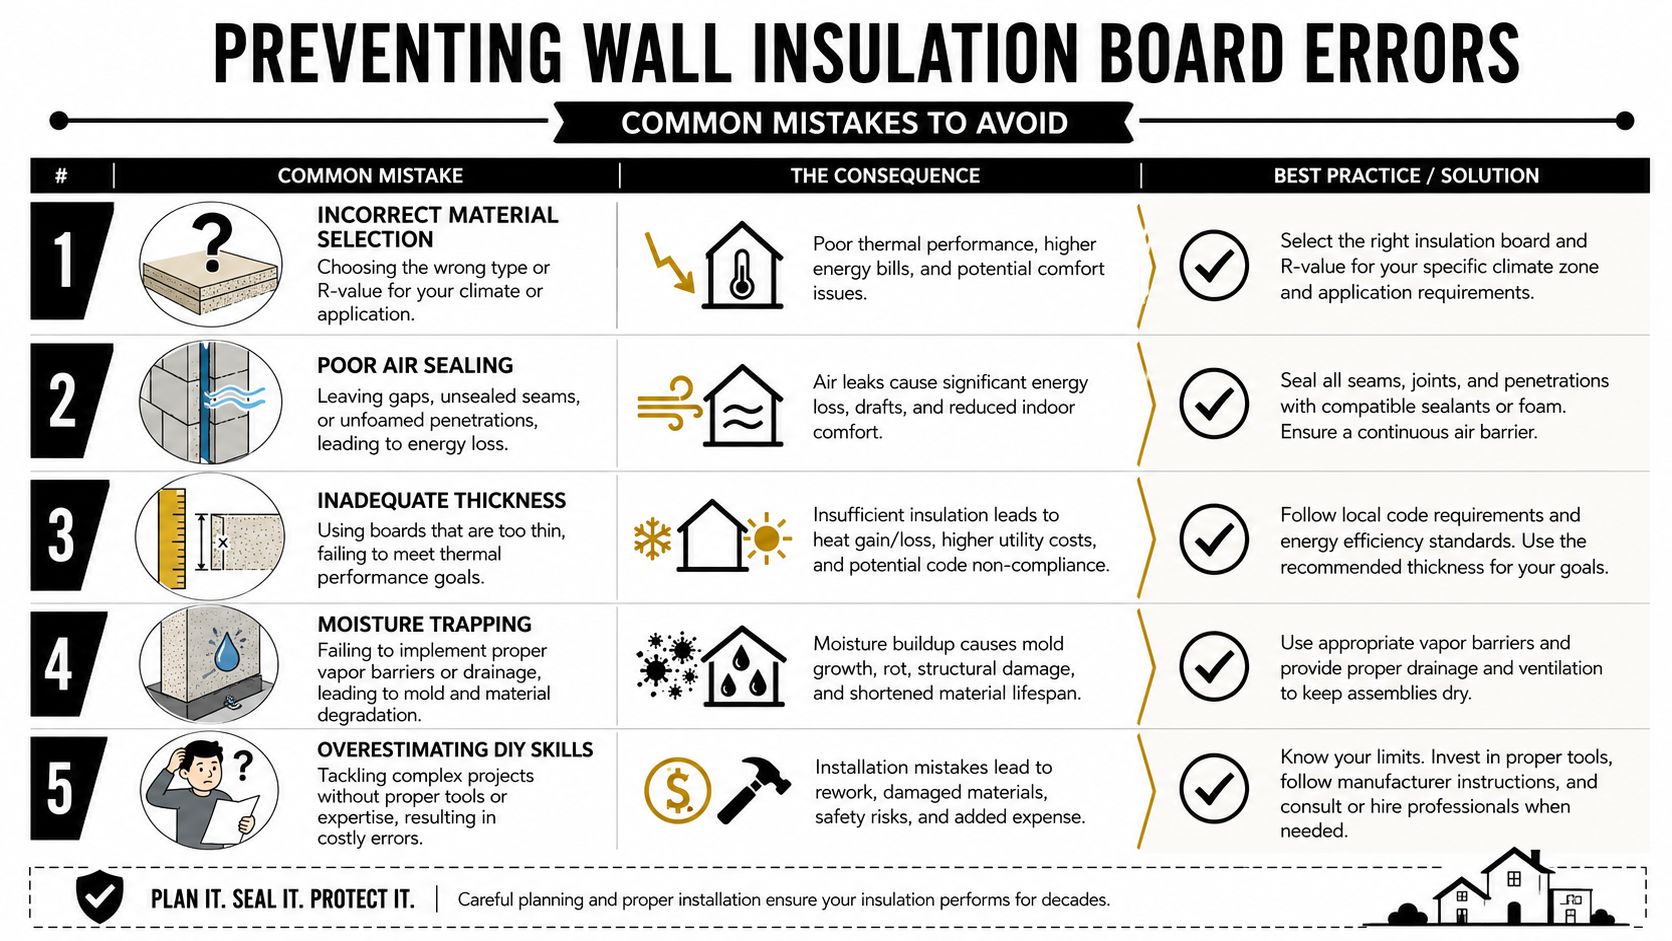
Mistake one and the one that causes the most hidden trouble
The classic South Florida error is creating a double vapor trap. A common but critical mistake is installing an impermeable interior vapor barrier with exterior foam boards, which can trap moisture. Guidance on when to omit interior vapor barriers so the wall can dry is often buried in code language rather than homeowner guides.
If you need a clearer background on how that issue affects assemblies, this guide on vapor barrier and insulation choices is worth reviewing.
Four more errors I see repeatedly
- Gaps between boards: Even small gaps interrupt continuity. Heat and air will use every opening you leave them.
- Poor fastening layout: Fasteners aren't random. In exposed South Florida conditions, attachment patterns need to match the system requirements.
- Ignoring windows and penetrations: The field of the wall may look great, while the weakest points around openings stay unsealed.
- Treating cladding and insulation as separate jobs: If the flashing, drainage plane, furring, and board aren't coordinated, moisture management falls apart.
Symptom, cause, and fix
Here's the practical version.
| Symptom | Likely cause | Better fix |
|---|---|---|
| Interior wall feels warm or damp near exterior exposure | Board too thin, discontinuous, or poorly sealed | Rework the assembly for continuity and moisture control |
| Musty smell after cooling season peaks | Moisture trapped between low-perm layers | Reassess interior vapor control and drying path |
| Cracks or movement at cladding attachment points | Fastening pattern or support strategy was weak | Use system-specific attachment and furring details |
| Good insulation on paper, weak comfort in real life | Air leakage around seams and penetrations | Seal edges, tape joints, and integrate transitions properly |
Practical rule: If the wall can't dry and can't stay airtight, the insulation upgrade is incomplete no matter what product was purchased.
When to Call a Professional for Your Insulation Project
A small repair or a simple detached structure might be manageable for a skilled DIY owner. A full exterior wall insulation retrofit or a new high-performance wall assembly usually isn't.
South Florida makes the margin for error smaller. You're balancing solar heat, rain exposure, air-conditioned interiors, vapor movement, attachment details, and code requirements at the same time. One wrong assumption about board type, seam treatment, or interior vapor control can cancel out the benefits of the upgrade.
Projects that deserve professional design and installation
You should bring in a qualified insulation and enclosure professional when the job includes any of these conditions:
- Whole-house continuous exterior insulation
- A hybrid assembly with spray foam and rigid board
- Cladding removal or replacement
- Window replacement tied into new flashing layers
- Persistent humidity, musty odor, or suspected hidden condensation
- Multi-story walls or high-wind exposure
Why expertise matters here
A pro doesn't just install boards. A pro checks whether the assembly makes sense before the first fastener goes in. That includes moisture behavior, drying potential, fastening method, penetration sealing, and how the wall interfaces with windows, doors, soffits, and roof edges.
This is also where accountability matters. A proper crew should be able to explain the wall in plain language, tell you what layers are doing what, and show how the insulation ties into the rest of the enclosure.
For homeowners and contractors evaluating a more advanced system, it helps to see what a spray-foam-focused insulation contractor does in the field:
If your project involves exterior wall boards, cavity spray foam, or a moisture-control problem that hasn't been solved by HVAC tweaks alone, professional help is usually the cheaper path compared with tearing open a failed wall later.
If you want a wall system that does more than look good on a quote sheet, Airtight Spray Foam Insulation can help you evaluate the right approach for your South Florida property. Their team works across Jupiter, Palm Beach Gardens, West Palm Beach, Wellington, Stuart, and nearby areas, designing and installing insulation systems that focus on air sealing, moisture control, and long-term comfort. Request a free, no-obligation quote to find out what makes sense for your walls, your building, and your climate.