Blog
Insulating Shower Walls: Prevent Mold, Save Energy
You’re probably thinking about tile, grout color, fixture trim, and whether to add a niche or ledge. That’s normal. Most bathroom remodels start with what you can see.
The part that decides whether the shower stays healthy for years is what goes behind the tile.
In South Florida, insulating shower walls isn’t mainly about making the bathroom feel warmer. It’s about controlling moisture inside a wall cavity that sits next to daily steam, constant humidity, and big temperature differences between conditioned indoor air and hot, damp exterior conditions. If that wall assembly is wrong, the failure stays hidden until paint bubbles, trim swells, grout starts looking suspicious, or the wall opens up and you find mold and rot.
Why Insulating Your Shower Is Non-Negotiable in Florida
A lot of homeowners in Jupiter, Palm Beach Gardens, West Palm Beach, Wellington, and Stuart assume the waterproofing on the tile side handles everything. It doesn’t. Tile and grout are part of the system, but they are not the whole system. The cavity behind the shower needs its own defense.
That’s where climate changes the conversation. In a dry region, builders can get away with assemblies that would be risky here. In South Florida, warm humid air and cool interior surfaces create the exact conditions that let condensation form where no one sees it. Once that moisture gets trapped behind a wet wall, wood framing, fasteners, and backing materials start paying the price.

What usually goes wrong
The common failure isn’t dramatic flooding. It’s slow moisture movement.
A shower on an exterior wall can collect warm, damp air from the room, humid air from outside, and occasional water intrusion from bad detailing. If the cavity is filled with a material that insulates but doesn’t stop air and vapor effectively, moisture can move through the assembly and condense on cooler surfaces. That’s how hidden mold starts.
Closed-cell spray foam is the material I trust most for this environment because it handles multiple jobs at once. In humid subtropical climates like South Florida, it provides superior vapor impermeability with an R-value up to 6.5 per inch, compared with Rockwool at R-4.2 per inch, while helping prevent condensation behind wet walls. Building science data also indicates spray foam can reduce air leakage by up to 90% in wall assemblies, which directly addresses one of Florida’s biggest moisture problems, as noted in this bathroom insulation discussion for humid climates.
Why generic advice falls short here
A lot of remodel articles tell you to “add insulation” as if all insulation behaves the same. It doesn’t.
Fiberglass and mineral wool can have a place in the right assembly, but in a shower wall in this climate, they don’t give you the same protection against air movement and vapor drive. If the wall isn’t carefully detailed, they can leave you with a cavity that looks insulated on paper and still performs poorly in the field.
Field reality: In Florida showers, the wall cavity fails from moisture movement long before most homeowners ever think about heat loss.
If you’re reviewing a remodel scope, you should also pay attention to how the contractor handles the moisture layer and air control layer behind the shower. If you need background on that side of the assembly, this overview of a white vapor barrier system helps explain why continuity matters.
Choosing the Right Materials for a Watertight Assembly
Material selection decides whether your shower wall works as a system or becomes a stack of mismatched parts. The best assembly controls water, air, vapor, and temperature at the same time.
That’s why I don’t judge shower insulation by R-value alone. In a bathroom, especially on an exterior wall, vapor behavior matters just as much as thermal performance. A material can look acceptable in a spec sheet and still be the wrong call for a wet wall in South Florida.
What each layer needs to do
A reliable shower wall assembly needs these jobs covered:
- Tile-side waterproofing: The backer board and membrane need to manage direct water exposure from daily use.
- Cavity insulation: The stud bay needs insulation that resists heat flow without becoming a weak spot for moisture.
- Air control: Gaps around pipes, valves, and framing joints must be sealed so humid air can’t move freely through the wall.
- Drying logic: The whole assembly needs to be built with a clear plan for where moisture is stopped and where it can safely go.
Shower insulation material comparison for humid climates
| Material | Typical R-Value (per inch) | Vapor Permeability | Suitability for Showers |
|---|---|---|---|
| Closed-cell spray foam | R-5.5 to R-6.5 per inch | Low permeability, acts as a vapor barrier | Best choice for humid, wet-adjacent wall cavities |
| Fiberglass batt | R-2.75 to R-5.25 per inch | More moisture susceptible | Higher risk in shower walls unless the whole assembly is detailed extremely well |
| Rockwool | R-4.2 per inch | More vapor open than closed-cell foam | Better than doing nothing, but not my first choice for South Florida shower walls |
| Open-cell spray foam | Qualitatively lower moisture resistance than closed-cell in wet applications | More vapor open | Not my preferred option for shower walls in this climate |
| Rigid foam board | Qualitatively strong if cut and sealed well | Depends on product and detailing | Can work, but joint quality and continuity are everything |
Properly insulating shower walls can reduce heating and cooling costs by up to 40%, and closed-cell spray foam delivers R-5.5 to R-6.5 per inch while also acting as a vapor barrier, which is why it outperforms moisture-susceptible fiberglass in wet areas, according to this guide on insulating behind shower walls.
What works best with tile backer systems
I like to separate the wall assembly into two decisions. First, what goes in the cavity. Second, what goes directly behind the tile.
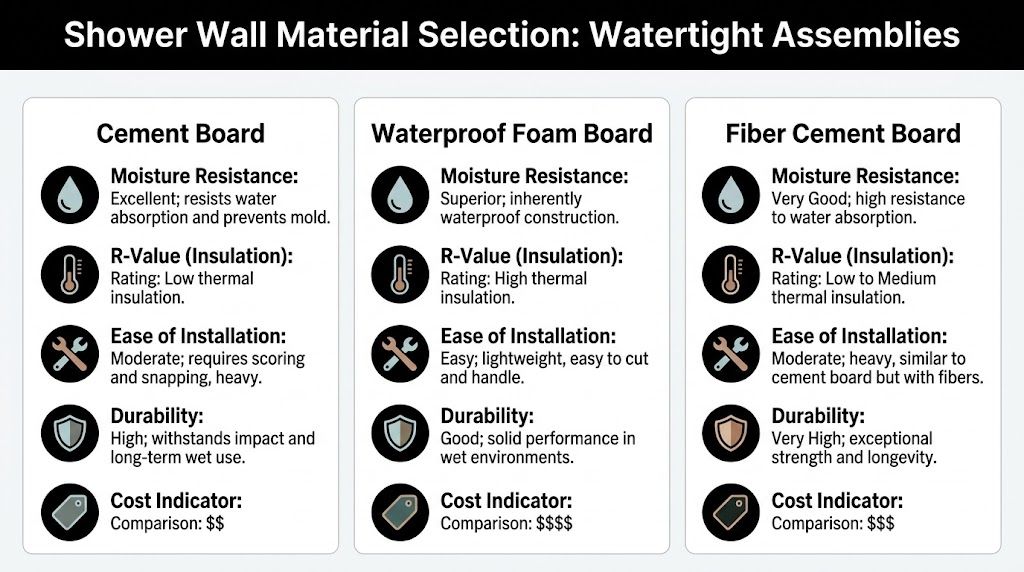
For the tile-side layer, cement board and fiber cement board are proven options when paired with a continuous waterproofing membrane. Waterproof foam board also performs well because it combines backer and water management in one panel system. The point is not to pick a fashionable product. The point is to build a continuous, watertight surface with sealed seams, corners, and penetrations.
If you want a clear visual reference for tile-side protection details, this leak-free waterproofing guide is useful because it shows how the waterproofing layer has to be treated as a complete envelope, not a patchwork.
A shower wall only performs as well as its weakest seam. That weak seam is often a valve cutout, a niche corner, or an unsealed board joint.
My material verdict for South Florida
If I’m insulating shower walls in this climate, closed-cell spray foam is the safest answer inside the stud cavity. It insulates, air seals, and resists moisture movement in one application. That matters because bathrooms aren’t forgiving. One skipped detail can undermine every expensive finish that comes after.
Fiberglass is the material I’m most cautious about in shower walls. It can meet a basic insulation requirement in some assemblies, but it doesn’t solve the air leakage problem by itself, and it doesn’t give you the same margin for error once humidity gets involved.
Rigid foam board can be part of a good assembly, but it demands tight cuts, sealed joints, and disciplined workmanship. If the board fit is sloppy or the penetrations are left open, you’ve created a system with built-in bypasses. Closed-cell foam avoids a lot of those failure points because it expands into irregular framing and seals as it insulates. If you want to understand why that matters in wet and humid conditions, this page on closed-cell spray foam insulation for waterproof performance lays out the advantages well.
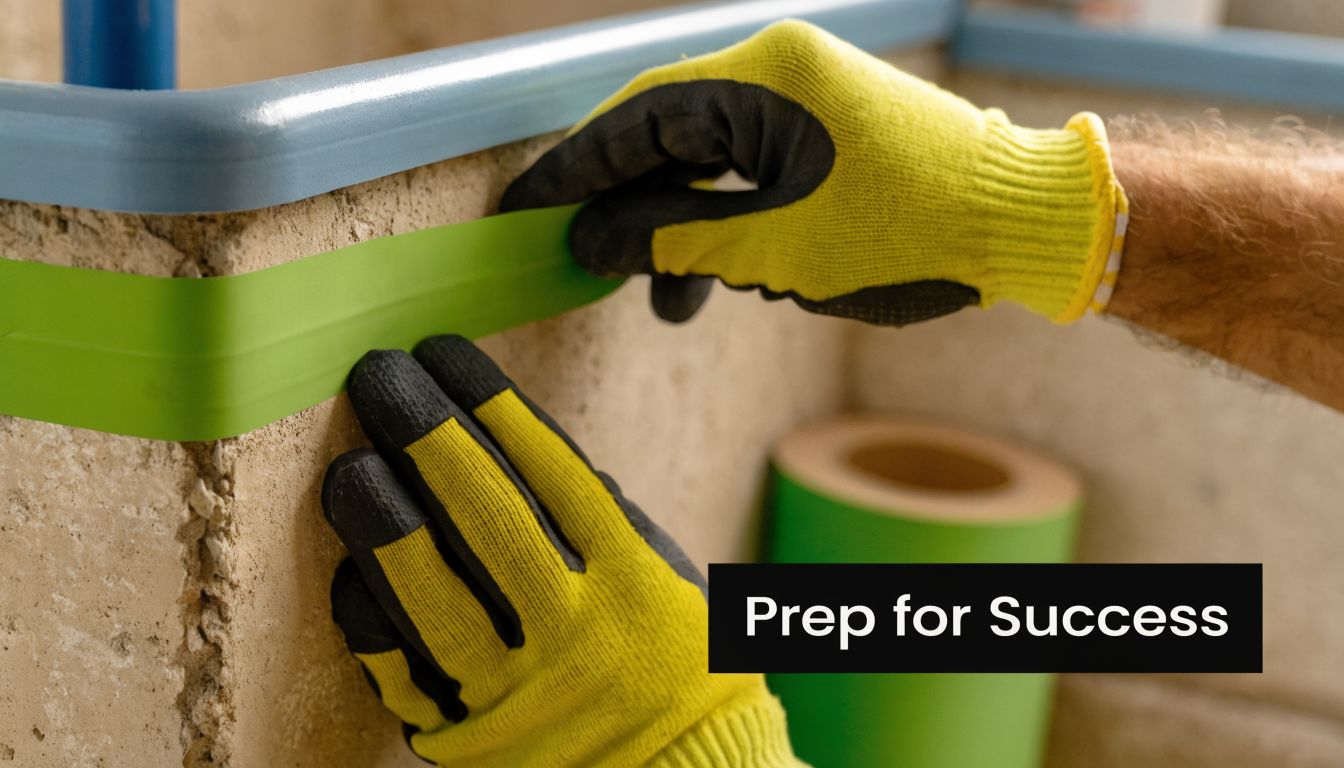
Prepping Your Shower for Flawless Insulation
Preparation is where good shower walls are won or lost. Once the backer board goes up and the tile crew starts working, your chance to fix the cavity is gone.
I’ve seen showers with premium tile and nice fixtures fail because the wall behind them was never cleaned up, dried out, and sealed properly. Insulation doesn’t correct a bad cavity. It only covers one.
What to inspect before insulation goes in
Open wall cavities tell the truth fast. If there’s been a slow leak, old water staining, termite damage, rusty fasteners, or mold on the framing, this is when you catch it.
Look closely at:
- Bottom plates and subfloor edges: These areas reveal past water exposure first.
- Plumbing penetrations: Valve bodies, shower heads, tub spouts, and supply lines are common air leakage paths.
- Exterior sheathing side: Any sign of bulk water intrusion from outside has to be corrected before insulation starts.
- Stud condition: Bowed, cracked, or deteriorated framing can make board installation and waterproofing harder later.
Air sealing is not optional
The biggest mistake I see is treating insulation as if it will stop air movement by itself. In shower walls, the primary energy loss mechanism is air leakage, and fiberglass installations often lack an air barrier behind them. Closed-cell spray foam provides R-6.0 to R-7.0 per inch while serving as an impermeable air seal, and proper air sealing alone can reduce total air infiltration by 25%, according to this building science discussion on bathroom insulation.
That matters for more than energy. In Florida, moving air carries moisture. If humid air can bypass the insulation through a pipe opening or framing crack, the wall can still collect condensation even if the cavity is technically insulated.
Practical rule: Seal every penetration you can see before the wall is closed. If air can move through it, moisture can move through it.
Prep checklist that actually matters
Don’t overcomplicate the prep stage. Be thorough.
- Fix any leak first. If exterior water intrusion or plumbing leakage exists, stop there and repair it.
- Remove contaminated materials. Wet insulation, mold-damaged backing, and deteriorated framing components need to come out.
- Seal the cavity edges. Corners, framing joints, and utility penetrations need continuity.
- Confirm the shower layout. Valve depth, niche framing, blocking for grab bars, and glass attachment points should be finalized before insulation.
- Keep the cavity clean and dry. Dust, debris, and damp surfaces can interfere with adhesion and detailing.
A clean cavity gives spray foam the best chance to bond properly and perform like a continuous layer instead of a patch.
The Shower Wall Insulation Installation Process
The installation sequence matters because shower walls are layered assemblies. If one trade gets ahead of another, you end up with trapped mistakes.
For most remodels, the cavity work happens after framing and rough plumbing are complete but before the final tile substrate and finish layers are locked in. The exact order can shift by contractor, but the principle doesn’t. Every layer has to support the next one.
How the wall assembly comes together
In a standard shower build, the framing is corrected first. Studs are flattened, blocking is added where needed, and rough-ins are checked so the valve body, shower arm, and any body sprays end up at the right depth. Then the wall cavity is prepared and insulated.
After that, the installer puts up the chosen backer system. That might be cement board, fiber cement board, or a waterproof foam board panel system. Seams, inside corners, fastener penetrations, and transitions are then treated with the appropriate waterproofing method for that system. Only after that should tile work begin.
DIY board fitting versus professional spray foam application
The difference between a decent job and a durable job becomes quite obvious.
If someone uses rigid foam board in a stud bay, they have to measure each cavity, cut the board accurately, fit it around pipes and blocking, and seal every edge. That can work. But in the field, framing isn’t perfect. Stud bays vary. Plumbing penetrations are irregular. Small gaps around a foam board panel become pathways for air and moisture.
Closed-cell spray foam behaves differently. A trained crew applies it so it expands into cracks, adheres to the cavity surfaces, and creates a more continuous layer. This is its key technical advantage. It doesn’t rely on perfect hand-cut geometry inside an imperfect wall.
The goal isn’t to “put insulation in the wall.” The goal is to eliminate the hidden paths where humid air slips around the insulation.
A quick visual can help if you want to see how insulation work and cavity access typically look during construction.
What professionals pay attention to
The foam itself is only part of the job. Application quality decides performance.
A good installer watches for full cavity coverage, keeps foam thickness consistent, avoids leaving upper voids in the stud bay, and trims cured foam correctly so the backer board sits flat. They also protect adjacent finishes, plumbing, and electrical components before spraying. That sounds basic, but sloppiness here creates downstream problems for the tile setter.
Some showers also benefit from a hybrid approach, depending on the wall depth and overall assembly design. The key is that the insulation layer must stay compatible with the waterproofing plan and the drying behavior of the wall.
Where jobs usually fail
Most shower insulation failures happen in one of these spots:
- Around the mixing valve body
- At shower niches or ledges
- At exterior corners
- Where the top of the shower wall meets the ceiling
- In upper cavities that were partially filled or missed
Partial fills are especially risky. If an installer leaves a thin band of insulation low in the wall and misses the upper cavity, air can still circulate behind the shower and carry moisture exactly where you don’t want it.
That’s why I push for complete, controlled installation instead of “good enough.” Shower walls don’t reward shortcuts.
Beyond Insulation Moisture Control and Ventilation
A well-insulated wall still needs the rest of the bathroom to do its job. If steam lingers in the room after every shower, you’re asking the whole space to absorb moisture day after day.
Insulation controls what happens inside the wall. Ventilation controls what happens in the room. You need both.
The fan has one job
The exhaust fan should vent to the exterior, not into an attic or another concealed space. If moist bathroom air is dumped into the wrong area, you’ve just moved the problem.
Run the fan during the shower and keep it running afterward long enough to clear the humid air out of the room. That simple habit reduces how much moisture settles on paint, mirrors, trim, ceilings, and grout joints. It also lowers the moisture load the wall assembly has to deal with.
If indoor humidity is a recurring problem in the house, broader moisture control strategies matter too. This guide on how to reduce humidity in a house is worth reading because shower performance is tied to the whole indoor environment.
High-performance walls work as systems
The strongest bathroom walls are designed as assemblies, not individual products. Modern high-performance bathroom walls can reach about R-35 using hybrid configurations that combine closed-cell spray polyurethane foam with other insulation layers. In standard 2×4 cavities, achieving code-level R-13 to R-15 gets difficult with fiberglass alone once air-sealing requirements are included, which is one reason high-performance alternatives such as spray foam are often necessary, according to this NREL document on high-performance wall systems.
That doesn’t mean every shower wall needs the most elaborate assembly possible. It means the wall should be designed with all four realities in mind: bulk water, vapor, air leakage, and thermal control.
Bathrooms fail when one trade assumes another trade handled the moisture details.
What homeowners should remember
If your shower wall is on an exterior wall, in a bathroom with daily use, in a humid coastal market, the assembly has to be tighter and smarter than generic remodel advice suggests. The waterproofing membrane, backer board, insulation choice, fan performance, and finishing details all affect the same outcome.
A beautiful shower that traps moisture behind the tile is not a successful remodel.
DIY vs Hiring a Pro for Your Shower Insulation
A skilled DIYer can handle parts of a shower project. Installing cement board, taping seams, and applying a compatible waterproofing membrane are realistic tasks for people who work carefully and follow the manufacturer’s system.
Spray foam inside a shower wall is a different decision.
Closed-cell spray foam has to be the right product, applied at the right thickness, in the right conditions, with the cavity properly prepared. If a DIY kit is off-ratio, if the substrate condition is wrong, or if the installer misses voids behind plumbing and framing irregularities, the wall may look finished and still perform badly. In a shower, hidden failure is the expensive kind.
What a pro brings that a kit doesn’t
- Material control: A professional can make sure the assembly gets true closed-cell foam suited for a wet-adjacent environment.
- Coverage discipline: Pros know where cavities tend to be missed and how to avoid leaving air pockets.
- Code awareness: Bathroom wall assemblies need to line up with local building requirements and moisture-control logic.
- Safety procedures: Spray foam chemicals require proper handling, PPE, and jobsite control.
If you’re managing the rest of the shower build yourself, it still helps to review reliable waterproofing details first. This guide on how to waterproof shower walls is a solid companion reference for understanding what the tile-side assembly needs to do.
Hiring a professional for the foam portion gives you a better chance of getting one continuous, durable wall instead of a collection of decent materials installed with weak transitions. In South Florida showers, that difference matters.
If you’re remodeling a bathroom in South Florida and want the shower wall done right the first time, Airtight Spray Foam Insulation can help. Their team installs closed-cell spray foam for homes and projects across Jupiter, Palm Beach Gardens, West Palm Beach, Wellington, and Stuart, with a focus on sealing gaps, controlling humidity, and protecting wall assemblies in the toughest moisture conditions.