If your AC seems to run fine but your house still feels harder to cool, the problem may be above your head. In South Florida, recessed can lights are one of the most overlooked leakage points in a ceiling. Homeowners usually notice the symptoms first. Warm rooms in the afternoon, humidity that won’t settle down, and utility bills that feel too high for the square footage.
The trouble is simple. Every recessed light cuts a hole through the ceiling plane. If that hole isn’t handled correctly, it leaks air, sheds energy, and in our climate, invites moisture where you don’t want it.
Most online advice stops at “put a cover over it.” That’s not enough here. To properly insulate around can lights in Jupiter, Palm Beach Gardens, West Palm Beach, Wellington, and Stuart, you have to think about fire safety, air sealing, and humidity control at the same time.
A lot of homes in South Florida have plenty of recessed lighting. It looks clean, gives good light spread, and became standard in kitchens, living rooms, hallways, and covered patios. But from an insulation standpoint, every one of those fixtures can become a weak spot.
The first distinction that matters is IC-rated versus non-IC. IC stands for insulation contact. An IC-rated fixture is built to allow insulation to touch the housing. A non-IC fixture is not. That older type has to stay separated from insulation because of heat buildup risk.
If you want a quick visual check, start in the attic. An IC-rated housing is often buried or partly surrounded by insulation. A non-IC fixture usually has a visible buffer around it, or at least it should. If you can access the can from below, remove the trim and bulb or LED module if the fixture design allows it, then look for the label inside the can housing. The label is what matters, not guesswork.
The reason this deserves attention is more significant than commonly realized. According to the U.S. Department of Energy guidance summarized here, uninsulated recessed can lights can account for up to 50% of a ceiling’s total thermal loss, and a home with 20 fixtures can be comparable to leaving an attic door open continuously.
In our climate, those openings don’t just let conditioned air drift away. They let hot attic air and humidity move in the wrong direction. That changes how rooms feel, especially under the ceiling line and around return airflow paths.
A few common signs show up in the field:
When homeowners decide to insulate around can lights, they usually expect a small tune-up. In many homes, it’s a much more important correction than that.
Most mistakes happen before the first tool comes out. People assume all recessed lights are safe to cover, or they rely on the age of the house instead of checking the fixture label. That’s where problems start.
A non-IC light isn’t just “older.” It’s a fixture that can overheat if insulation touches it. The 3-inch clearance rule is not a suggestion. It’s the safety line that keeps the fixture from trapping too much heat.
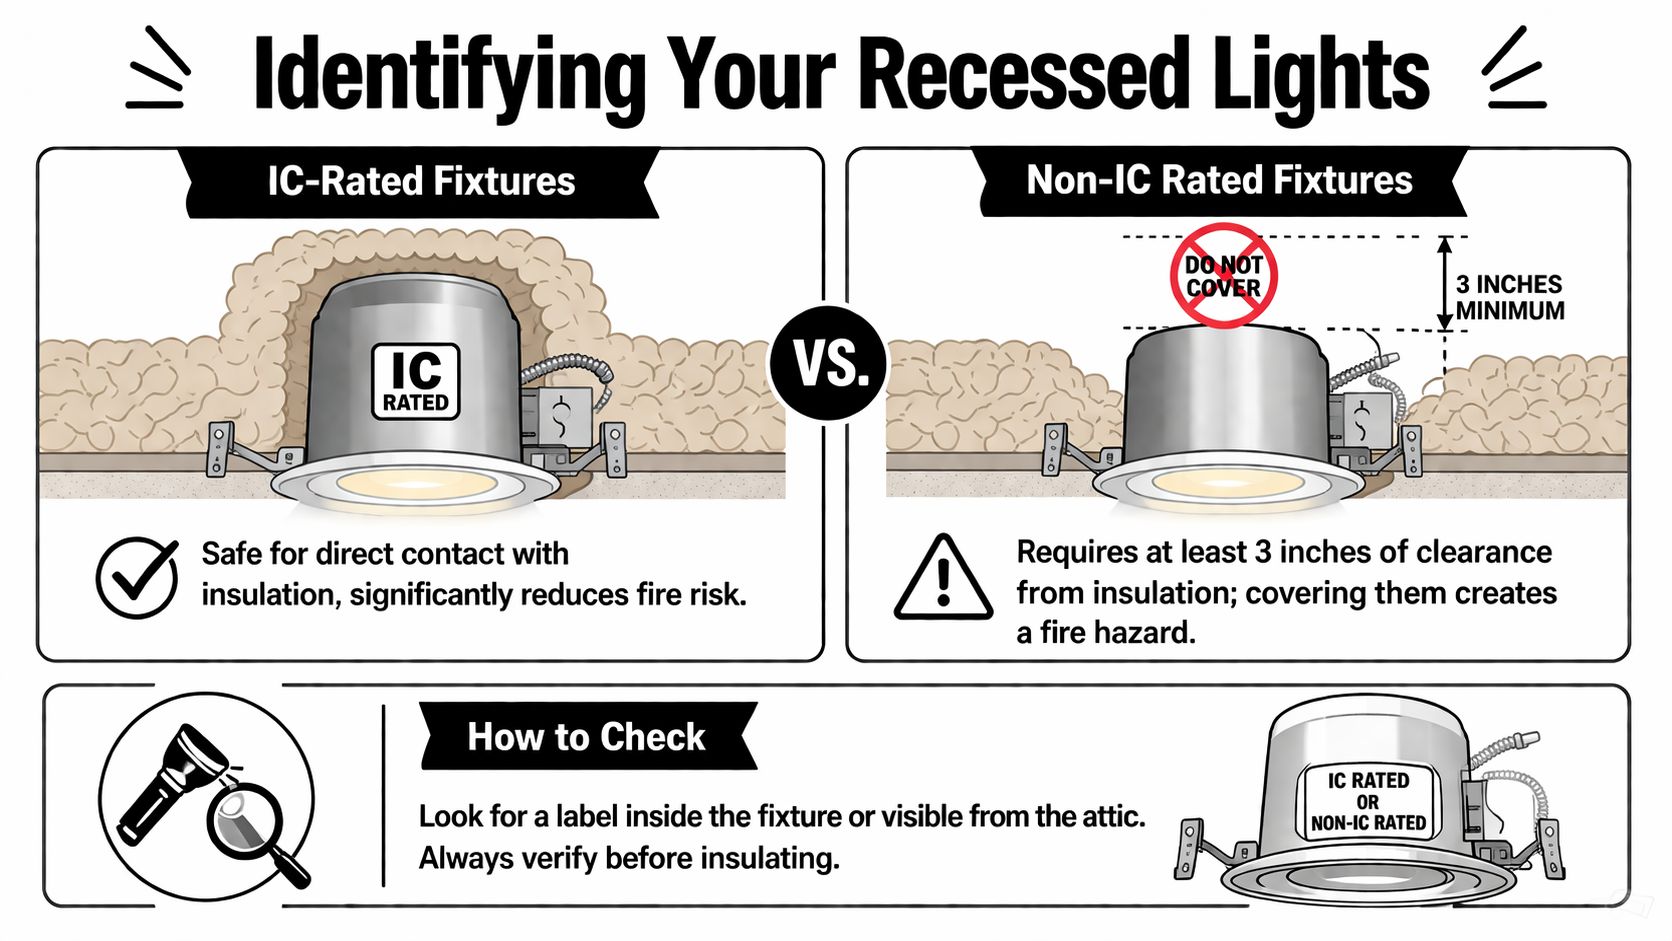
If the attic is tight, checking from below is often easier. Turn off power at the breaker first. Then remove the trim or lens, depending on the fixture style, and look inside the housing with a flashlight.
You’re looking for a label stamped or printed inside the can. It will identify whether the fixture is IC or non-IC. If the label is painted over, rusted, or unreadable, stop treating it as if it’s safe for insulation contact. Unknown is not the same as IC-rated.
From the attic, clear loose insulation carefully so you can see the housing. Don’t yank insulation away blindly. Wiring, junction boxes, and support bars are usually nearby.
Look for these clues:
Practical rule: If you haven’t verified the rating on the fixture itself, treat the light as non-IC until proven otherwise.
Homeowners sometimes tell me, “They’re LED now, so they should be fine.” The bulb type doesn’t automatically change the housing rating. An old can with a newer LED retrofit trim is still an old can unless the fixture assembly itself is rated for insulation contact and airtight performance.
The same goes for remodel work. One room may have newer IC cans while another still has older non-IC fixtures. Mixed fixture types are common, especially in homes that have had kitchen remodels, additions, or piecemeal electrical updates.
Here’s the simplest explanation:
| Fixture type | Can insulation touch it | What you do next |
|---|---|---|
| IC-rated | Yes | Air-seal it well, then insulate correctly |
| Non-IC | No | Build or install a fire-rated enclosure and maintain clearance |
| Unknown | Assume no | Verify label before proceeding |
If you only remember one thing, remember this: the safest project starts with identification, not materials.
Insulation and air sealing are related, but they’re not the same job. Insulation slows heat transfer. Air sealing stops movement. Around recessed lights, both matter, and one without the other leaves performance on the table.
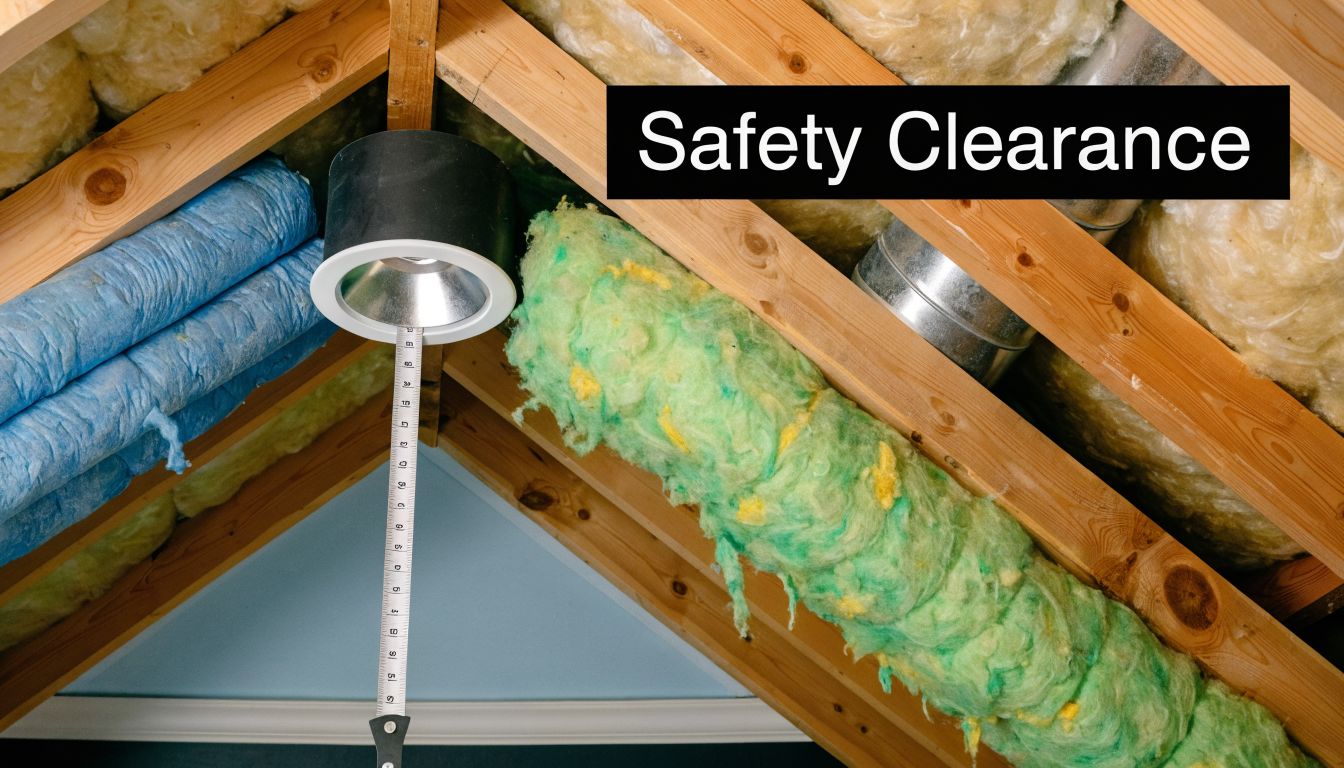
For non-IC fixtures, PNNL guidance on insulating and air sealing existing non-ICAT recessed lights requires a fire-rated enclosure with at least 3 inches of clearance. That same guidance notes that inadequate clearance can lead to a 20-30% thermal overload risk, and skipping air sealing retains 50-70% of the original energy loss.
That’s the trade-off homeowners often miss. You can preserve safety but still lose performance if the enclosure isn’t sealed to the drywall plane. The can is protected, but the hole in the ceiling still leaks.
Air seal first. If air can move, the fixture will still behave like a leak point even after you add insulation around it.
That applies to both fixture types. With non-IC lights, the cover or box creates the safety zone. With IC-rated lights, the housing may be safe for insulation contact, but the perimeter and penetrations can still leak attic air.
Common material options each solve a different part of the problem:
Store-bought batts stuffed around a light rarely fix the underlying issue. They may add some thermal resistance, but they don’t stop leakage paths around the can, wiring penetrations, or the drywall cutout.
Closed-cell foam, used correctly and with the right clearances or covers, gives a tighter, longer-lasting seal than loose-fill alone. Fire ratings still matter, especially around older fixtures. If you’re comparing materials, it helps to understand how insulation fire ratings affect fixture safety.
A good install treats the recessed light as part of the ceiling air barrier, not just a lighting fixture.
The right material depends on one question first. Are you working around non-IC cans that need separation, or IC-rated cans that need tighter air control? Once that’s clear, the tool and material choices make a lot more sense.

For older non-IC fixtures, a commercial fire-rated cover is usually the cleanest option. Products such as TiteShell or Tenmat are designed for this kind of retrofit. They preserve the safety clearance and give you something solid to air-seal at the base.
A site-built gypsum enclosure can work too if it’s made correctly. The problem is consistency. Homemade boxes often end up out of square, poorly sealed around wiring, or built from the wrong material. That’s where DIY jobs drift from “careful” into “risky.”
According to this recessed light insulation guide from This Old House, commercial covers like TiteShell installed and sealed with low-expansion spray foam achieved a 98% airtight seal in blower door tests, reducing leakage from 10-20 CFM50 to less than 1 CFM50 per fixture.
A serious can-light sealing job usually calls for:
A quick visual on tools and layout helps before you start:

Canned foam from a home center is useful. It’s just not magic. It works well for sealing the base of a cover, the drywall joint, or small penetrations around wiring. It is not the right move to bury a non-IC can in foam or to fill the entire cavity around a hot fixture.
Professional closed-cell spray foam is different. It creates a more continuous air seal and handles irregular gaps better than batt insulation or loose fill. In South Florida, that matters because the problem isn’t only heat flow. It’s also moist air migration into the ceiling assembly.
If you want to insulate around can lights for both efficiency and moisture control, closed-cell foam paired with the right cover is usually the strongest system. The cover handles the fixture safety issue. The foam handles the air leakage and supports a tighter envelope around the penetration.
That combination is why some attic jobs hold up and some don’t. A fluffy insulation layer over a leaky fixture may look finished. A sealed, protected, code-conscious assembly performs better long after the installer leaves.
Most national guides treat can lights like an energy leak only. In South Florida, that’s incomplete. A leaky recessed light can also move humid attic air into the ceiling assembly and living space. That’s where comfort complaints turn into staining, rust, and mold concerns.

Hot humid air behaves differently than dry heat. When it finds a pathway through a recessed light opening, it can hit cooler surfaces around the fixture or drywall. That’s when you start seeing discoloration near trim rings, damp insulation, or rusty hardware around the can.
The often-missed advantage of closed-cell foam in this climate comes from moisture control. In this discussion of can light insulation in humid conditions, closed-cell spray foam used around a covered can light is noted for acting as a vapor barrier and cutting moisture intrusion by 30-40% compared to other methods, helping prevent condensation that can lead to mold.
For IC-rated fixtures, the sequence is straightforward:
For non-IC fixtures, don’t shortcut the process:
In South Florida attics, the goal isn’t only to keep heat out. It’s to stop damp air from using the light opening as a travel lane.
The weak points are predictable. An unsealed wire notch in the cover. Gaps at the base where the cover meets textured drywall. Foam applied sloppily so the cover lifts instead of sealing. These aren’t cosmetic mistakes. They leave a pathway for air and moisture.
If your home has musty rooms, supply vents sweating, or repeated ceiling staining near recessed lights, humidity control should be part of the repair plan from the start.
A good can-light insulation job is less about speed and more about sequence. If you skip prep, use the wrong cover, or insulate before sealing, you’ll redo the work later. The cleanest results come from treating each fixture as its own small air-sealing project.
Shut off power to the lighting circuit before you start. From the attic, pull back existing insulation carefully until the drywall around each fixture is visible. You need room to inspect the housing, locate the label, and see how wires and support bars enter the area.
Have your materials ready before moving from fixture to fixture. That usually means cover units or gypsum components, low-expansion foam, sealant if needed, a knife, and PPE. If you’re planning broader attic improvements, it also helps to understand how pros approach sealing attic air leaks across the full attic floor.
This is the path where safety matters most. Non-IC cans need a fire-rated enclosure and clear separation from insulation.
Use this workflow:
The common mistake here is assuming the box alone solves the problem. It doesn’t. The box creates safe clearance. The seal at the base is what stops airflow.
Field note: If the cover shifts when foam expands, pull it, trim the foam, and reset it. A crooked cover leaks.
IC-rated fixtures are more forgiving, but they still need attention. You can insulate against the housing if the label confirms that rating, but first check the drywall cutout and any visible leakage paths.
A careful install usually includes:
For batt insulation, cut around the fixture so the insulation fits snugly instead of bunching up. For blown material, make sure coverage stays even and the fixture location remains visible if future service is needed.
Before you call it done, inspect each fixture from both sides if possible. From the attic, the enclosure or sealed fixture should sit tight to the ceiling plane with no obvious bypasses. From inside the home, the trim should sit flat and clean without gaps that pull attic dust.
A simple final checklist helps:
| Checkpoint | What you want to see |
|---|---|
| Fixture rating confirmed | IC or non-IC identified before insulation |
| Safety clearance preserved | Non-IC fixtures fully separated from insulation |
| Perimeter sealed | No visible gaps at drywall, framing, or wire entries |
| Insulation restored | Even coverage without compression or contact violations |
A competent homeowner can handle a small number of accessible fixtures if the labels are readable, the wiring is in good shape, and the attic allows safe movement. Patience matters more than speed.
When the attic is crowded, the housings are corroded, or the labels can’t be verified, the project gets harder fast. That’s usually the point where repair work, electrical evaluation, or a full retrofit becomes the better call.
Some can-light jobs are straightforward. Others involve old wiring, mixed fixture types, or moisture problems that go well beyond the light itself. The trick is knowing which one you have before you spend a weekend in the attic.
Can I just cover every recessed light and blow insulation over it?
No. If any fixture is non-IC, it needs the right fire-rated enclosure and clearance. If you don’t know the fixture type, verify it first.
Is insulating around the lights enough to lower bills?
It helps, but it’s only one part of attic performance. As noted in this guide to recessed light insulation and covers, properly insulating can lights can reduce energy loss by up to 30%, while the EPA estimate cited there says thorough air sealing can lead to average savings of 15% on heating and cooling costs.
When should I stop and call a pro?
Call for help if you find brittle wiring, signs of arcing, rusty housings, staining on drywall, or a large number of fixtures spread across the attic. Also call if you’re considering replacing old cans with modern airtight fixtures.
Don’t ask only, “Can someone insulate around can lights?” Ask, “Will they address the whole ceiling leakage path?” The best result usually comes from looking at the attic as a system, not a set of isolated fixtures.
If you’re comparing options, it helps to start with local air sealing contractors who understand attic leakage in South Florida homes. That gives you a clearer idea of whether you need a targeted repair, a full air-sealing package, or a fixture retrofit.
If you want a professional assessment of recessed lights, attic leakage, and humidity control, Airtight Spray Foam Insulation serves homeowners across South Florida with practical recommendations and precise installation. Request a free estimate to find out whether your can lights need sealing, enclosures, upgraded insulation, or a more complete attic solution.