Blog
Understanding Spray Foam Cure Time in South Florida
Spray foam usually becomes tack-free in 5 to 60 minutes, but the full spray foam cure time that matters for safety, re-entry, and performance typically takes 8 to 24 hours. In South Florida, humidity, substrate conditions, and lift thickness can stretch or complicate that window, so the foam may look finished long before the job is ready for people or follow-on trades.
If you're standing in a house, attic, garage, or commercial shell watching fresh foam rise and harden, the first question is usually simple. When can we get back in, and when can the next trade start? The short answer is that you can't judge it by appearance alone.
Fresh spray foam doesn't "dry" like paint. It cures through a chemical reaction. That distinction matters because a surface can stop feeling sticky well before the interior has fully set and before the air has cleared enough for safe re-occupancy.
In South Florida, that gap between "looks done" and "is done" matters on real job sites every day. Roof schedules, drywall timing, HVAC startup, tenant turnover, and homeowner move-ins all depend on understanding cure time correctly.
Why Spray Foam Cure Time Is More Than Just Waiting
A lot of project delays start with the wrong assumption. Someone sees the foam expand, sees the surface skin over, and figures the insulation phase is over. It isn't.
Spray foam cure time is part chemistry, part jobsite control, and part safety planning. The foam changes fast at the surface, but the full reaction keeps moving through the material after application. That's why timing affects more than convenience.
Dry to the touch isn't the same as cured
Homeowners often use the word dry because that's the closest everyday comparison. Contractors sometimes do it too. But on a spray foam job, "dry" misses the true point.
What matters is whether the foam has moved through its cure stages well enough for:
- Safe re-entry for occupants and workers
- Stable adhesion to the substrate
- Reliable trimming and covering
- Normal sequencing for drywall, roofing, or other trades
If any of that happens too early, the job can get messy fast. Foam can be disturbed before it's ready. Odors can linger longer than expected. Other trades may start working around material that hasn't fully stabilized.
Practical rule: Treat cure time as a quality-control checkpoint, not dead time on the schedule.
Why this matters more in South Florida
South Florida projects don't happen in a vacuum. Heat builds quickly. Humidity changes by the hour. Attics, roof decks, block walls, and metal assemblies all behave differently. That means cure time isn't just a factory number. It's a field condition.
On a busy residential remodel or commercial build-out, every hour matters. If the foam isn't ready, drywall crews wait. If re-entry is rushed, occupants may return before the space has been ventilated properly. If lift thickness isn't planned well, the outside may look ready while the inner mass still needs time.
That's why experienced installers don't just ask how many square feet need foam. They ask what the substrate is, how thick the lifts will be, what time of day the work is happening, and how the building will be ventilated afterward.
The Three Stages of Curing From Application to Full Set
The easiest way to understand spray foam curing is to think about baking. A cake can look set on top while the middle still needs time. Spray foam behaves in a similar way. The outside changes first, and the interior finishes later.
Industry and EPA guidance describe a broad cure pattern where spray foam becomes tack-free in about 5 to 60 minutes, while full cure usually takes 8 to 24 hours depending on the product and jobsite conditions. The EPA also notes that some manufacturers recommend 24 hours before worker re-entry without PPE for two-component professional systems, which shows that re-entry guidance can be more conservative than the basic cure window (spray polyurethane foam FAQ from the Spray Polyurethane Foam Alliance).
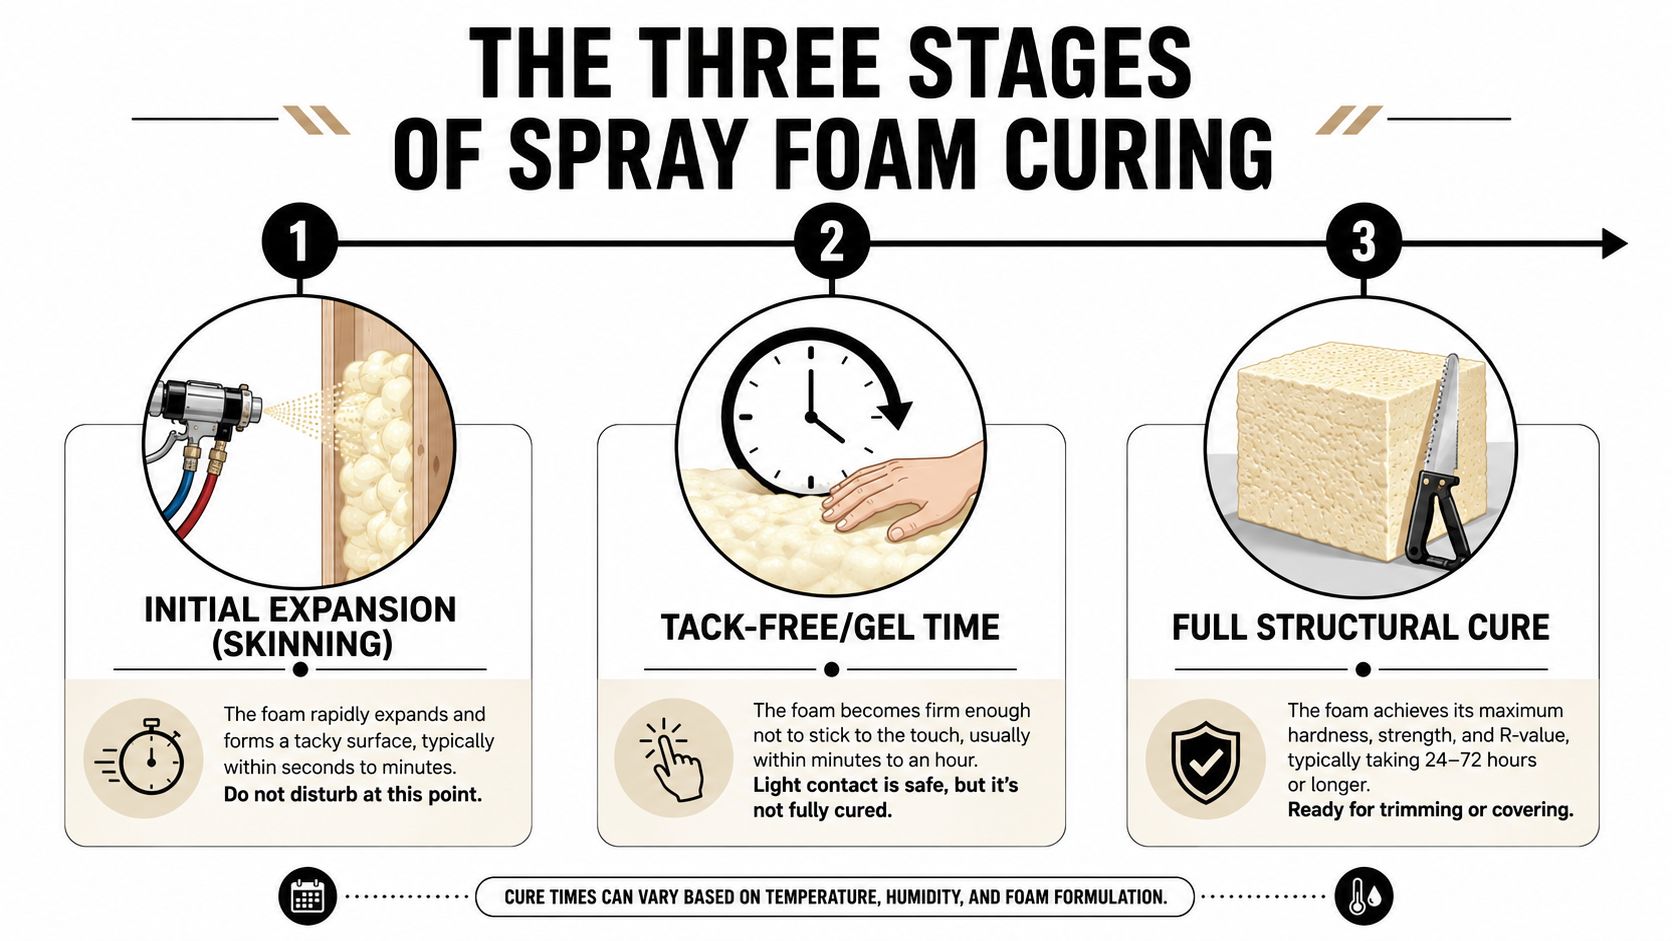
Stage one: initial expansion and skinning
Right after application, the foam expands rapidly and starts forming a surface skin. This is the phase where it changes appearance the fastest. To an untrained eye, it can seem like the hard part is over.
It isn't ready for contact yet. The reaction is active, the foam is still changing shape, and disturbing it at this stage can affect the final result.
This is also where installers watch closely for signs that conditions are off. Surface behavior can reveal whether temperature, mixing, or substrate conditions are helping the foam cure correctly.
Stage two: tack-free and workable
Once the surface is no longer sticky, people often assume the material is cured. That's the most common misunderstanding on site. Tack-free only tells you the surface has advanced. It doesn't tell you the full thickness is finished.
At this stage, the foam may be firm enough for light contact or for planning the next move, but it still needs time before you treat it as a completed assembly. Depending on the product and conditions, this middle phase is where trimming decisions and sequencing calls have to be made carefully.
Foam that feels finished on the outside can still be curing inside. That's why schedule decisions should follow the cure stage, not the appearance.
Stage three: full cure and stabilization
Full cure is the point that matters most for performance and safety. This is when the chemical reaction has run its course, the material has stabilized, and the foam is ready for the next permanent step in the assembly.
That can include trimming, covering, or turning the space back over to the homeowner, tenant, or another trade. In practical terms, this is also the point where off-gassing concerns and re-entry planning matter most.
A good installer thinks about these three stages separately. That prevents the two biggest mistakes in the field: touching the foam too soon and closing up the assembly too soon.
Comparing Cure Times Open-Cell vs Closed-Cell Foam
Open-cell and closed-cell foam don't just look different after installation. They cure on different timelines because they have different densities and behave differently in the assembly.
In simple terms, open-cell foam is lighter and more forgiving in many interior applications. Closed-cell foam is denser, more rigid, and often chosen where strength, moisture control, or tighter assemblies matter more. That denser structure is one reason it generally takes longer to fully cure.
One industry FAQ reports that open-cell foam may be tack-free in 20 to 30 minutes, reach handling strength in 1 to 2 hours, and fully cure in 8 to 12 hours. The same source says closed-cell foam may take 45 to 60 minutes to become tack-free, 3 to 4 hours to reach handling strength, and 16 to 24 hours to fully cure. It also notes that a 2-inch closed-cell application can require 24 to 48 hours to fully set, compared with 8 to 12 hours for a half-inch layer, which shows how strongly thickness changes the schedule (open-cell and closed-cell cure-time comparison).
Cure time comparison table
| Curing Stage | Open-Cell Foam (Typical) | Closed-Cell Foam (Typical) |
|---|---|---|
| Tack-free | 20 to 30 minutes | 45 to 60 minutes |
| Handling strength | 1 to 2 hours | 3 to 4 hours |
| Full cure | 8 to 12 hours | 16 to 24 hours |
| Thicker application impact | Less delay in lighter lifts | 2-inch application can require 24 to 48 hours |
What these differences mean on the job
For a contractor, this isn't academic. It affects the entire sequence.
If you're insulating an interior wall cavity where speed and sound control matter, open-cell may fit the assembly and the schedule better. If you're working on a roof deck, exterior wall, or another area where a denser foam layer is part of the design strategy, closed-cell's longer cure time is usually a trade-off worth planning around.
That doesn't mean one is "better" in every case. It means the cure profile needs to match the project.
For homeowners trying to sort out the two materials, this breakdown of closed-cell vs open-cell spray foam helps connect foam type to how the assembly is supposed to perform.
Why closed-cell often demands more patience
Closed-cell foam rewards careful scheduling. It creates a tougher, more rigid layer, but you can't rush the chemistry that gets it there. On South Florida roofs and walls, that matters because dense foam is often being asked to do more than just insulate. It's part of the air and moisture control strategy.
That means the crew has to think beyond "when can we touch it?" and ask "when is this assembly ready to be enclosed or turned over?" Those are different questions.
Five Key Factors That Alter Spray Foam Cure Time
No manufacturer label can tell you exactly how every South Florida job will cure. The chemistry reacts on site, not on paper. The installer has to manage the variables.
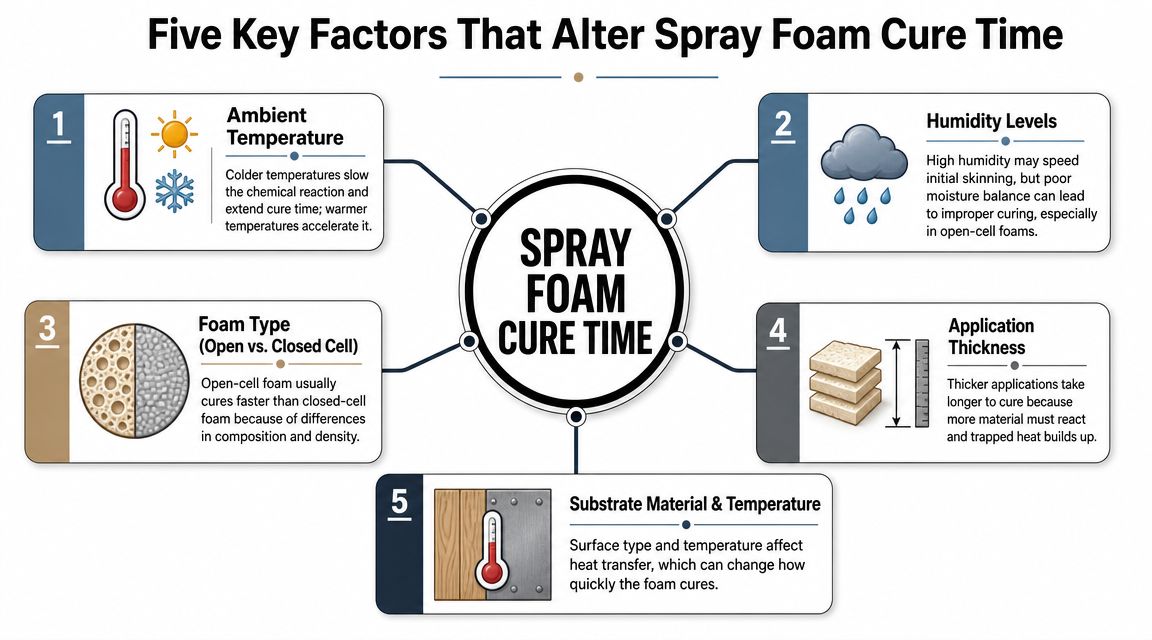
Temperature changes reaction speed
Both the air temperature and the surface temperature matter. A warm attic, hot roof deck, or sun-baked wall can change how quickly the foam reacts when it hits the substrate. A cooler surface can slow that same reaction down.
This is why experienced crews check more than the thermostat reading. The substrate is where the foam bonds, so if the deck or wall is running hotter or cooler than the surrounding air, the cure profile changes with it.
Humidity changes how the foam behaves
South Florida installers live with humidity every day. Moisture in the air can affect skinning, expansion, and the overall cure pattern. It can make the job look like it's moving quickly at the surface while still creating conditions that need close monitoring.
Open-cell products are especially sensitive to environmental balance. Even when the foam appears to set fast, the surrounding conditions can still affect how cleanly the application cures and how predictable the finish will be.
A short explanation of the process can help if you want to see how installers think through setup and application before spraying begins.
Thickness changes everything
This is one of the biggest field realities. Foam cures from the outside inward, so thicker lifts take longer than thinner ones. The thicker the application, the more important planning becomes.
That matters because installers don't just spray until the cavity is full and hope for the best. They plan lift thickness so the foam can cure correctly through its full depth.
Substrate type matters more than most people think
Wood, masonry, metal, and concrete don't absorb or release heat the same way. They also don't hold moisture the same way. That means the same foam product can behave differently from one substrate to another.
A metal building in South Florida is a good example. Metal responds quickly to sun exposure and can swing in temperature fast. A block wall or concrete surface behaves differently. The installer has to adapt.
Foam chemistry is product-specific
Not all spray foam products react at the same speed or under the same ideal conditions. Formulation differences affect how the foam expands, how quickly it skins, and how long it needs before it's stable.
That doesn't mean one product is automatically superior. It means crews need to know the chemistry they're spraying and match the setup to the product.
Field note: The best cure times come from controlled conditions, proper lift planning, and crews who adjust in real time instead of spraying every job the same way.
Special Guidance for South Florida Insulation Projects
South Florida isn't a forgiving environment for sloppy spray foam work. Heat, daily humidity swings, salt air near the coast, and tight construction schedules all put pressure on the installer to get the chemistry right the first time.
That pressure shows up in real ways. Builders want the next trade moving. Homeowners want the house back. Property managers want turnover to stay on schedule. But local conditions don't care about the schedule board.
Why local conditions create scheduling risk
In this climate, a foam job isn't just an insulation task. It's a sequencing decision. If the building can't be safely re-occupied when expected, everything behind it can shift. Drywall, painting, electrical trim-out, final cleaning, and owner handoff can all get pushed.
That's one reason larger renovation and construction teams often think about insulation work alongside risk planning. On projects where timeline disruptions can trigger broader financial exposure, a practical resource like this Florida builder's risk insurance guide can help owners and contractors understand how delays and site issues fit into the bigger picture.
What smart South Florida installers do differently
Good local crews don't treat cure time as a fixed promise. They build the day around conditions.
That often means:
- Watching the substrate, not just the forecast: A roof deck under direct sun can behave very differently from a shaded wall.
- Timing the work window carefully: Some installations go better when crews avoid the harshest part of the day.
- Managing ventilation immediately: Air movement after spraying isn't an afterthought. It's part of the job.
- Adjusting for assembly type: Attics, block walls, and metal structures each demand different expectations.
If you want a plain-language look at the installation sequence itself, this guide on how spray foam insulation is applied gives useful context for what happens before, during, and after the spray pass.
Why experience matters more here
A national rule of thumb doesn't solve a South Florida attic at midday. Neither does a generic estimate that assumes every substrate behaves the same. Local success comes from reading the jobsite correctly and staying disciplined when conditions aren't ideal.
That is where bad habits show up. Rushed projects push for early access. Inexperienced crews spray too much thickness in one pass. Someone sees a skinned-over surface and assumes the room is ready. Those decisions don't always fail immediately, but they raise the odds of callbacks, delays, or safety concerns.
South Florida projects reward installers who stay boring in the best possible way. They check conditions, follow lift limits, ventilate properly, and wait until the foam is ready.
Troubleshooting and Safety After Installation
Most post-installation questions come down to two things. Does the foam seem normal, and is it safe to go back in?
Those are good questions, because spray foam can look finished before it's fully ready. Open-cell spray foam may become tack-free within seconds, but full cure commonly takes 8 to 24 hours depending on conditions, and industry guidance treats cure time as the period required for off-gassing to finish before safe re-occupancy (open-cell cure and re-occupancy guidance).
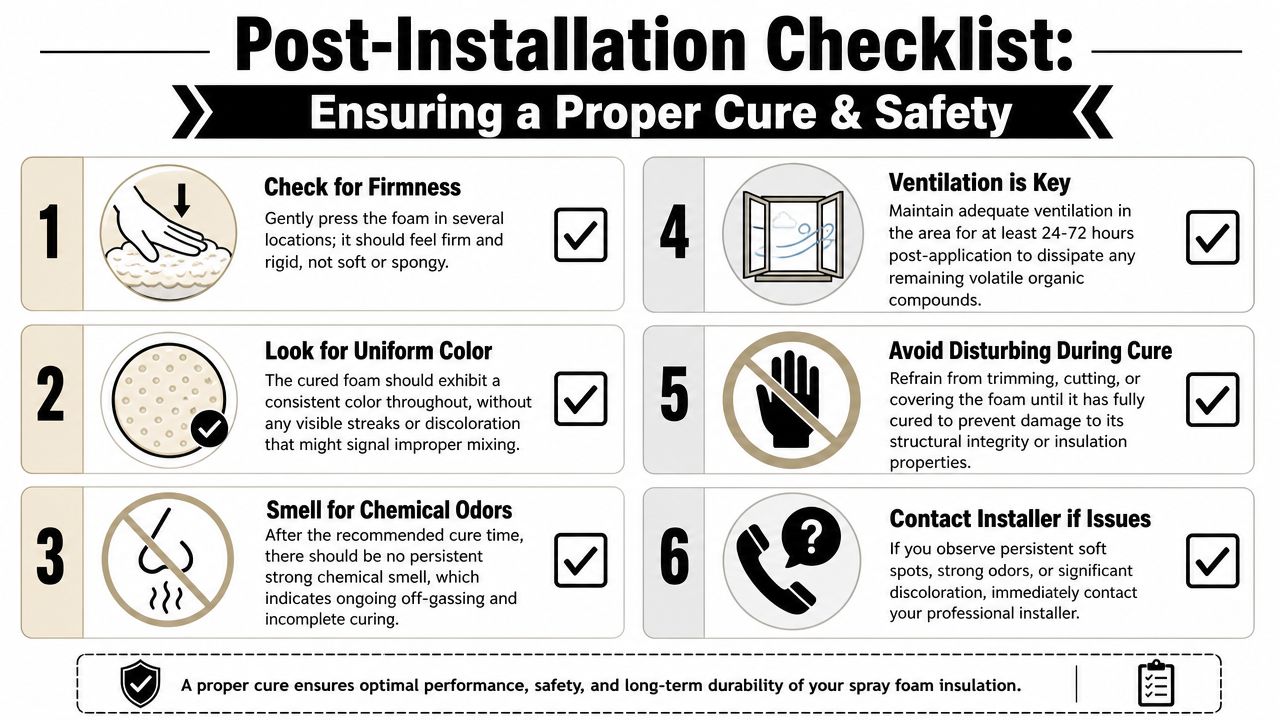
What to check after the crew leaves
You don't need lab equipment to notice obvious red flags. A careful walk-through tells you a lot.
Use a simple checklist:
- Check firmness: Gently press in a few areas. The foam shouldn't feel wet or gummy.
- Look for consistency: The texture and color should appear generally uniform across the sprayed area.
- Pay attention to odor: A strong chemical smell that doesn't ease with proper ventilation deserves a call to the installer.
- Avoid early disturbance: Don't cut, trim, cover, or let other trades lean into the foam too soon.
What doesn't look right
Some issues call for immediate follow-up rather than guesswork.
Examples include:
- Lingering tackiness: This can point to an incomplete cure or an application problem.
- Noticeably soft spots: The foam may not have reacted evenly.
- Strong persistent odor: That can signal the space needs more ventilation or that the application needs to be reviewed.
- Uneven appearance in isolated areas: This may indicate a mixing or substrate-related problem.
If the foam still seems sticky, soft, or unusually strong-smelling after the expected cure window, call the installer before anyone trims it, covers it, or moves back into the space.
Re-entry and ventilation
Re-entry isn't just about whether the foam surface has set. It's also about the air in the building. Ventilation needs to continue until the space is appropriate for normal occupancy, especially after larger professional applications.
That matters for:
- Homeowners and children
- Pets
- Trade crews working without protective gear
- Tenants returning after a turnover
If you're concerned about odors and what normal off-gassing should look like, this overview of spray foam insulation off-gassing is useful background.
When to push pause
Contractors sometimes feel pressure to keep the schedule moving. Homeowners sometimes want to get back in the same day. That pressure is understandable, but this is one point in the project where patience protects everyone.
Don't let anyone cover foam just because it looks hard. Don't assume a room is ready because the smell is "better." And don't accept unresolved soft or sticky areas as normal.
The right response to questionable cure isn't improvisation. It's verification.
If you need guidance on spray foam cure time, re-entry planning, or the right foam system for a South Florida attic, roof, wall, or commercial space, contact Airtight Spray Foam Insulation. They serve homeowners, builders, and property managers across Jupiter, Palm Beach Gardens, West Palm Beach, Wellington, and Stuart with careful installation, clear jobsite communication, and a final walkthrough that helps make sure the foam is ready before the next step begins.