You're standing in a hot South Florida attic, looking at foam on the underside of the roof deck, and the question hits fast, is that foam safe, and is it even allowed to stay exposed? For homeowners, contractors, and property managers, what is thermal barrier comes down to one practical idea, a protective layer that slows heat transfer and, in fire-safe assemblies, buys time for evacuation and response. In spray foam projects, that layer can decide whether an inspection passes, whether a retrofit gets bigger, and whether an attic stays a usable part of the building or becomes a liability.
A thermal barrier is a layer or system that slows heat transfer by limiting conduction, often with low-conductivity materials or reflective surfaces, and building codes give that idea a very specific fire-safety purpose. In the International Building Code, foam plastics must be separated from interior occupied spaces by an approved thermal barrier, and the common benchmark is to keep the foam plastic temperature below 250°F (121°C) for at least 15 minutes after testing begins, because that delay can help slow ignition and reduce heat exposure during a fire (thermal barrier definition and code context).
That matters in real homes because exposed spray foam is never just an insulation question. It is also a fire-safety question, a code question, and often a moisture and durability question. In South Florida, where attics can be brutally hot and buildings face storm-season wear, the right barrier can also make inspections cleaner and cut down on avoidable rework.
For many owners, the concern starts with a simple observation, foam is visible where it probably should not be. Contractors have to look more closely, because the correct answer depends on the exact assembly, how the space is used, and the tested material approved for that location. In practice, that often means choosing between options such as intumescent coatings and gypsum board, with the right choice shaped by access, durability needs, and the assembly details that inspectors will check.
A thermal barrier works like a double-wall coffee mug. The mug keeps a drink hot or cold longer because its walls slow heat transfer, and a building thermal barrier does the same job by making it harder for heat to move quickly through an assembly. The simplest way to understand it is that the goal is less heat transfer, not merely more material.
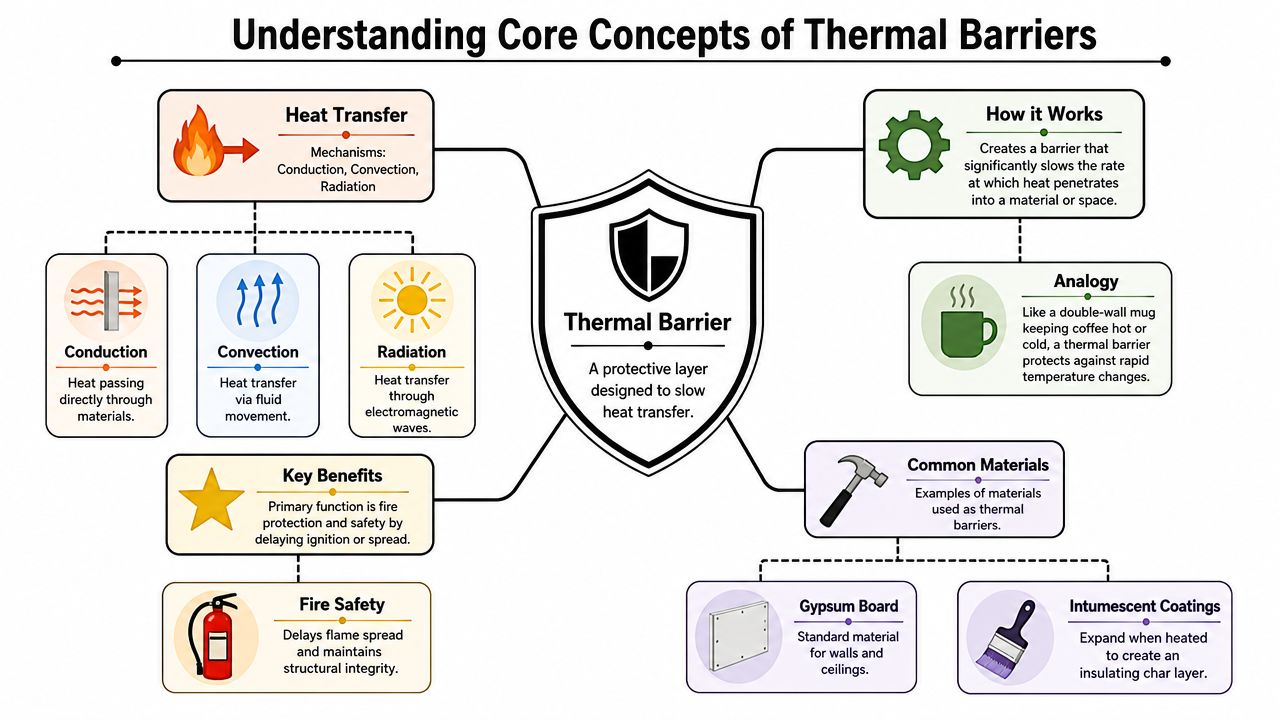
A thermal barrier interrupts the path heat takes through a material. Some barriers rely on low-conductivity materials, some use reflective surfaces, and some combine both in one assembly. In buildings, that can mean an insulation layer, a gypsum layer, or a tested coating system, depending on the assembly and where it is installed.
Practical rule: if the layer keeps heat from getting to the vulnerable material fast enough, it is doing thermal barrier work.
The same basic principle shows up in gas turbines, where thermal barrier coatings protect hot-section parts from extreme heat. Modern TBCs are typically only 100 μm to 2 mm thick, yet they are engineered to maintain a large temperature difference between the coating and the metal beneath it (thermal barrier coating overview). That thin profile is a useful reminder for building work, because protection does not have to be bulky to be effective.
In turbines, these coatings are part of a multilayer system that includes a metal substrate, a bond coat, an oxide layer, and a ceramic topcoat, all working together to protect the component and support higher operating temperatures. In buildings, the same logic applies in a simpler form. The layer is chosen not just for thickness, but for how it performs under heat.
Thermal barriers in buildings often include gypsum board, continuous insulation, and radiant barriers in walls, roofs, and attics. In South Florida, that choice often comes down to how the assembly is built, how much access there is in the attic or wall cavity, and how the material will hold up during inspection and long-term use. A thermal barrier is not one product, it is a function, a layer that slows heat long enough to improve safety and performance.
A thermal barrier slows heat transfer and delays ignition by holding the protected material away from fire exposure for a longer period. An ignition barrier serves a narrower role, it helps resist flame spread or flame penetration in some assemblies, but it does not always meet the same heat-slowing benchmark. That difference matters because homeowners often hear both terms in the same spray foam conversation and assume any fire-rated board or coating can do the same job.
The practical distinction is simple. A thermal barrier works like a heat buffer between the foam and the occupied space, while an ignition barrier is closer to a flame-control layer used in limited assembly types. In buildings where foam plastics are exposed to occupied areas, the thermal barrier requirement is the stricter one because the performance target is tied to limiting temperature rise under fire exposure (IBC thermal barrier performance benchmark).
| Item | Thermal barrier | Ignition barrier |
|---|---|---|
| Main job | Slow heat transfer and delay ignition | Resist flame involvement in certain assemblies |
| Common code context | Foam plastics near occupied spaces | Some concealed or special-use spaces |
| Typical example | 1/2-inch regular gypsum board | Code-listed protective layer or coating for limited conditions |
| Performance focus | Heat delay under fire exposure | Flame control in specific assembly types |
The source of the confusion is easy to see. Both terms appear in spray foam specifications, and both relate to fire safety, so the labels sound close even though the code paths are different. The more important question is not which material sounds fire-resistant, it is which tested assembly matches the actual location, exposure, and use of the space.
A contractor who treats these as interchangeable can fail inspection, and a homeowner can end up paying for a layer that does not satisfy the required code path. In South Florida, that mistake can show up during hurricane repairs, attic retrofits, or other fast-turn projects where the assembly must still pass local review.
For a broader fire-rating reference, a system-specific explanation such as the insulation fire ratings guide helps show how a product is classified before it is installed. Then the barrier choice can be matched to the building condition instead of to a generic fire-safety label.
A contractor can have the right foam product and still fail inspection if the fire-protection layer is wrong. That happens because the code is written around the tested assembly, not just around how solid a material feels in the hand. For foam plastics separated from occupied spaces, the approved thermal barrier has to limit the average temperature rise on the unexposed surface to no more than 250°F after 15 minutes of fire exposure under the ASTM E119/UL 263 curve. That is why many assemblies are described as 15-minute thermal barriers.
The practical test is simple. If the material is only “fire-resistant” in a general sense, that does not prove it belongs in the wall, ceiling, or roof assembly being built. Inspectors want the exact product or system that matches the location and exposure, especially on projects where schedules are tight and weather disruptions can already slow the job down. For homeowners and builders dealing with navigating hurricane risks in Florida, getting the barrier right early helps avoid rework during storm-related repairs or fast-turn retrofit work.
| Material | Thickness | 15-Minute Performance |
|---|---|---|
| Regular gypsum board | 1/2-inch | Commonly accepted as a compliant thermal barrier option |
| Approved assembly-specific alternatives | Varies by tested system | Must meet the 15-minute thermal barrier benchmark |
| Service-space alternatives in some conditions | Varies by code path | Allowed only where the assembly qualifies |
Regular gypsum board is the familiar option because it is widely recognized in code discussions and easy for inspectors to verify. The field question, though, is whether the assembly needs gypsum board, an approved alternative, or a different protective layer altogether. A quick product reference such as the thermal barrier fire-rating overview can help sort out how a material is classified before it goes into the wall.
South Florida projects add another layer of judgment. A wall or roof assembly may be exposed to moisture, storm repairs, or a rushed renovation sequence, so the installer has to confirm the barrier path before the foam is covered. That is why paperwork matters as much as the material itself. If the thermal barrier is part of a tested assembly, the submittal package and the installed layer need to match.
Inspection rule: if the barrier is part of a tested assembly, the paperwork matters as much as the board or coating itself.
Masonry and concrete assemblies can change the answer, since not every surface needs the same protective layer. Some projects use 1/2-inch regular gypsum board as the straightforward choice, while others rely on a listed coating system or another approved assembly when the code path allows it. Intumescent coatings are useful where a thinner finish is needed, because they swell under heat and help protect the foam beneath. Gypsum board is usually easier to identify in the field, easier to inspect, and often simpler to explain to a homeowner who wants a clear, familiar layer. The right choice depends on the exact wall, floor, or roof condition, plus the approval path for that specific assembly.
Spray polyurethane foam, or SPF, often needs a thermal barrier when it is installed in interior rooms or other occupied spaces. The rule depends on where the foam is used and how the assembly is built, so attics and crawl spaces may allow different coverings when they meet the code path for that space. A quick check of spray foam flammability safety facts can help clarify why exposed foam is treated differently from foam that is fully protected.
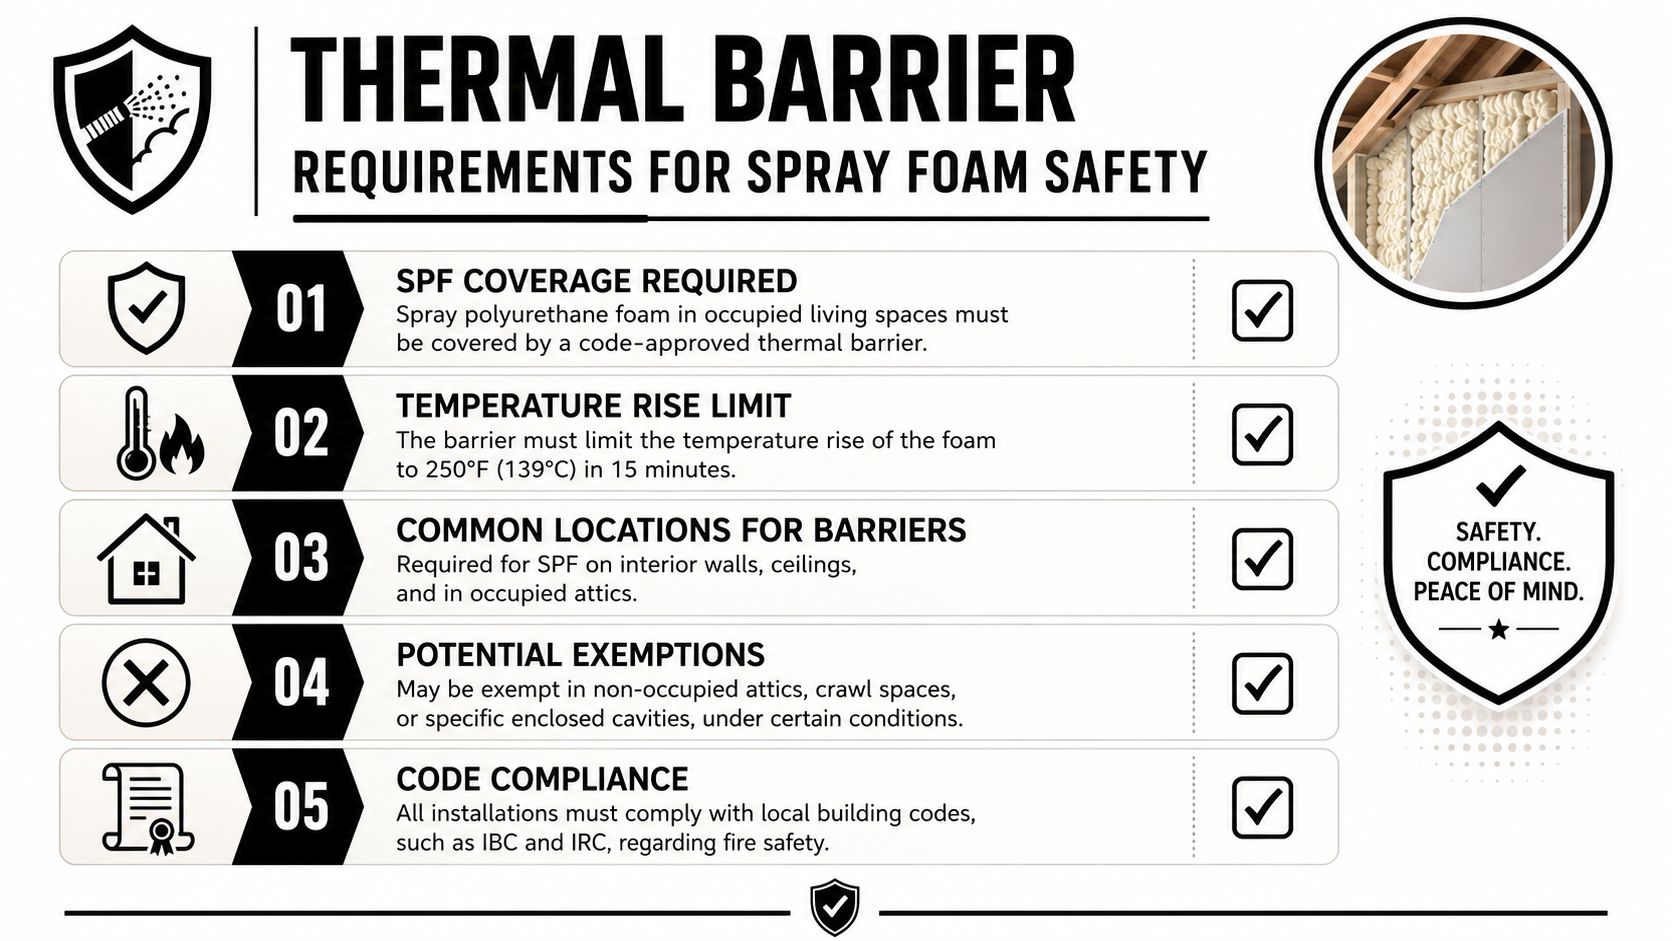
In typical residential work, the barrier shows up on interior walls, ceilings, and other conditioned spaces where spray foam becomes part of the exposed building surface. If the foam sits behind a finished interior layer, that finish may already serve the protective role, but the full assembly still has to be checked carefully.
South Florida projects add a practical wrinkle. A fast renovation, a roof repair, or a moisture-prone assembly can change what should be covered and when, so the installer has to confirm the protection path before the foam is hidden. Paperwork matters as much as the material itself. If the thermal barrier is part of a tested assembly, the submittal package and the installed layer need to match.
Inspection rule: if the barrier is part of a tested assembly, the paperwork matters as much as the board or coating itself.
Masonry and concrete assemblies can change the answer, since not every surface needs the same protective layer. Some projects use 1/2-inch regular gypsum board as the straightforward choice, while others rely on a listed coating system or another approved assembly when the code path allows it. Intumescent coatings help where a thinner finish is needed, because they swell under heat and help shield the foam below. Gypsum board is usually easier to identify in the field, easier to inspect, and easier to explain to a homeowner who wants a familiar layer they can see and understand. The right choice depends on the wall, floor, or roof condition, plus the approval path for that specific assembly.
A simple field check helps catch problems before they turn into callbacks. If a section of foam is visible after the finish trades leave, the job likely needs another look.
For homeowners, the question is straightforward. If spray foam is visible where people live, work, or regularly access the space, ask whether that exposure is allowed. For contractors, documenting the barrier choice and confirming the exact assembly before finishing work reduces inspection friction and helps avoid rework later.
A contractor comparing gypsum board and intumescent coating is usually balancing three things, available space, finish expectations, and the order of work on site. Gypsum board is the familiar path because it creates a solid, inspectable layer that many crews already know how to install. Intumescent coatings fit better when the assembly needs to stay thin or when the shape is irregular and a full board layer would be difficult to fit cleanly. Thin protective layers can still perform well when they are part of a tested assembly, as shown in the broader concept of thermal barrier coating overview.
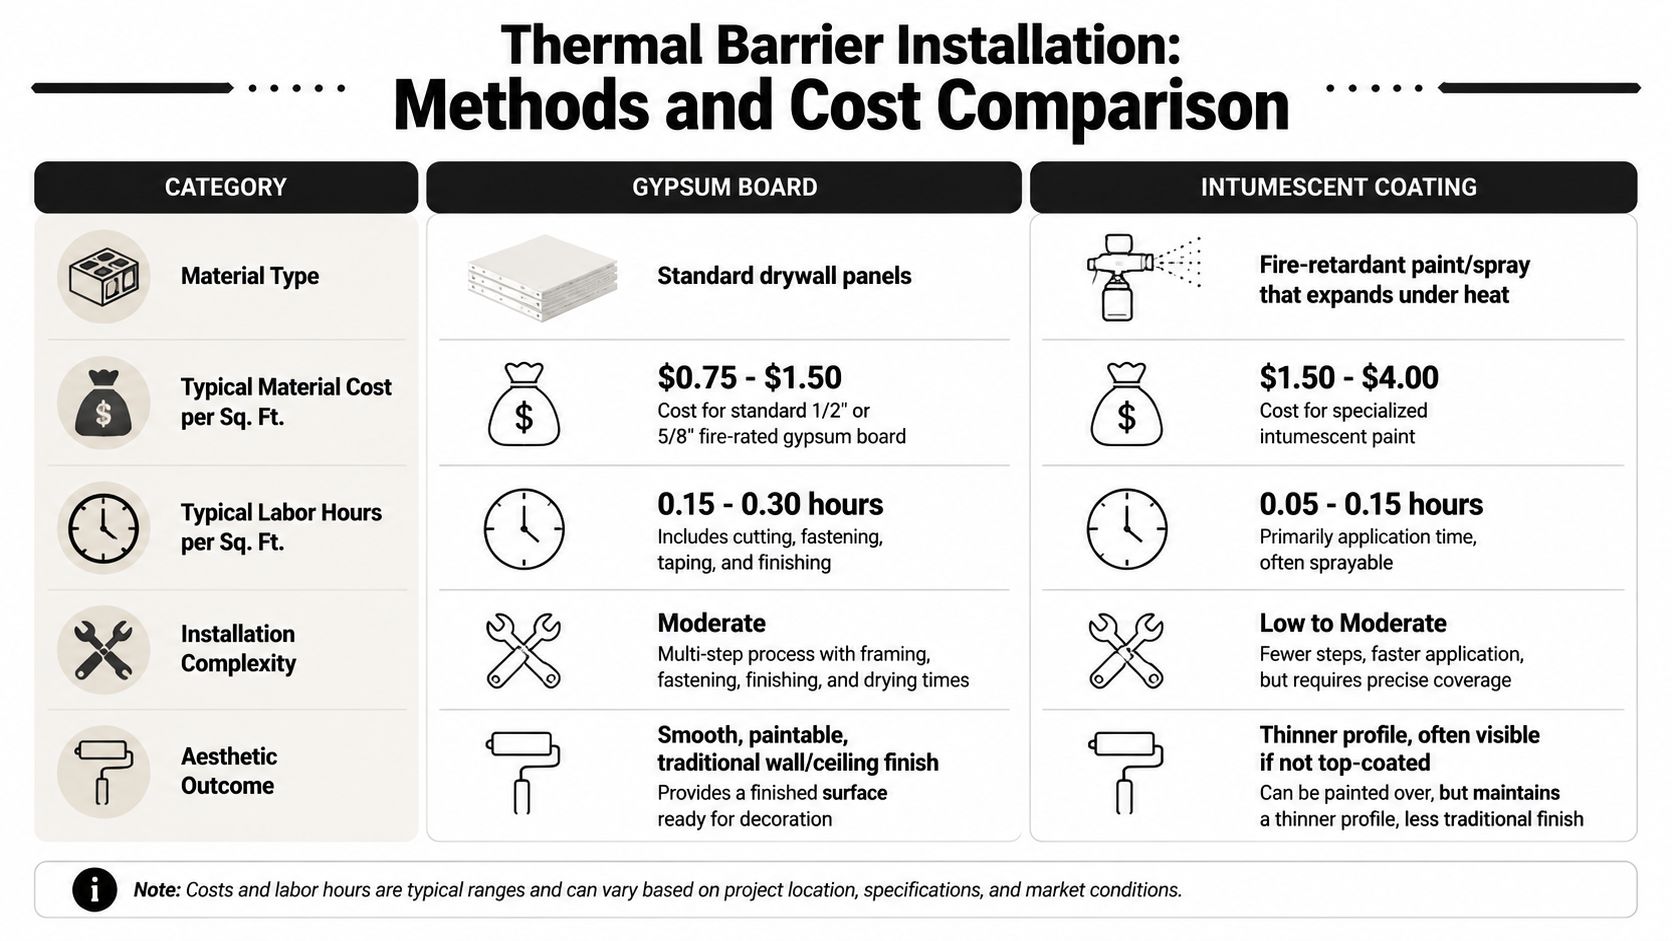
| Category | Gypsum Board | Intumescent Coating |
|---|---|---|
| Material type | Standard drywall panels | Fire-retardant paint or spray that expands under heat |
| Typical material cost per sq. ft. | $0.75 to $1.50 | $1.50 to $4.00 |
| Typical labor hours per sq. ft. | 0.15 to 0.30 hours | 0.05 to 0.15 hours |
| Installation complexity | Moderate | Low to moderate |
| Aesthetic outcome | Smooth, paintable, traditional finish | Thinner profile, may remain visible without topcoat |
Gypsum board has the advantage of familiarity. Crews know how to cut it, fasten it, tape it, and finish it, so it works well on walls and ceilings that already need a standard interior surface. For a homeowner, it is easy to understand because it looks like the rest of the finished house.
That familiarity comes with tradeoffs. Gypsum board uses more depth than a spray-applied coating, and it asks for more finish work. In crowded spaces with framing changes, rooflines, or many penetrations, those extra steps can slow the job and make the barrier harder to fit neatly.
Intumescent coatings are a better fit when the project needs to preserve space or follow an uneven shape. The material is applied directly to the protected surface, so the assembly can stay thinner and avoid some of the framing adjustments that board installation may require. Under heat, the coating expands and helps shield the foam below, which is why it is used in tested protective systems.
Coverage still has to be treated carefully. A missed spot, thin pass, or skipped edge can reduce the protection of the whole assembly, so field quality matters just as much as material choice. Contractors should verify the selected product, confirm the required thickness or coverage for the exact assembly, and check whether the finish will stay exposed or receive a topcoat.
For bids, the useful questions are simple. Which barrier matches the specific wall, ceiling, or roof condition, how will coverage be checked, and what finish work is still required after the barrier goes on. A comparison chart detailing the material costs, labor hours, and installation requirements for gypsum board versus intumescent coating. helps make the tradeoffs plain, and contractors who work with spray foam can also coordinate the barrier choice with the foam system and the room finish requirements, including teams such as Airtight Spray Foam Insulation.
South Florida adds a few pressures that generic guides usually skip. Humidity, fast-moving weather, and inspection timing all make the barrier decision more than a line-item on a proposal. In some South Florida projects, code exceptions for certain masonry or concrete assemblies are overlooked, and understanding them can reduce retrofit scope and inspection delays (South Florida code nuance).
A practical example comes up in a West Palm Beach attic where a homeowner wants to keep the roofline tight but still pass final inspection. If the foam is part of a qualified masonry or concrete assembly, the barrier path may differ from a conventional framed attic, so the installer has to verify the exact condition before closing anything up. That's where local experience matters, because the wrong assumption can add unnecessary drywall work or trigger a failed inspection.
For South Florida owners, moisture and scheduling are tied together. Rainy-season work, curing windows, and the sequence of barrier installation all need to line up so the foam is protected before the finish trades move on. A separate resource on spray foam cure time can help set expectations for when the assembly should be ready for the next step.
Local rule of thumb: the most expensive barrier is the one added after the inspector has already flagged exposed foam.
Homeowners in Jupiter, Palm Beach Gardens, Wellington, and Stuart usually want one thing from the process, a clean finish that doesn't create a code problem later. Contractors want the same thing for a different reason, because a barrier mismatch slows down closeout and eats labor. The smartest move is to verify the assembly early, confirm whether an exception applies, and make sure the chosen layer matches the exact location where the foam was installed.
A thermal barrier is more than a sheet of material. It's a tested, code-relevant layer that slows heat transfer, protects foam plastics in occupied spaces, and helps keep spray foam assemblies safe and inspectable. In practice, the right choice depends on the assembly, the location, and whether the finish needs to be gypsum board, an approved coating, or one of the code-recognized alternatives.
A simple project checklist helps keep things on track.
When you're ready to move forward, the safest route is to choose the barrier with the assembly, not against it. If you're planning spray foam work in South Florida, bring the barrier decision into the project early so the install, the inspection, and the finish all line up cleanly.
A CTA for Airtight Spray Foam Insulation.