Blog
What Causes Ice Damming On Roofs? Prevention & Solutions
Winter roofs often send the same warning before they leak. Long icicles hang off the eaves. Snow stays put on the upper roof, but the edge looks glossy and wet. Then a brown ceiling stain appears, usually near an outside wall or around a light fixture.
That sequence fools a lot of people because the visible ice is outside while the actual problem starts inside. An ice dam isn't just frozen runoff. It's a sign that the house is losing heat unevenly, the roof surface isn't staying at one temperature, and meltwater has found a place to refreeze and pile up.
For homeowners, that means wet ceilings, peeling paint, soaked insulation, and the kind of hidden wood damage that keeps getting worse after the snow melts. For contractors and property managers, it means a building-envelope problem, not just a roof maintenance problem. If you only knock the ice off, clear a gutter, or install a cable without dealing with heat flow and air leakage, you're often treating the symptom and leaving the cause in place.
A lot of advice about what causes ice damming on roofs stops at simple lists. The better way to look at it is as a system failure involving heat, air, moisture, roof geometry, and drainage. Once you see that system clearly, the fixes make more sense. Some methods buy time. A few reduce risk. The permanent solution comes from controlling the roof temperature by stopping air leakage and limiting heat transfer at the assembly itself.
Introduction The Unwelcome Winter Guest on Your Roof
It usually starts with something that looks harmless. A homeowner notices thick icicles along one side of the house and assumes they're just part of winter. A day later, the paint near the top of a wall starts to bubble. Soon after, a ceiling stain shows up in a bedroom that was perfectly dry in the fall.
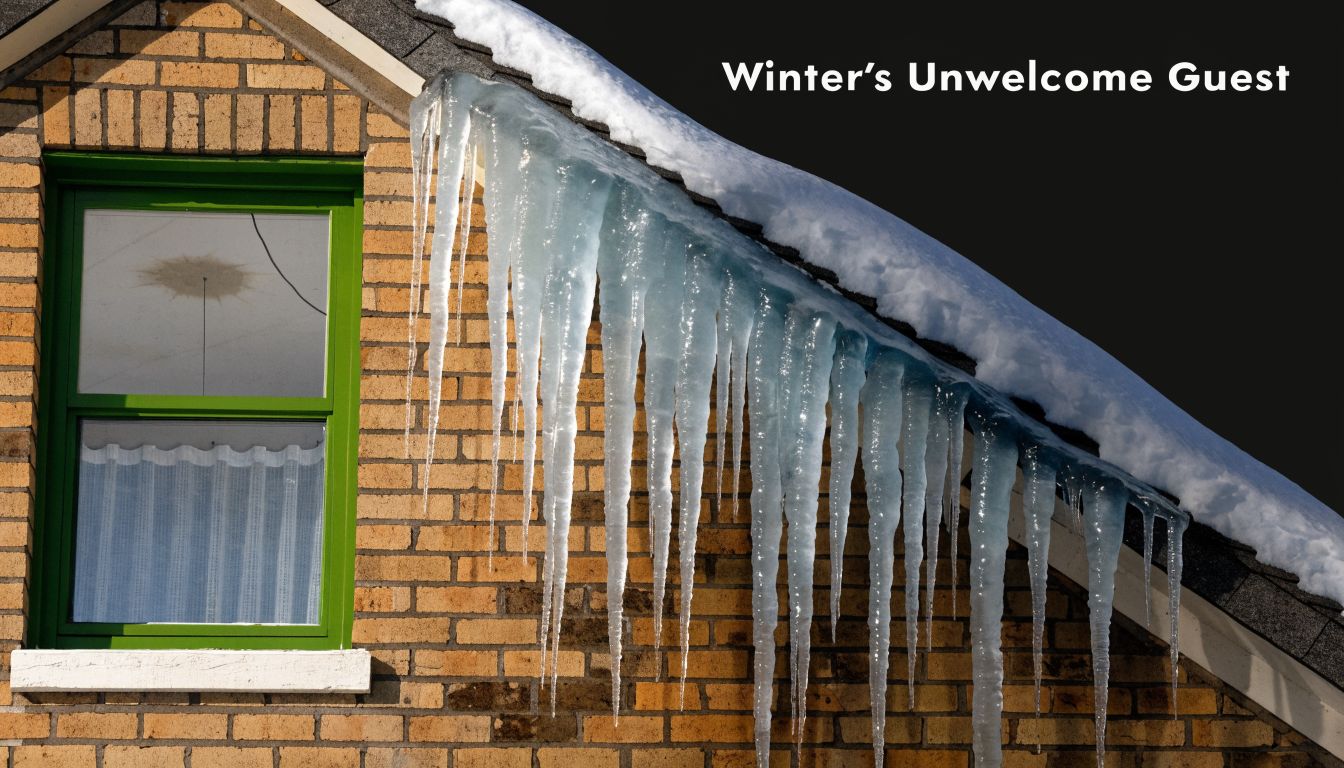
That's the moment people realize an ice dam isn't decorative. It's destructive. Water gets trapped behind the ridge of ice at the eave, then works backward under shingles and into the roof assembly. Once it's inside, it doesn't need a big opening. It uses tiny imperfections such as overlaps, fastener penetrations, and other weak points in the roofing system.
The damage rarely stays limited to one surface. Wet insulation loses performance. Wood stays damp longer than it should. Interior finishes start showing distress in places that don't look related to the roofline at first glance.
Ice dams are one of the clearest signs that a house isn't managing heat where it should.
The mistake I see most often is treating the ice as the primary problem. It isn't. The ice is the evidence. The underlying issue is a roof that's warm in some areas and cold in others, with enough snow cover and enough freezing weather to turn that imbalance into a leak path.
A useful guide has to do more than say "add insulation" or "clean the gutters." You need to know how the dam forms, where the building is failing, how to spot those failures early, and which fixes solve the physics instead of hiding it for one season.
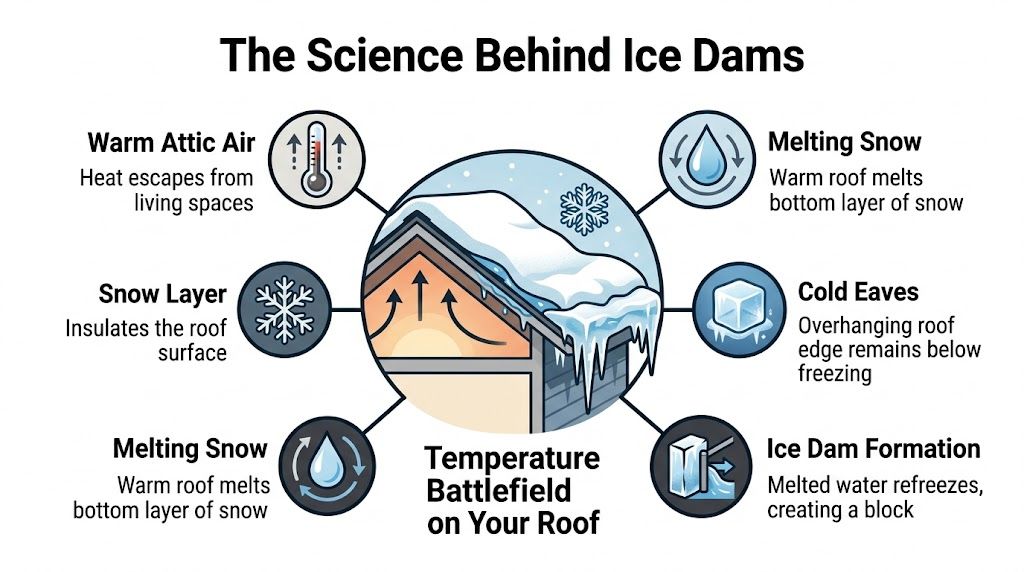
The Science Behind Ice Dams A Battle of Hot and Cold
An ice dam forms when the roof becomes a temperature battlefield. One part of the roof is warm enough to melt snow. Another part is cold enough to freeze that water again. The dam is the frozen line where those two zones meet.
Uneven roof temperature is the trigger
According to the University of Minnesota Extension on dealing with and preventing ice dams, ice dams develop when snow sits on the roof, upper roof sections average above 32°F (0°C) and create meltwater, while lower sections such as eaves and overhangs stay below 32°F, where that water refreezes. The same guidance notes that eaves are often 10 to 20°F cooler because they don't have heat beneath the overhang.
That temperature split is the whole game. If the roof deck stayed uniformly cold, the snow would stay snow. If the roof stayed uniformly warm, you would have other problems, but not this melt-refreeze ridge at the edge. Ice dams require a mixed condition.
Heat moves in three ways
Homeowners usually think only about insulation, which addresses conduction. That's part of it, but not the whole story.
Conduction is heat moving through materials. Heat from the house moves through the ceiling, into the attic, and then through the roof deck.
Convection is the bigger troublemaker in many homes. Warm indoor air leaks through bypasses around recessed lights, attic hatches, wiring penetrations, duct chases, and top plates. If you want a simple next step, start by learning how to seal attic air leaks.
Radiation also plays a role, especially when warm surfaces in the attic transfer heat to nearby materials, but air leakage is often what turns a manageable attic into a roof-melting machine.
Practical rule: Ice dams don't need a bad roof to start. They need a roof with uneven temperatures.
Snow makes the problem worse
Snow isn't just the thing that melts. It also acts like a blanket. Once snow accumulates on the roof, it slows heat loss to the outside. That lets the upper roof area stay warm enough to melt from below while the exposed eaves remain colder.
The University of Minnesota Extension notes that backed-up water can enter through flaws such as nail holes or shingle overlaps, at rates of up to several gallons per melt cycle, and that wet insulation can lose 20 to 50% of its R-value as it gets saturated.
Air leakage changes everything
The same University of Minnesota Extension guidance notes that even homes with R-30 attic insulation can still develop ice dams if air leakage exceeds 0.35 ACH at 50 Pa, because conductive heat loss by itself isn't the only driver. Stack effect pushes warm, moist air upward through ceiling bypasses and can raise roof deck temperatures by 20 to 40°F above ambient.
That last point is more significant than commonly understood. A roof doesn't need uniformly poor insulation to create a dam. It only needs enough concentrated heat loss in key areas to create warm channels under the snowpack.
A durable fix aims for a blower door result below 0.25 ACH50, along with air sealing that keeps attic temperatures within 5°F of outdoors, which the same source associates with preventing 90% of heat-driven melting in northern climates. That is why the best solutions focus on the building envelope, not just the shingles.
Top 5 Culprits That Cause Ice Damming on Your Roof
Most ice dams come from the same handful of building failures. The visible ice may show up at the gutter, but the chain of events usually begins with heat escaping into the roof assembly and a roof edge cold enough to refreeze runoff.
Attic air leaks
This is the biggest offender.
Warm indoor air escapes upward because stack effect is always trying to move heat to the top of the building. The RetroFoam explanation of what causes ice dams on roofs notes that poor attic air sealing and ventilation can account for up to 30 to 50% of total home heat loss via attics, and that indoor air at 70°F+ can leak into attics and warm upper roof surfaces enough to melt snow when roof temperatures reach 33 to 40°F.
The leak points are usually ordinary details:
- Recessed lights: Older can lights can leak surprising amounts of warm air into the attic.
- Attic hatches: If the panel isn't gasketed and insulated, it behaves like a hole in the ceiling.
- Plumbing and wiring penetrations: Small openings around pipes and cables add up fast.
- Dropped soffits and chases: These often connect wall cavities directly to the attic.
If the house leaks air, the roof pays for it.
Insulation that looks adequate but isn't doing the job
A thick attic doesn't always mean a well-performing attic. Gaps, compression, wind washing, and missed corners reduce real-world performance. Insulation slows conductive heat flow, but it doesn't stop moving air unless it's paired with proper air sealing.
The result is a common false sense of security. The attic may have plenty of fluffy material on the floor, yet warm air still bypasses it through holes and cracks. That's why an attic can still melt snow unevenly even when it appears insulated.
Poor ventilation balance
Ventilation can't fix a leaky ceiling plane, but poor ventilation still makes ice dam conditions worse.
The RetroFoam source notes that even R-49 insulation can fail to prevent damming if ventilation is below the 1/150 ratio per IRC R806. It also recommends balanced ridge and soffit venting with a 1:1 intake-to-exhaust relationship and using infrared thermography to look for less than a 10°F delta across decking.
When soffit vents are blocked by insulation, or when exhaust venting overwhelms intake, the attic doesn't stay consistently cold. Hot spots develop. Snow melts in patches. The roof edge refreezes that runoff.
Roof design that traps snow and complicates drainage
Some roof shapes are less forgiving.
Valleys collect snow. Dormers create intersections and dead zones. Transitions between heated and unheated sections can create abrupt temperature changes. Long overhangs make the edge of the roof colder than the field above it.
The RetroFoam source notes that roofs with eave overhangs greater than 12 inches are 2 to 3 times more prone to ice dam issues without peel-and-stick ice barriers, and identifies membranes meeting ASTM D1970 with 70-mil SBS-modified bitumen extending 24 to 36 inches inside walls as the protective specification.
Those membranes help with leak protection. They do not solve the underlying heat imbalance.
Clogged gutters and downspouts
Gutters don't cause every ice dam, but they can make a bad situation worse in a hurry.
The same RetroFoam source reports that clogged gutters with more than 2 inches of debris can initiate dams 70% faster during day-to-night swings greater than 20°F. It also notes ice buildup can reach 60 lbs per cubic foot and distort fascia by 1 to 2 inches.
If your gutters are packed with leaves, needles, or roof granules, meltwater slows down right where the roof is already coldest. That's why seasonal maintenance matters. If you're dealing with overflow, sagging sections, or repeated winter blockages, scheduling professional gutter cleaning is one of the simplest ways to reduce one contributing factor before the first freeze.
Gutters are rarely the root cause. They are often the accelerant.
Identifying the Warning Signs A Diagnostic Checklist
You can usually spot ice dam risk before water starts dripping through the ceiling. The trick is to look for patterns, not just isolated symptoms. A home detective pays attention to where the clues concentrate.
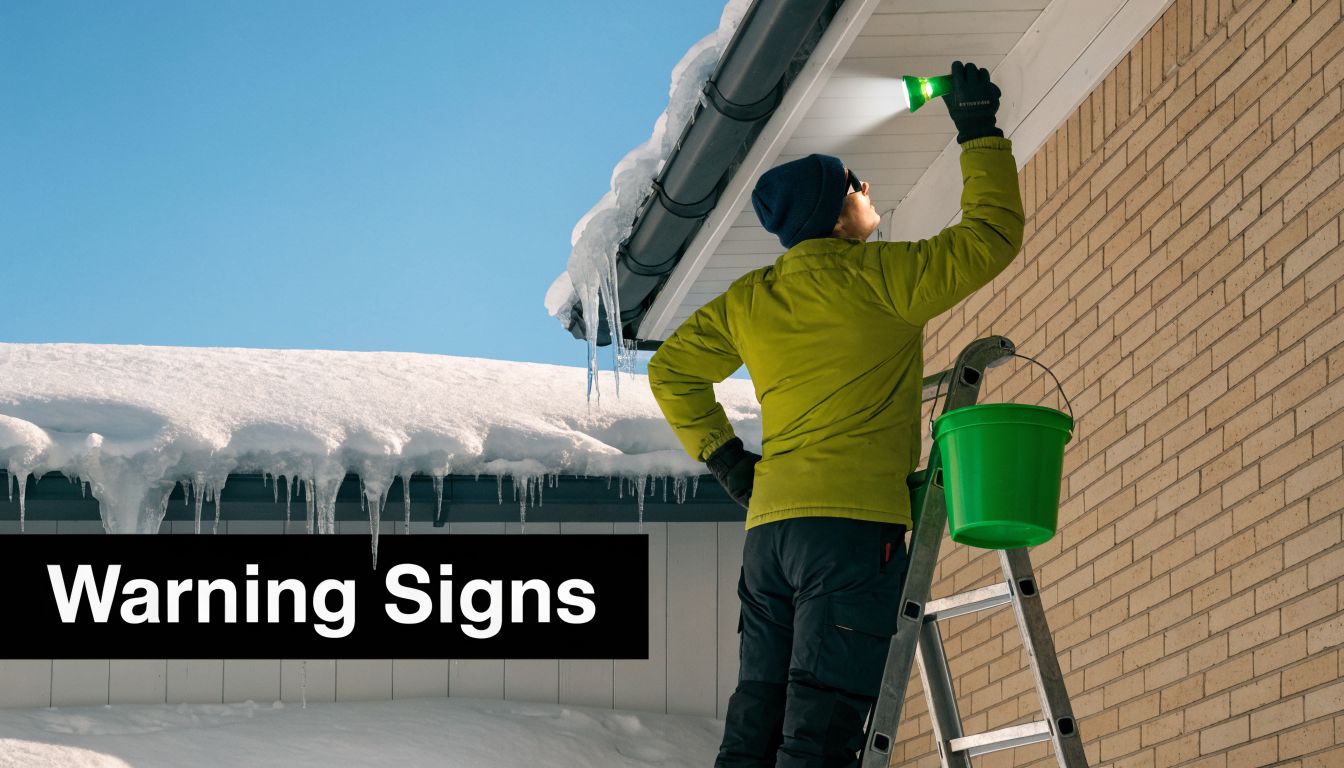
Outside clues on the roofline
Walk the perimeter from the ground and look up.
- Icicles concentrated in one area: A few small icicles aren't unusual. Thick, repeated buildup over one section usually points to localized heat loss.
- A sharp snow line: If one roof area is bare or thin while nearby sections still hold snow, the roof surface isn't staying at a consistent temperature.
- Ice visible behind the gutter edge: That often means water is backing up, not draining cleanly.
- Heavy buildup at valleys or dormers: Complex intersections tend to reveal where snow and runoff are getting trapped first.
Clues inside the house and attic
Some of the strongest warning signs show up indoors before the roof leak becomes obvious.
- Ceiling stains near exterior walls: Backed-up water often travels farther than people expect before it appears.
- Peeling paint or lifted trim near the roofline: Moisture may be moving through the wall assembly.
- Musty smells in upper rooms: Damp materials can hold odor before visible staining appears.
- Frost or dampness in attic insulation: That points to warm, moist interior air reaching cold attic surfaces.
If you want to move beyond guesswork, a blower door test is one of the best diagnostic tools. It helps identify where the building is leaking air so you can fix the actual pathways warming the roof.
A simple field checklist
Use this when you're deciding whether the problem is minor maintenance or a deeper building-envelope issue.
| What you observe | What it usually suggests |
|---|---|
| Icicles only on one elevation | Localized heat loss or poor ventilation in that section |
| Repeated winter stains in the same room | Recurring backup at the eave above |
| Wet insulation near the perimeter | Water intrusion from an exterior ice ridge |
| Ice-packed gutters plus overflow | Drainage is restricted and worsening refreeze |
| Snow melting unevenly above living space | Heat is escaping into the roof assembly |
If the same roof edge ices over every winter, don't call it a weather problem. Call it a repeatable building problem.
The Permanent Fix How Spray Foam Insulation Stops Ice Dams
Temporary fixes remove ice. Permanent fixes remove the conditions that made the ice possible. That's why spray foam has become such a powerful tool in roofs and attics with chronic ice dam issues. It addresses the two drivers that matter most: air leakage and heat transfer.

It turns a leaky assembly into a controlled one
Traditional attic approaches often rely on a patchwork of materials. Caulk here. Batts there. Loose-fill on the floor. Vent chutes at the eaves. That can work when detailing is excellent, but many attics aren't simple enough for a perfect patchwork.
Spray foam changes the geometry of the problem because it conforms to irregular framing, penetrations, transitions, and hard-to-reach roof connections. Instead of trying to block heat and air with multiple disconnected pieces, it creates a more continuous barrier.
That matters because ice dams don't need the whole roof to fail. They only need a few warm zones. A monolithic air barrier reduces those hot spots.
Why air sealing matters more than people think
Most homeowners ask about R-value first. Contractors who deal with recurring ice dams learn that air control is usually the first battle to win.
When warm air escapes into an attic or roof cavity, it carries heat and moisture with it. That warms the underside of the roof deck in concentrated streaks and pockets. Fiberglass and cellulose can slow conductive loss, but neither one is an air barrier by itself. If moving air can bypass the insulation layer, the roof can still warm unevenly.
Spray foam solves that in a direct way. Applied correctly, it seals around penetrations, framing joints, top plates, and awkward transitions that other insulation systems struggle to address cleanly.
Open-cell and closed-cell aren't interchangeable
Both foam types can help, but they do different jobs.
Open-cell spray foam
Open-cell foam is especially strong as an air barrier. It expands aggressively, fills irregular voids well, and does an excellent job limiting the convective heat movement that drives many attic-related ice dam problems.
It's often a strong fit when the assembly needs effective air sealing and the design allows for that material choice. In practical terms, open-cell foam helps stop warm indoor air from sneaking into roof cavities and creating melt channels under the snow.
Closed-cell spray foam
Closed-cell foam adds several layers of control at once. It provides an air barrier, a higher R-value per inch, and moisture resistance that makes it useful in assemblies where space is limited or conditions are more demanding.
If you're comparing systems in more detail, this overview of how spray foam insulation works gives a clear explanation of the material behavior and where each type fits.
Closed-cell foam is particularly useful in unvented attic designs, cathedral ceilings, and rooflines where you need a compact layer doing multiple jobs at once.
Conditioned attics change the whole strategy
A vented attic tries to keep the attic cold by separating it from the living space below. That can work well when the ceiling plane is thoroughly air sealed and the ventilation is balanced.
A conditioned attic changes the approach. Instead of insulating the attic floor and venting the attic to the exterior, the thermal and air boundary move to the roofline. The attic becomes part of the controlled building envelope.
That has major advantages in difficult roof assemblies:
- Complex framing: Foam handles hips, valleys, dormers, and transitions better than cut-and-fit materials.
- Mechanical equipment in the attic: Ducts and air handlers perform better when they aren't sitting in an extreme environment.
- Persistent bypasses: The roofline can often be sealed more reliably than an old, chopped-up attic floor.
Here's a useful visual on the application side.
What works and what doesn't
A lot of products reduce symptoms without fixing the system.
What works long term
- Continuous air sealing at the roofline or ceiling plane: This is the heart of the solution.
- Spray foam in assemblies with many penetrations or hard-to-seal geometry: It handles irregularity better than layered patch jobs.
- Designing the attic as part of the building envelope when conditions call for it: That reduces the temperature swings that start the melt-refreeze cycle.
What doesn't solve the root cause
- Heat cables alone: They create drainage paths but don't stop heat loss into the roof.
- Extra insulation without air sealing: This can help, but warm air will still bypass weak spots.
- Repeated ice removal every winter: Necessary in emergencies, but not a strategy.
A roof stops forming ice dams when it stops having warm and cold patches in the wrong places.
The big trade-off is cost and scope. Spray foam is not the cheapest short-term option. It usually requires a professional installer, careful prep, and a building-science mindset. But when the goal is to stop chronic ice damming, not just survive another winter, it's one of the few upgrades that attacks the root cause directly.
Other Prevention and Remediation Strategies
Not every response to ice dams needs to be a full roofline retrofit. Some tactics are useful right now when the dam is already there. Others help reduce risk as part of a broader roof and attic strategy. The key is knowing which ones are emergency measures, which ones are supporting details, and which ones people tend to overestimate.
If the ice dam is already on the roof
Start with safety. Roofs are slippery, ladders are unstable in winter conditions, and chipping at ice can damage shingles and flashing fast.
A roof rake is usually the safest homeowner tool for immediate relief because it lets you pull snow off the lower roof from the ground. The goal isn't to scrape the roof clean. It's to reduce the snow feeding the meltwater behind the dam.
Steam removal is the professional option when the buildup is severe or active leaking has started. It removes the ice without the mechanical damage that often comes from hammers, chisels, or axes. It's a remediation method, not a prevention method.
Long-term measures that help
Some conventional upgrades absolutely have value. They just work best when they're coordinated.
Conventional insulation upgrades
Adding fiberglass or cellulose can improve thermal resistance, especially where the attic floor is underinsulated. But if the ceiling plane still leaks air, added insulation alone won't deliver its full benefit. Think of it as a thicker sweater on a house that still has open windows.
Ventilation improvements
Balanced soffit and ridge venting help maintain a colder, more even roof deck in vented attic assemblies. This matters most after the major bypasses have been sealed. Ventilation is a control layer, not a substitute for air sealing.
Ice and water shield membranes
These products are leak-defense materials. They don't prevent the dam itself, but they can reduce interior water damage when backup occurs. On reroof projects in cold regions, they're often a smart part of the assembly.
Heat cables
Heat cables can open drainage channels at chronic problem spots, especially at eaves, valleys, and gutter transitions. They are useful in difficult conditions, but they're still a workaround. The house continues losing heat. The cable manages the consequences.
Where gutters fit in
Gutters deserve attention because they can accelerate the problem, especially when debris blocks drainage before winter. If you want a practical overview focused specifically on preventing ice dams in gutters, that resource lays out the maintenance side well.
The important distinction is this: clear gutters improve water movement at the roof edge, but they don't correct the heat imbalance higher on the roof. That's why a perfectly cleaned gutter can still end up full of ice if the attic or roof assembly is leaking heat.
A realistic ranking of these options
| Method | Best use | Limitation |
|---|---|---|
| Roof rake | Immediate snow reduction near eaves | Temporary and weather-dependent |
| Steam removal | Safe professional ice removal | Doesn't prevent recurrence |
| More fiberglass or cellulose | Improves thermal resistance | Needs air sealing to work well |
| Ventilation upgrades | Supports cold roof performance | Won't fix a leaky attic floor |
| Ice and water shield | Limits leak damage | Doesn't stop dams from forming |
| Heat cables | Creates melt channels | Ongoing energy use, symptom control |
The best results come from treating the roof as part of the building envelope, not as an isolated exterior surface.
DIY vs Pro A Decision Guide for Ice Dam Solutions
Some ice dam tasks are realistic for a careful homeowner. Others aren't worth the safety risk or the chance of making the building perform worse. The dividing line isn't just skill. It's whether the job affects the roof assembly, the air barrier, or the structural durability of the house.
What homeowners can usually handle
Routine observation, basic maintenance, and low-risk snow management are often reasonable DIY territory. That includes visual inspection from the ground, keeping gutters from filling with seasonal debris, and using a roof rake according to the manufacturer's guidance.
Those tasks don't require redesigning the building. They reduce contributing factors and buy time.
What usually belongs with a professional
The moment you get into whole-attic air sealing, spray foam installation, roof ventilation redesign, or recurring leak diagnosis, the job stops being simple maintenance. At that point you're dealing with building science, moisture management, material compatibility, and safety.
Missteps here can create hidden condensation, block intended airflow paths, or trap moisture where it shouldn't be. A roof can look fixed from the outside while the assembly gets worse from the inside.
Ice Dam Solutions DIY or Hire a Professional
| Task | Typical DIY Cost | Professional Cost | Key Considerations & Recommendation |
|---|---|---|---|
| Ground-level visual inspection | Low | Moderate | Good DIY task if you stay off the roof and document where ice and icicles repeat. |
| Roof raking from the ground | Low to moderate | Moderate | Reasonable DIY if conditions are safe and you can avoid damaging shingles. Don't work from a ladder. |
| Basic gutter cleaning on an accessible low roof | Low to moderate | Moderate | DIY only when access is safe. If the home is multi-story, steep, or icy, hire a pro. |
| Emergency steam removal | Not practical | Higher | Professional only. This is specialized equipment work on a hazardous surface. |
| Adding fiberglass or cellulose in a simple attic | Moderate | Moderate to higher | DIY can work in open attics, but only after air leaks are identified and sealed correctly. |
| Air sealing attic bypasses | Moderate | Moderate to higher | Better with a pro if the attic is complex. Missing bypasses is common. |
| Ventilation corrections | Moderate | Higher | Best left to a professional who can evaluate intake, exhaust, and blockage conditions together. |
| Spray foam installation | Not recommended | Higher | Professional only. Material performance depends on design, prep, thickness, and application quality. |
| Diagnosing chronic recurring ice dams | Low to start | Moderate to higher | Hire a pro when the same areas fail every winter. Repetition usually means a system issue, not a maintenance issue. |
The more a task affects the air barrier or roof assembly, the less forgiving it becomes as a DIY project.
Conclusion Build a Roof That Works for You Not Against You
Ice dams form when the roof stops behaving as one system. Heat leaks out. Snow insulates the warm roof surface. Meltwater runs to a colder eave and freezes. Then water backs up into places it was never supposed to reach.
That means the right question isn't just what causes ice damming on roofs. The better question is where the building is losing control of heat and air. Once you frame it that way, the path forward gets clearer.
Short-term measures have their place. Roof rakes, steam removal, gutter maintenance, membranes, and ventilation improvements can all help in the right context. But recurring ice dams usually point to a deeper problem in the attic or roof assembly. Permanent prevention comes from controlling air movement and stabilizing roof temperature, not from fighting the same ridge of ice every winter.
If your home or property keeps developing ice at the eaves, stop treating it like a seasonal annoyance. Treat it like a building-envelope defect and solve it at the source.
If you want a long-term fix instead of another winter workaround, Airtight Spray Foam Insulation can evaluate the roof and attic as a complete system. Their team installs open-cell and closed-cell spray foam with a focus on air sealing, moisture control, and durable building performance. Request a free quote to find out whether a sealed, conditioned attic is the right answer for your property.