
If you're standing in a garage, crawl space, or utility area in South Florida and noticing musty smells, damp floor edges, or rooms that never seem to stay comfortable, the rim joist may be part of the problem. It's one of the most overlooked parts of the building envelope, and in this climate, overlooked areas usually turn into expensive ones.
Rim joists sit at the outer edge of the floor framing, right above the foundation wall. In older homes, they're often stuffed with fiberglass or left partly exposed around pipes, wiring, and framing joints. That might look finished from a distance, but it rarely performs well against humid air, air leakage, and the small moisture problems that build up slowly in coastal homes.
The rim joist is the band of framing that closes off the ends of your floor joists where the wood structure meets the foundation. In practical terms, it's the strip around the perimeter of the house where outside conditions can leak into the floor system. In South Florida, that means humid air, salt-heavy air near the coast, and warm outdoor conditions pressing against cooler interior surfaces for much of the year.
Homeowners usually find rim joist problems indirectly. They feel warm floors near exterior walls, spot staining on baseboards, or notice a musty smell that seems stronger near corners of the house. The cavity itself is hidden, so the symptoms show up first.
Rim joists tend to have multiple weak points packed into a narrow area:
That last point is where many homes go wrong. Fiberglass batts in a rim joist cavity can look fine and still allow humid air to move behind and around them. In South Florida, moving humid air is often the bigger issue.
According to EPA insulation and air sealing methodology, homeowners can save an average of 15% on heating and cooling costs by adding insulation and air sealing at rim joists, with blower door tests showing infiltration reductions up to 19.3%.
Practical rule: If insulation doesn't also control air movement at the rim joist, it usually won't solve the comfort or moisture problem for long.
For homeowners trying to understand what proper sealing looks like in the field, this guide to rim joist air sealing methods shows the assembly details that matter most.
Mild winters don't make this area less important. They change the priorities. Up north, people focus on heat loss first. Here, the bigger concerns are indoor humidity control, condensation risk at cool surfaces, and keeping outside air from feeding moldy cavities.
A leaky rim joist also creates easy pathways for insects and can hide early wood damage. Once that cavity is sealed correctly, the house usually feels less drafty around the floor line, and the HVAC system isn't fighting as much uncontrolled air movement.
Material choice at the rim joist isn't just about R-value. In South Florida, the right product also needs to deal with humidity, irregular framing, and the clutter of fasteners, pipes, and odd gaps often found in rim joist bays.
Closed-cell spray foam is usually the benchmark because it insulates and seals at the same time. Other materials can work, but they need tighter detailing and they leave more room for installation mistakes.
Oak Ridge research, summarized in this rim joist spray foam overview, shows that 2–3 inches of closed-cell spray foam delivers R-13 to R-20 and cuts conductive heat loss by 85%, outperforming open-cell foam's R-3.5 to R-3.8 per inch.
That matters in South Florida because Climate Zones 1–2 require R-13 at rim joists, and closed-cell can reach that target in the thickness range commonly used in these cavities. It also conforms to uneven surfaces better than board products.
If you're weighing foam types, this breakdown of open-cell vs. closed-cell foam is useful because it explains why the cheaper option isn't always the right one in humid assemblies.
| Material | R-Value per Inch | Required Thickness | Air Barrier | Vapor Barrier | Cost Range |
|---|---|---|---|---|---|
| Closed-cell spray foam | R-6 to R-7 per inch | Often suited to reaching the Zone 1–2 rim joist target within typical cavity depth | Yes | Yes | Higher |
| Open-cell spray foam | R-3.5 to R-3.8 per inch | Needs more depth to approach the same thermal level | Yes | No | Moderate |
| Rigid foam board | Not specified in verified data | Depends on product and cut quality | Can be, if edges are fully sealed | Depends on product | Moderate |
| Fiberglass batt with sealed backing | Not specified in verified data | Depends on batt selection and air-sealing details | No, not by itself | No | Lower |
Closed-cell spray foam handles awkward cavities well. It adheres to the rim board, joist ends, sill plate, and small cracks, so it solves several problems in one pass. The downside is cost and the need for proper application. Bad spray technique leaves voids, and overexpansion can create trimming and finish issues.
Open-cell spray foam air seals, but it doesn't bring the same moisture resistance. In a South Florida rim joist, that matters. This isn't the place to prioritize softness or lower upfront cost over assembly control.
Rigid foam board can work for skilled DIYers. It's a reasonable option when access is good and the joist bays are square enough to cut accurately. The weak point is always the perimeter. If the board fits loosely or the edges aren't sealed tightly, the whole assembly performs like a patchwork.
Fiberglass batts are the material I see misused most often in rim joists. They can be part of a system if there's a true air barrier behind them, but a batt pushed into the cavity alone is not a reliable solution for South Florida humidity.
If the cavity is uneven, cluttered, or already shows signs of moisture staining, the material that seals best usually wins over the material that's cheapest on day one.
For South Florida homes, the decision usually comes down to two practical paths:
What usually doesn't work is mixing low-detail installation with a high-humidity climate. Rim joist insulation is one of those jobs where the assembly is only as good as its gaps.
Most insulation failures start before the insulation goes in. If the rim joist area is dusty, damp, termite-damaged, or leaking at the sill, even a good material won't perform the way it should.
A proper prep job starts with access and visibility. Remove stored items, old scraps, loose batt insulation, and anything blocking the perimeter. You need to see the wood, the concrete, and every penetration.
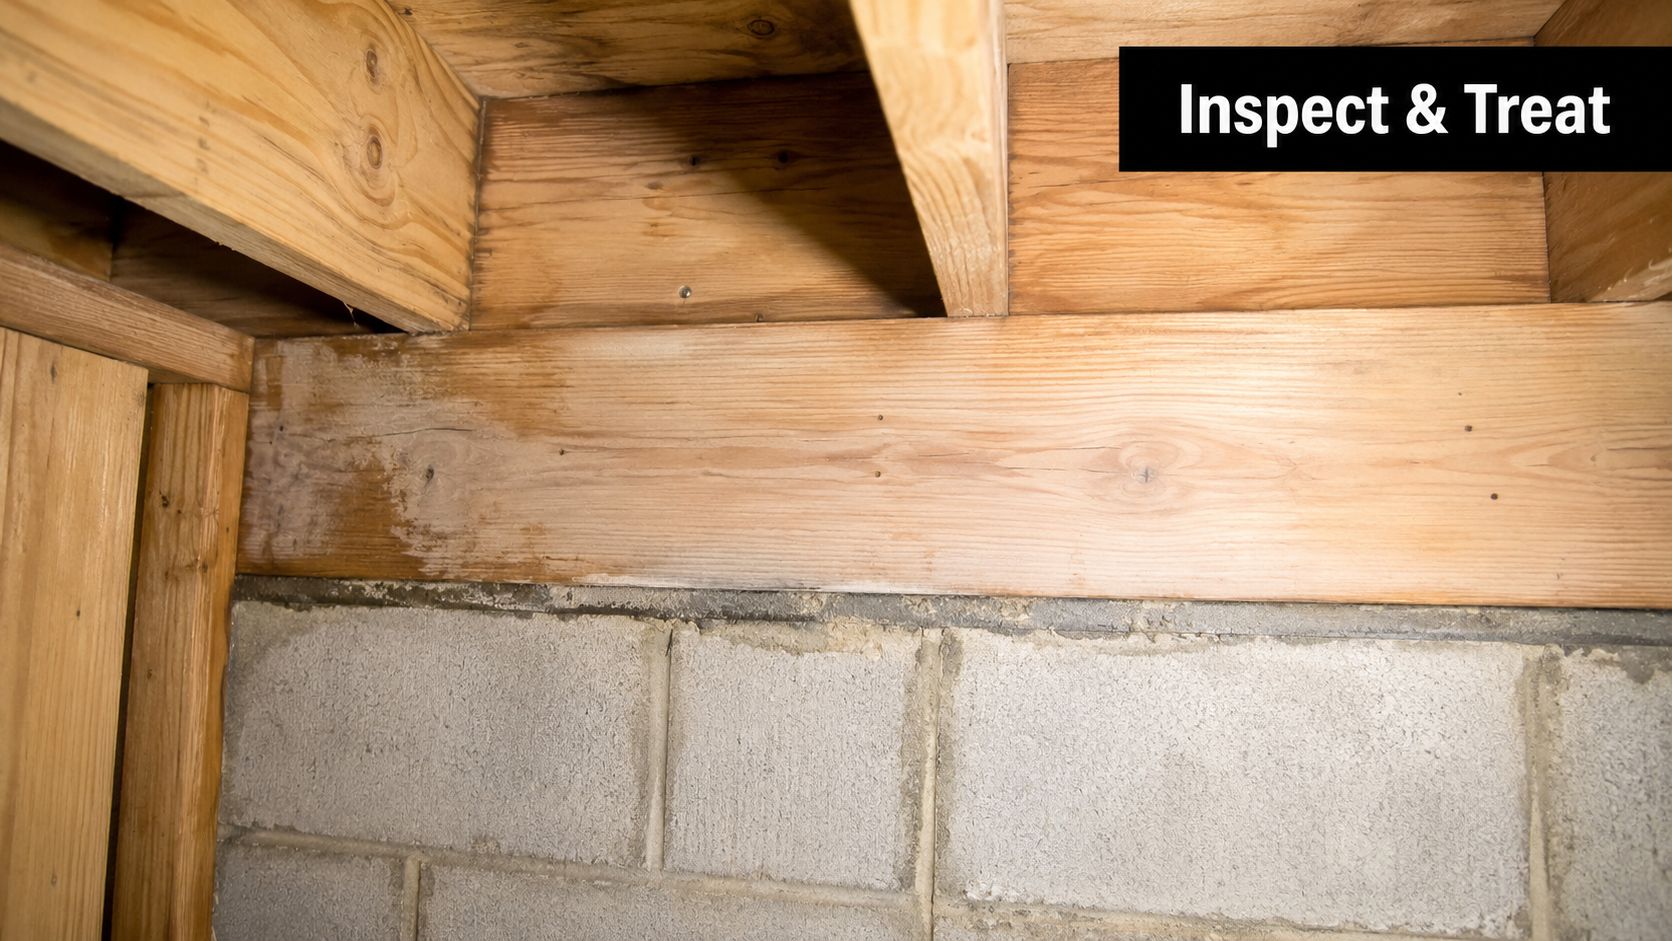
Look for dark staining, fuzzy growth, rusted fasteners, swollen wood fibers, and white mineral residue on the foundation. Each one points to a different moisture path. Some come from bulk water, some from air leakage, and some from condensation.
A pin-style moisture meter helps confirm whether the wood is dry enough for insulation work. If readings stay high or surfaces feel cool and damp, stop and solve the moisture source first. Insulation should cover a stable assembly, not hide an active problem.
South Florida adds a major complication that many national guides barely mention. Rim joist areas can sit near foundation edges, landscaping, slab transitions, and other pest pathways. Before you insulate, inspect for mud tubes, damaged wood, frass, or suspicious patching from prior treatment.
For homeowners who want a clear overview of prevention basics, the Pestless guide to termite treatment is a useful reference for understanding common warning signs and treatment approaches before the cavity gets closed up.
Covering active termite damage with insulation doesn't fix the assembly. It just makes the next inspection harder.
Before installation, make sure you can answer yes to these points:
That last item matters more than people expect. A refrigerant line, drain, or conduit passing through the bay often creates the leak path that defeats an otherwise decent insulation job.
Installation quality at the rim joist comes down to continuity. The job isn't done when the cavity looks full. It's done when the rim board, joist ends, sill plate, and the foundation transition all connect into one sealed layer without skipped corners or hidden voids.
The workflow below gives a clean sequence for both spray foam and cut-and-cobble style rigid board work.
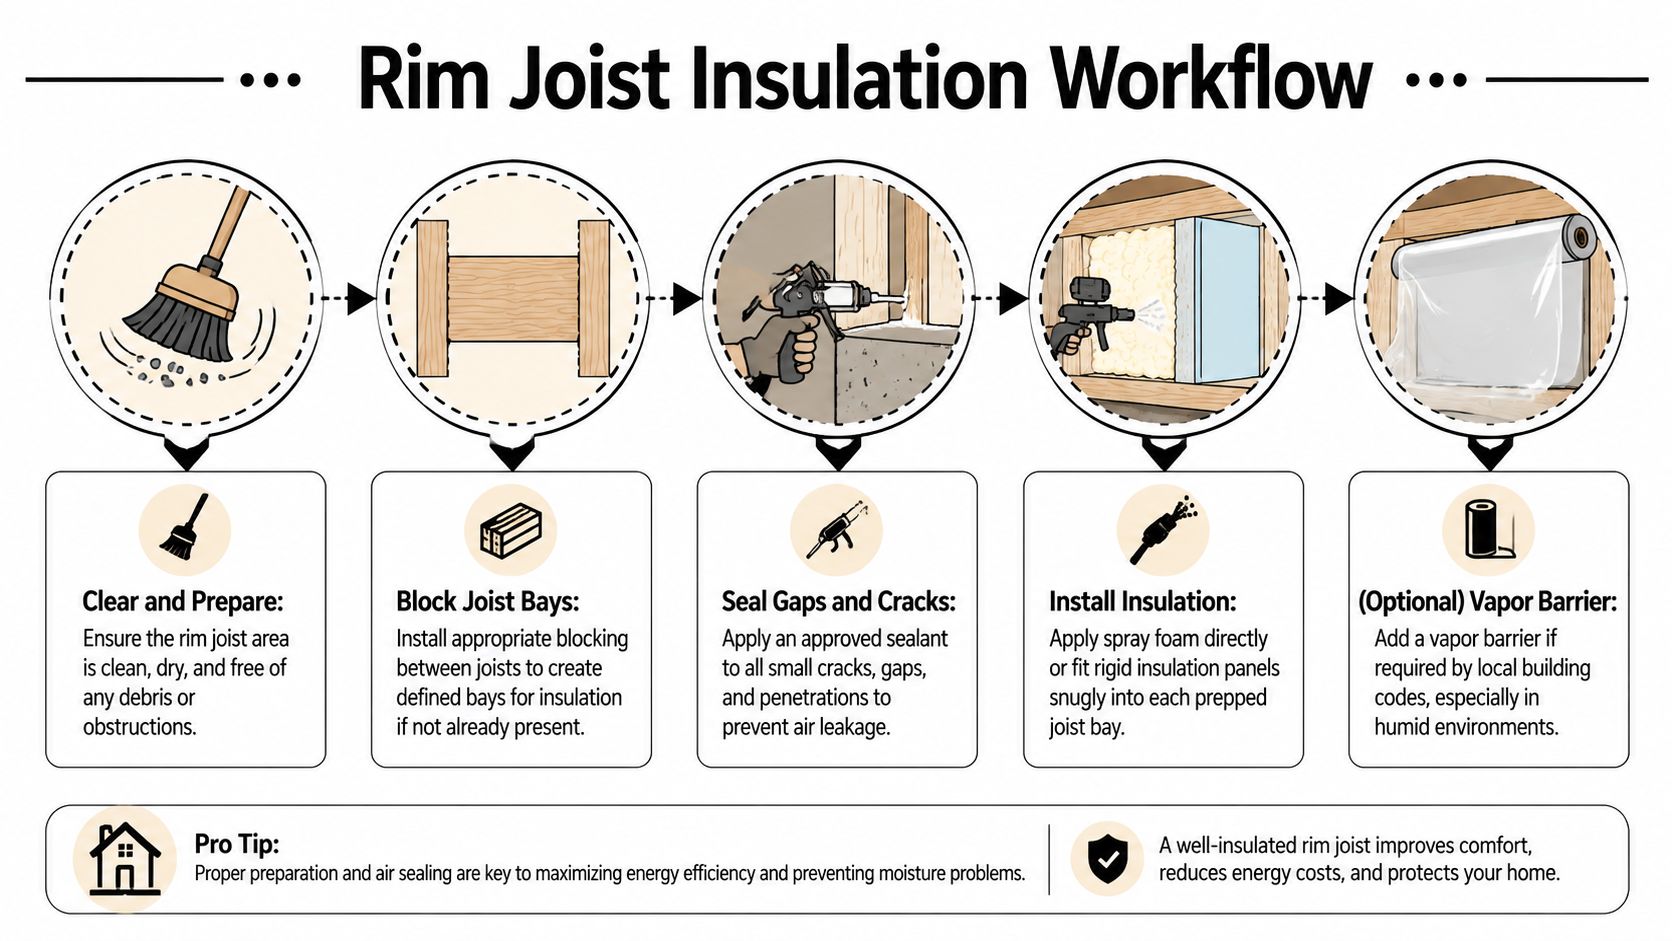
Old fiberglass batts need to come out first, especially if they're dirty, compressed, or damp. Best practice from this closed-cell rim joist guide calls for removing old batt insulation and applying 2–3 inches of closed-cell spray foam across rim boards, joist ends, sill plates, and the concrete-to-sill joint for a single, sealed envelope.
That concrete-to-sill joint deserves special attention. It's one of the most common leak points in the whole assembly, and many installers rush past it because it sits low and can be hard to see once foam starts building.
With closed-cell foam, the goal is even, bonded coverage. The applicator should treat the cavity as a connected assembly, not as separate little patches.
Key target areas include:
A good installer doesn't just fill depth. They watch for shadow lines, skipped corners, and areas where the foam bridges over a gap without sealing it.
Field check: If you can still trace air paths at corners, around penetrations, or along the concrete seam, the cavity isn't finished no matter how thick the center looks.
Rigid foam board can work well in accessible basements or crawl spaces with consistent framing. The board should be cut snug to each bay, then sealed around the perimeter with compatible foam or sealant. The detail work takes more time than most DIYers expect.
The common failure points are predictable:
If fiberglass is used in any hybrid assembly, it should never be the only line of defense against humid air. It needs a true air-sealed layer behind or around it.
The fastest quality check is visual, but it needs to be deliberate. Use a bright work light and inspect each bay from more than one angle. Low corners, plumbing penetrations, and framing seams hide defects.
A solid verification routine includes:
On larger or higher-end projects, diagnostic testing after installation can confirm whether the work reduced leakage. Even without formal testing, a clean rim joist job should read as continuous, not pieced together.
South Florida homes don't get a pass on rim joist details just because winters are mild. Code and climate still push the assembly in a specific direction. The target isn't only thermal performance. It's moisture control, inspection readiness, and durability in a humid region.
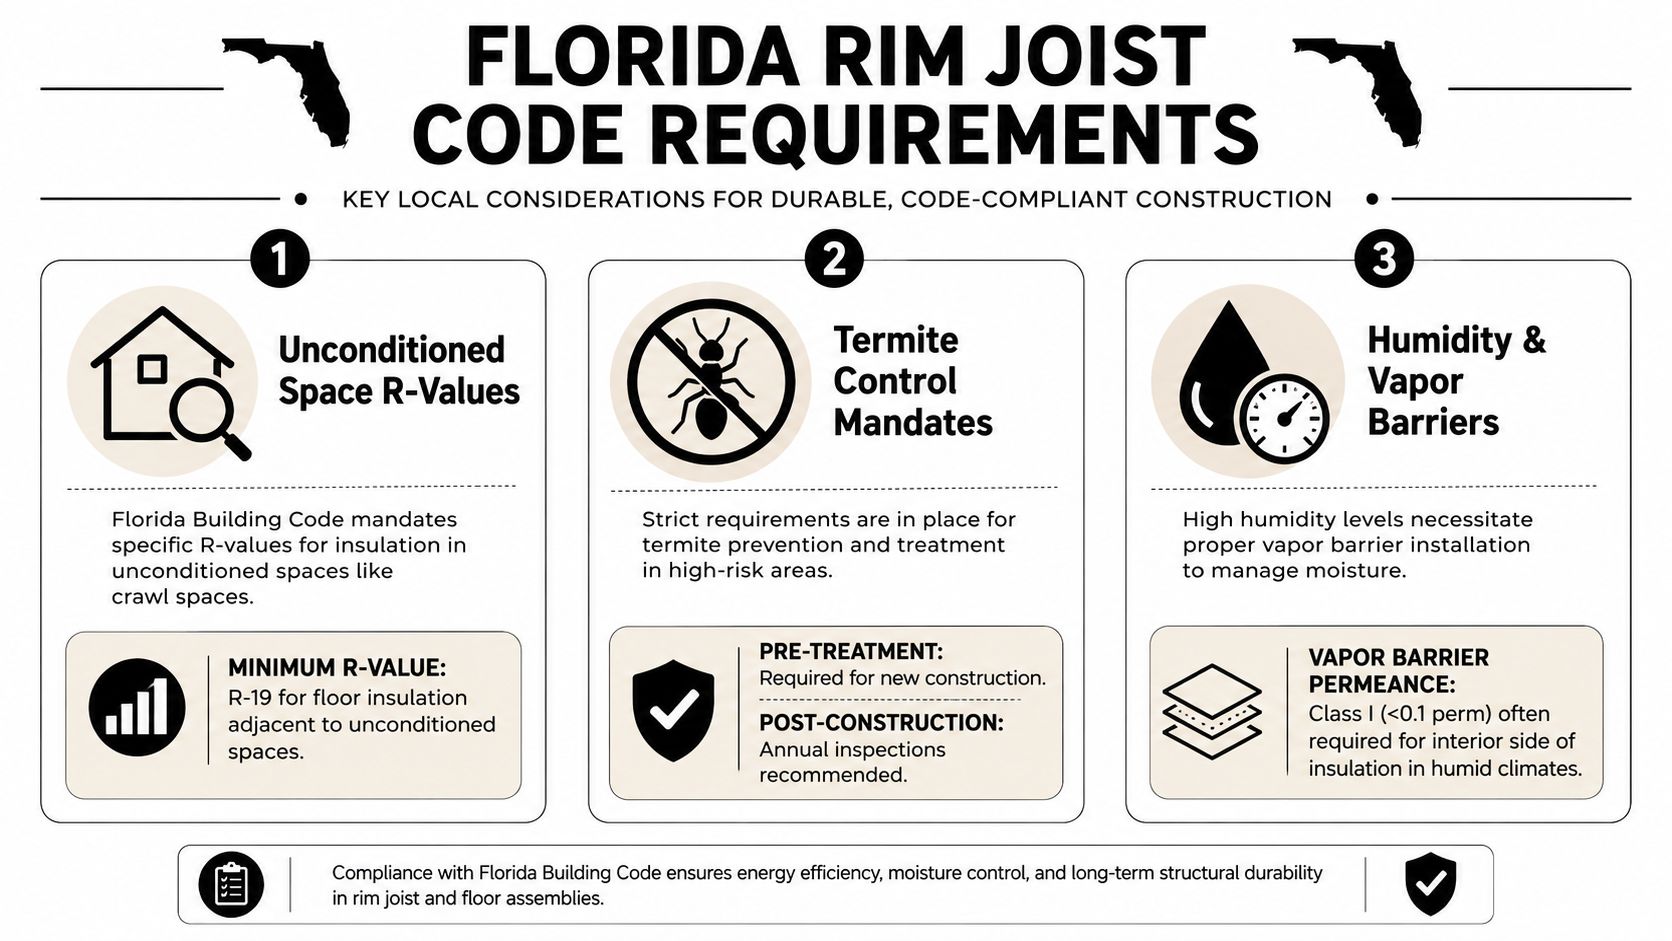
For South Florida's Climate Zones 1–2, rim joists require R-13, as outlined in this climate-zone rim joist reference. Generic advice telling homeowners to use "2 to 4 inches" without tying that depth to actual thermal performance is where a lot of confusion starts.
If you're checking broader requirements around insulation assemblies and project documentation, this overview of energy code compliance for insulation work is a helpful baseline.
South Florida assemblies need to control humid air first. That's why vapor-open, loosely fitted insulation approaches tend to create problems at rim joists here. The cavity is small, full of joints, and close to concrete. If humid air reaches cooler surfaces inside the assembly, mold and wood deterioration can follow.
The "let it dry" argument gets overused in rim joist discussions. In practice, uncontrolled indoor and outdoor moisture movement does more damage than a properly sealed cavity.
In this climate, the safer assembly is usually the one that limits air movement and controls moisture at the cavity surface.
A code-compliant insulation detail can still struggle if rainwater is constantly loading the foundation perimeter. Poor roof drainage, splashback, and saturated soil near the wall keep rim joist areas under stress. Homeowners dealing with recurring wet perimeter conditions should also review effective stormwater strategies for homeowners, because exterior water management often determines whether an interior insulation fix stays dry.
The most common rim joist mistakes aren't dramatic. They're small misses that add up. A half-inch skipped at a concrete seam, a board cut loose at one corner, or an old damp batt left buried behind new work can undermine the whole job.
Closed-cell spray foam usually carries a higher upfront price than rigid board or batt-based approaches. That's the trade-off for combining insulation, air sealing, and moisture control in one application. Rigid board can lower material costs, but labor rises fast when the bays are irregular or access is poor.
DIY makes the most sense when the area is open, dry, square, and easy to inspect. Hiring a pro makes more sense when you have low-clearance access, termite history, visible staining, mechanical obstructions, or a house with persistent comfort and humidity complaints that basic insulation hasn't solved.
You should bring in a qualified insulation contractor when:
A professional installation isn't just about spraying foam. It's about identifying whether the cavity is ready to be sealed in the first place.
If you want help evaluating rim joist insulation in South Florida, Airtight Spray Foam Insulation handles inspections, closed-cell spray foam applications, and code-conscious installations for homes and buildings across Jupiter, Palm Beach Gardens, West Palm Beach, Wellington, Stuart, and nearby areas. Their team understands the local mix of humidity, coastal exposure, and construction details that make rim joists tricky, and they can recommend whether spray foam or another approach fits the assembly best.