Blog
Your Guide to Foam Insulation Removal in South Florida
Most people think of insulation as a "set it and forget it" part of their home. But here in South Florida, that’s a dangerous assumption. Old or poorly installed spray foam can go from an asset to a major liability, especially when it starts trapping the one thing we have in abundance: humidity.
Deciding to tear out your foam insulation is a big call, but sometimes it’s the only way to protect your home's health and your wallet. The red flags aren't always dramatic; they often start small and build over time.
Knowing When Foam Insulation Removal Is Necessary

One of the first signs I tell homeowners to watch for is a creeping FPL bill. If your air conditioner seems to be fighting a losing battle and your home just won't stay cool, your insulation might have lost its R-value. It’s no longer resisting heat, and you’re paying the price every month.
Moisture And Mold: The Silent Killers
In our climate, moisture is the number one enemy of a healthy attic. I’ve seen countless cases where open-cell foam, especially if it was installed incorrectly, acts like a giant sponge. It soaks up humidity right out of the air or, even worse, traps moisture from a tiny, unnoticed roof leak.
That persistent musty smell you can't quite locate? That’s often the only clue you have a serious moisture problem brewing inside your walls or attic. It’s a telltale sign of mold, which thrives in damp, dark spaces. If you're concerned, it's worth understanding how mold can grow on insulation.
Trapped moisture is more than just a mold problem. Over time, it will rot the wood in your roof deck and attic trusses. I've seen it turn what should have been a straightforward insulation job into a massive structural repair project.
When An Upgrade Is Overdue
The insulation industry is constantly evolving. In a humid state like Florida, older foam simply doesn't hold up, which is why a huge part of our work is replacing outdated systems. North America actually makes up 40% of the global market revenue, largely driven by these kinds of retrofits.
Studies show moisture and mold affect as many as 20% of insulated attics in our region, making foam insulation removal a critical first step. The good news? After we professionally remove the old, failing material and install modern closed-cell foam, homeowners often report energy savings of 30-50%.
Sometimes, the signs are impossible to ignore. It’s definitely time for a removal if you spot:
- Pest Infestations: Old, soft foam is a perfect nesting ground for rodents and insects. They'll tunnel right through it, destroying its insulating properties and leaving behind a hazardous mess.
- Visible Damage: If you see insulation that is crumbling, pulling away from the studs, or discolored, it's failed. It's no longer creating an air seal and needs to go.
- Renovations or Repairs: Planning to access wiring, plumbing, or fix a roof leak? Removing the old foam is often the necessary first step to get the job done right.
To make it easier, here’s a quick checklist to help you decide if it’s time to call in a professional.
Decision Checklist For Foam Insulation Removal
This table highlights common symptoms we see in the field that point toward a necessary removal.
| Symptom | Potential Cause | Recommended Action |
|---|---|---|
| Spiking Energy Bills | Insulation has lost its R-value; air leaks | Get a professional energy assessment and attic inspection. |
| Persistent Musty Odor | Trapped moisture is feeding mold and mildew growth | Immediately inspect for water intrusion and mold. Do not ignore this. |
| Visible Water Stains | Roof leak, condensation, or HVAC leak | Pinpoint the source of the moisture before addressing the insulation. |
| Crumbly or Sagging Foam | Material degradation due to age or poor installation | The foam has failed and is no longer effective. Plan for a full removal. |
| Pest Droppings or Tunnels | Rodents or insects are nesting in the insulation | Removal is required for sanitation and to restore the air seal. |
If you're checking off any of these boxes, your insulation is likely causing more harm than good. A full, professional removal is the only way to get your home's performance, air quality, and your own peace of mind back on track.
DIY Dangers Versus Professional Peace of Mind
It’s tempting to look at a mess of old spray foam and think, “I can handle that.” I get it. The DIY impulse is strong, and the thought of saving a few bucks is always appealing. You see the problem, you figure you’ll grab some tools, and you’ll get it done over the weekend.
But let’s have an honest conversation. Removing spray foam isn't like painting a room or swapping out a faucet. This is easily one of the most grueling, physically demanding, and potentially hazardous jobs you can take on in your home.
The sheer physical labor is what shocks most homeowners first. You’re not just scraping away old material. You’re working overhead, often in a cramped, stifling attic, fighting a substance that’s chemically fused to your home’s structure. It means hours of non-stop cutting, prying, and bagging, all while battling the sweltering South Florida heat.
The Hidden Costs of a DIY Job
Beyond the pure exhaustion, you have to think about the gear. A simple dust mask and your garage shop-vac just won’t cut it here. To even attempt this safely, you need a specific lineup of professional-grade equipment.
For any DIY project, these are the absolute non-negotiables:
- Full-Face Respirator with P100 Cartridges: Foam dust is no joke. Inhaling those fine particles can be seriously hazardous, and you need legitimate respiratory protection. This alone can be a surprising expense.
- Specialized Cutting Tools: You'll likely need an oscillating multi-tool with scraper blades or even a scarifier to slice through dense foam without chewing up your studs.
- A HEPA Vacuum: Your standard vacuum will just spit the finest, most harmful dust right back into the air. A HEPA-rated vacuum is the only way to capture those microscopic particles.
Renting or buying this equipment adds up fast, often erasing any savings you thought you were making. And that doesn't even touch on the biggest risk: expensive mistakes. It's incredibly easy for an inexperienced hand to gouge a wooden stud, slice right through hidden electrical wiring, or puncture a plumbing line. One slip can turn your weekend project into an emergency call to an electrician or plumber.
The Professional Difference: Time, Safety, and Skill
Now, let's contrast that with bringing in a seasoned crew. The decision to do it yourself or call in the pros isn't unique to insulation; you see the same debate for many home projects, as this helpful DIY vs Professional services guide points out. A professional team arrives with years of hands-on experience, a truck full of specialized equipment, and a process built for safety and efficiency.
A job that would take a homeowner a week of back-breaking labor, a professional crew can often knock out in a day or two. They use proper containment strategies, sealing off the work area and running negative air machines to make sure all the dust and debris gets vented outside—not into your living room. You can dig deeper into why proper handling is so crucial in our guide on whether insulation can be dangerous.
At Airtight Spray Foam, my team and I bring over 25 years of experience to every job. We’ve refined our process to be 95% dust-free by using powerful vacuums and grinders. This approach cuts project downtime by 50% compared to old-school tear-outs, which is a huge advantage for homeowners.
In South Florida, getting this right is especially critical. We’ve seen homeowners face $5,000+ repair bills from structural rot that went unchecked after a botched DIY removal. While professional removal runs between $1.50 and $3.00 per square foot, it sets the stage for a proper new installation that can deliver a 25% improvement in utility savings—a significant factor for anyone managing a property. You can explore more data on the foam insulation market to see the financial trends.
Ultimately, it comes down to risk versus reward. The DIY route for spray foam removal is a path filled with physical strain, hidden costs, and the very real danger of causing expensive, long-term damage to your home. The professional approach brings efficiency, safety, and the peace of mind that comes from knowing the job was done right—protecting your home and your family.
What a Professional Foam Removal Job Looks Like
When you bring in a professional for foam insulation removal, you’re getting much more than just a couple of guys with scrapers. It’s a completely different world from a weekend DIY project. A real pro job is methodical, clean, and built around protecting your home and family from start to finish.
It all starts long before a single piece of foam is touched. The first thing we do is a thorough site assessment. I need to know exactly what we're dealing with—is it the soft, spongy open-cell foam, or the hard, rigid closed-cell stuff? The answer changes the tools we use, the time it takes, and the entire approach. We also map out the job, identifying any wiring, plumbing, or other obstacles we need to work around.
Preparing the Work Zone for Containment
Once we have a plan, the crew’s first job is all about preparation and containment. This isn’t just about tossing down a few drop cloths. We create a completely isolated work zone to keep the mess and dust from ever reaching your living space.
Pros will seal off the entire area—whether it’s an attic, crawlspace, or wall cavity—using thick plastic sheeting. Think of it like creating a sealed bubble around the workspace. This means:
- Covering floors and any personal items left in the area to keep them pristine.
- Sealing off all doorways, vents, and registers that connect to the rest of the house.
- Setting up negative air pressure with industrial-grade air scrubbers and powerful fans.
This last part is non-negotiable for a professional job. The negative air machine pulls air out of the sealed work zone, filters it through a HEPA filter, and vents it safely outside. This ensures that any dust or particles kicked up during removal are immediately captured instead of drifting through your home. It’s a critical safety step.
This infographic breaks down the difference between a DIY attempt and a controlled, professional process.
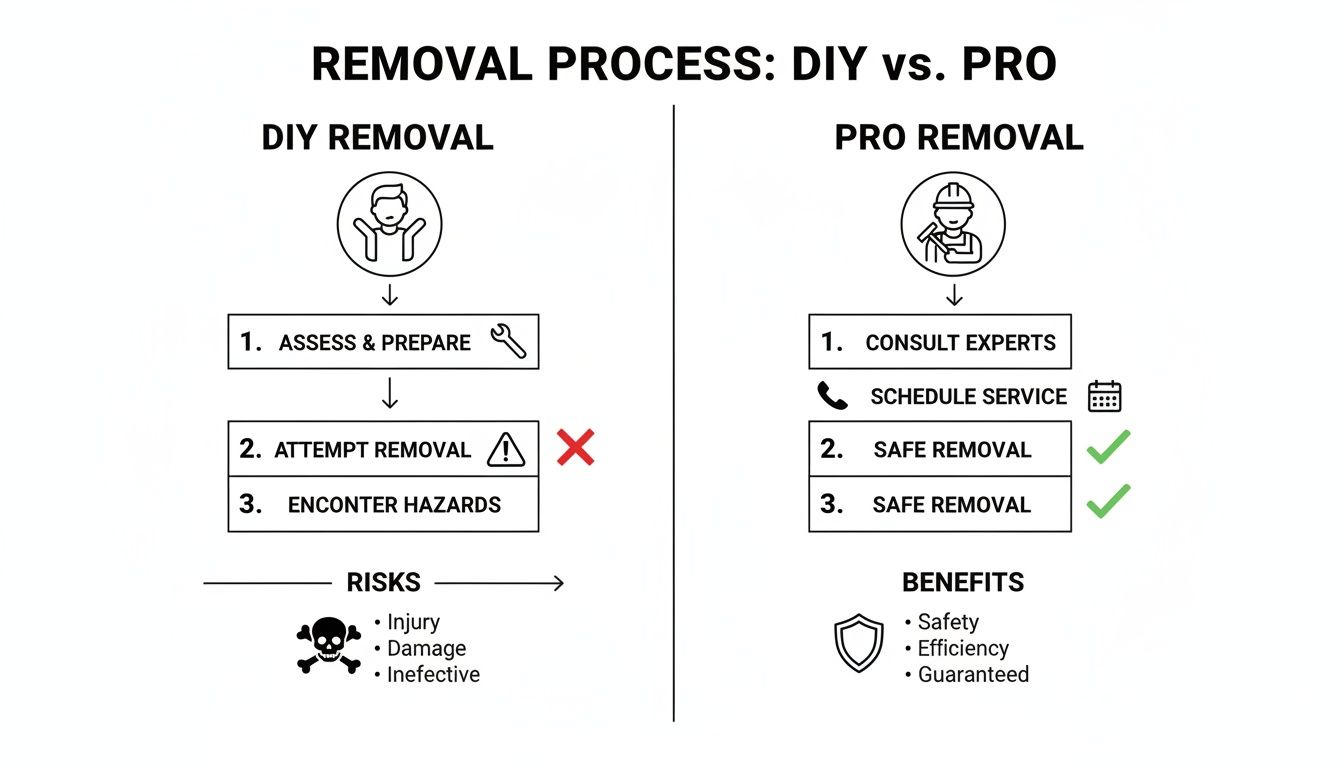
As you can see, the professional route is all about turning a potentially messy, hazardous job into a safe and controlled procedure.
The Surgical Removal Process
With the area fully contained, the real work begins. This is where experience makes all the difference. We don't just hack away at the foam. It’s a precise, almost surgical process that requires the right tools for the right situation.
For wide-open spaces like an attic roof deck, we might use a specialized tool called a scarifier to shave the foam down quickly and evenly. But in tight quarters—around electrical boxes, pipes, and rafters—we switch to smaller, more delicate instruments. Oscillating tools with scraper blades let us cut the foam away from sensitive areas without damaging a thing.
I’ve heard the horror stories from homeowners about DIY projects gone wrong: gouged drywall, sliced wires, or even punctured plumbing. A true professional knows how foam bonds to wood and works methodically to separate it cleanly, leaving the structure underneath untouched.
The goal isn't just to get most of it; it's to remove 100% of the old foam. We leave behind a perfectly clean slate, ready for new insulation. This avoids the "patchwork" mess that can compromise the performance of your new system.
Final Cleanup and Site Demobilization
The job isn't done when the foam is gone. The final step is a top-to-bottom cleanup that often leaves the space looking cleaner than when we started.
Our crew uses industrial HEPA vacuums to suck up every last particle of dust and debris from every surface, crack, and crevice. All the old foam and contaminated materials are then bagged, sealed, and prepped for proper disposal according to local regulations in Palm Beach or Martin County.
Only after the space is spotless and passes a final walkthrough do we break down the containment barriers. We carefully roll up the plastic sheeting to trap any remaining dust and remove all our equipment. You're left with a pristine, empty space, perfectly prepped for whatever comes next. That’s the difference between a messy weekend project and true professional peace of mind.
The Essential Tools and Safety Gear Pros Use
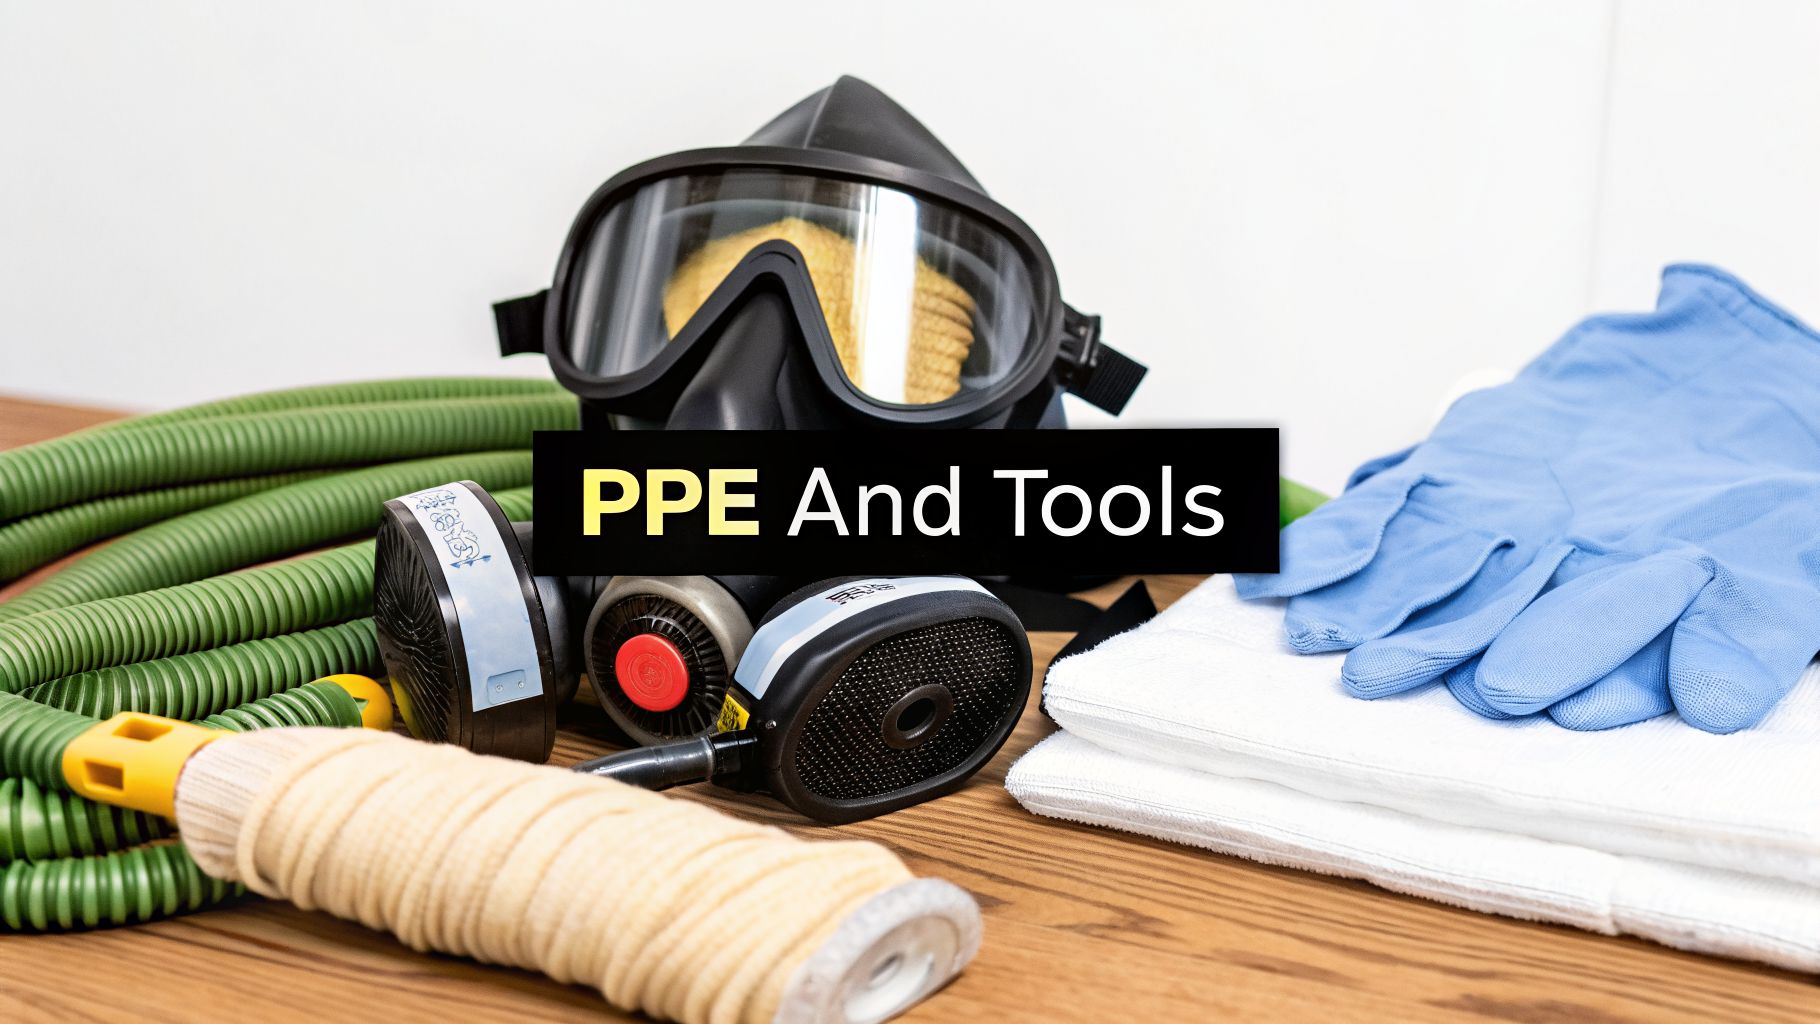
When our team shows up for a foam insulation removal, we’re not just carrying a few hand tools. We arrive with an entire arsenal built for one purpose: getting stubborn foam out safely while protecting our crew and, most importantly, your home.
This is what truly separates a professional job from a messy, hazardous DIY attempt. It all starts with our non-negotiable commitment to safety.
Gearing Up for Safety: It's More Than Just a Dust Mask
Personal Protective Equipment, or PPE, is the first thing we put on and the last thing we take off. Forget flimsy paper masks and old long-sleeve shirts. This is a serious system.
We’re talking full-face respirators equipped with P100 cartridges. These create a perfect seal and are designed to filter out 99.97% of those nasty airborne particles. This isn't just for dust; it’s for preventing any inhalation of fine particulates and potential fumes.
Next come the disposable full-body suits. Our technicians wear non-porous Tyvek suits that create a full barrier against chemical residues and fine dust. Goggles are a must to shield against flying debris, and proper gloves are crucial for protecting hands from sharp edges and abrasive materials. Getting the right pair of cut-resistant gloves is a small detail that makes a huge difference in preventing injuries on the job.
The table below outlines the essential gear we bring to every removal project, covering both the protective equipment we wear and the specialized tools we use to get the job done right.
Essential Gear for Foam Insulation Removal
A comparative look at the necessary Personal Protective Equipment (PPE) and specialized tools for a safe and effective removal project.
| Equipment Category | Essential Items | Purpose |
|---|---|---|
| Personal Protective Equipment (PPE) | Full-face respirators (P100), disposable body suits, safety goggles, cut-resistant gloves. | Provides a complete barrier against inhaling harmful particles, skin contact with residues, and physical injury. |
| Precision Removal Tools | Oscillating multi-tools with scraper blades, hand saws. | Allows for surgical removal of foam around delicate areas like wiring, plumbing, and framing without causing damage. |
| Bulk Removal Tools | Scarifiers, long-handled scrapers. | Quickly and efficiently shaves down large, open sections of foam, such as on roof decks or broad wall cavities. |
| Cleanup & Air Quality Control | Commercial-grade HEPA-filtered vacuums, plastic sheeting, heavy-duty contractor bags. | Captures microscopic dust particles to prevent them from circulating in the air, ensuring a clean and safe environment post-removal. |
As you can see, a professional setup is far more involved than what you'd find in a typical garage. Each piece of equipment has a specific role in ensuring the project is handled safely and effectively from start to finish.
The Right Tools for a Tough Job
Beyond the safety gear, the actual removal requires a specific set of powerful, and sometimes delicate, tools. Using the wrong equipment is a fast track to damaging studs, drywall, or even electrical wiring.
For tight spaces and tricky areas—think around electrical boxes or plumbing pipes—we rely on oscillating multi-tools fitted with special scraper blades. They allow us to cut the foam away with surgical precision.
Then, for wide-open areas like the underside of a roof deck, we bring out the heavy-hitters. A powerful scarifier can shave down huge sections of foam in a fraction of the time it would take by hand, which is key to keeping the project on schedule.
If there's one piece of equipment I can't work without, it's our commercial-grade HEPA vacuum. A standard shop-vac just blows the smallest, most harmful particles right back into the air you’re breathing. Our vacuums are designed to capture that microscopic dust, leaving the air in your home clean and safe when we pack up.
The high cost of this specialized gear is something most homeowners don't factor in when thinking about a DIY job. That HEPA vacuum alone can run into the thousands, and a scarifier is an expensive, hard-to-find rental.
That investment in professional equipment is a big part of the value you get when hiring a pro. With building codes getting stricter and an increase in removal projects since 2015, the risks of doing it wrong have never been higher—especially here in Florida. We've seen moisture-logged foam lose 40% of its R-value, completely defeating its purpose.
Hiring a team like Airtight Spray Foam Insulation means you get the full benefit of our professional arsenal without the enormous expense or steep learning curve. We show up with everything needed to do the job safely, cleanly, and correctly the first time.
Breaking Down Costs and South Florida Regulations
Every homeowner I talk to asks about two things right away: how much this is going to cost, and what kind of rules they need to follow. When it comes to foam insulation removal, there’s no simple, flat-rate answer. The final price tag is always based on the specific challenges of your home.
Simply put, the cost comes down to how difficult the deconstruction is. If you have a wide-open attic with easy access, you're looking at the lower end of the spectrum. But if we're dealing with a tight crawlspace or a complex roofline full of obstacles, it's going to take more time and specialized work, which is reflected in the budget.
What Drives the Cost of Removal?
The biggest variable by far is the type of foam you have. That spongy, soft-feeling open-cell foam is usually easier to handle. In many cases, we can cut it out in large, manageable sections and pull it away from the framing without much of a fight.
Closed-cell foam, on the other hand, is a completely different beast. It's incredibly dense, rigid, and it bonds to wood like concrete. Removing it is a slow, painstaking process. It requires special tools to grind or scrape it off inch by inch, all while protecting the structure underneath. That intensity means the cost per square foot for closed-cell removal is always significantly higher.
A few other things will impact the final quote:
- Total Square Footage: It’s a straightforward calculation. The bigger the space, the more labor and disposal fees will be involved.
- Accessibility: How easy is it to work in the space? Low-clearance crawlspaces, cramped attics, and hard-to-reach cavities all add to the time and effort required.
- Contamination Level: If we find mold or signs of a pest infestation, the job expands. We have to include extra steps for safe remediation and sanitation, which adds to the scope and cost.
For a deeper dive into the numbers, our guide on the cost of insulation removal can give you a much clearer idea of what to expect for your home.
Navigating South Florida’s Disposal Regulations
This is the part that trips up a lot of homeowners and DIYers: you can’t just bag up old insulation and leave it on the curb. Here in South Florida, used insulation is considered construction and demolition (C&D) debris, and it comes with very strict disposal rules.
Both Palm Beach County and Martin County have specific solid waste facilities designated to handle these materials. Trying to dispose of it improperly can get you hit with fines for illegal dumping, and believe me, local authorities don't take it lightly. This is one of the biggest reasons to bring in a professional.
A professional removal service does more than just tear out the old foam. A huge part of our job is managing the entire waste stream legally and responsibly. We handle all the bagging, hauling, and disposal at the correct facilities so you don’t have to worry about a thing.
When you get a quote from a reputable company, the cost of compliant disposal should be built right in. You aren't just paying to get the foam out; you're paying for a clean, complete, and regulation-compliant project from start to finish.
It ensures your home is ready for new insulation without leaving you to deal with the messy logistics or potential legal headaches.
We Get These Questions All The Time
Even after you’ve seen the process and gotten a cost estimate, there are always a few more questions that pop up. That’s perfectly normal. Tackling a foam insulation removal project is a big decision, and you need straight answers from people who do this work every day.
We've been in countless South Florida attics and crawl spaces, so we’ve heard it all. Here are the most common questions we get from homeowners, answered directly and honestly.
How Long Is This Actually Going to Take?
Every home is different, so there's no single answer, but we can give you a pretty solid idea based on our experience.
For a standard residential attic, say around 1,500 square feet, a good crew can typically get the entire job done—containment, removal, and cleanup—in one to three days.
So, what could make it take longer?
- Tough Access: If we’re working in a tight crawl space or an attic with a low roofline and lots of obstructions, it just takes more time to move carefully and get the job done right.
- The Foam Itself: As we mentioned, that dense, hard closed-cell foam is a beast to remove. It’s far more labor-intensive than the softer open-cell variety and can easily add a day or more to the project.
- What We Find Underneath: Sometimes, when the foam comes out, we uncover hidden problems like moisture damage, mold, or even rotted wood. Those issues have to be properly fixed before any new insulation goes in, which will extend the schedule.
Any professional worth their salt will give you a clear, realistic timeline only after they’ve put eyes on the space themselves.
Is Tearing This Stuff Out Going to Wreck My House?
This is probably the most critical question we get, and it’s the biggest reason to steer clear of a DIY attempt. The short answer is, yes, if it's done wrong, foam removal can absolutely cause serious damage.
When that foam was sprayed in, it formed an incredibly strong chemical bond to everything it touched—your wood studs, the roof decking, even the paper on your drywall. If you just try to grab it and rip it out, you’re going to take chunks of wood and paper with it. We’ve seen it lead to gouged framing, damaged electrical wires, and even punctured plumbing lines hidden in the walls.
Professional crews don't use brute force. We use specialized tools like oscillating multi-tools and scarifiers that are designed to slice and shave the foam away from the structure without damaging what’s underneath. It’s more like surgery than demolition.
Hiring an experienced and insured contractor is your best defense against expensive collateral damage. The cost of fixing a sliced electrical main or a punctured water line far outweighs any potential savings from a DIY attempt. A professional's primary goal is to protect your home's structure.
Can We Install New Insulation Right Away?
Yes, and you should. In fact, that’s the whole point. As soon as the old, failed insulation is gone, the space is ready for a new, high-performance system. You'll want to get that new insulation in as quickly as possible.
A huge part of our removal process is making sure the cavity is left perfectly clean, dry, and free of any debris or mold. This creates a "clean slate," which is essential for the new insulation to perform at its peak.
Working with a company that handles both removal and installation just makes sense. It creates a seamless project, ensuring your home isn't left uninsulated and exposed to our South Florida heat and humidity for any longer than necessary. You can start feeling the benefits of better energy efficiency and comfort almost immediately.
How Big of a Mess Does This Make?
While the work itself is messy by nature, our top priority is containing it completely. When we leave, it should look like we were never there—except for the perfectly clean, empty space ready for new insulation.
Before we even start, our team seals off the entire work area from the rest of your house. We lay down heavy-duty plastic sheeting, seal all the doorways, and shut down HVAC vents to ensure no dust escapes into your living space.
The real key to a clean job is using negative air machines with HEPA filters. These are powerful commercial-grade units that run the entire time, sucking up any airborne particles and dust and venting them safely outside your home. Once all the foam is gone, we do a final, detailed cleanup with industrial-strength vacuums, leaving the area spotless.
Ready to tackle your old insulation and transform your home's comfort and efficiency? The team at Airtight Spray Foam Insulation has the experience and equipment to handle your foam removal project safely and professionally. Request your free quote today and see how our experts can prepare your South Florida home for a high-performance future.