
Blog
How to Insulate a Tin Shed for Florida’s Climate
Let’s be honest: a tin shed in South Florida isn’t a shed—it’s an oven. If you’re wondering how to insulate a tin shed to survive our climate, the answer is simple: you need a complete thermal and moisture seal. For that job, nothing beats closed-cell spray foam. It’s the undisputed champion for blocking intense heat, sealing every pinhole air leak, and stopping condensation in its tracks.
Turn Your Florida Shed from a Hotbox into a Workspace
A metal shed baking in the South Florida sun can easily spike to 120°F or higher inside. That’s not just uncomfortable; it’s completely unusable. It’s a space where your tools rust faster, your paints and chemicals go bad, and anything you care about gets cooked.
This guide is about reclaiming that space. We’re going to walk through how to transform that sweltering metal box into a dry, comfortable, and functional part of your property. But before you even think about insulation, we have to start with the most critical step: a brutally honest look at your shed’s current condition.
Why a Pre-Insulation Check Is Non-Negotiable
I’ve seen it happen time and again: someone gets excited, skips the prep work, and ends up with a disaster. In our humid environment, trapping moisture behind new insulation is the fastest way to accelerate rust and grow mold. You end up creating a bigger problem than you were trying to solve.
A real inspection is more than a quick glance. You have to put on your detective hat and hunt down every potential issue that could sabotage your project down the road.
- Hunt for Leaks: Get inside on a sunny day and look for pinpricks of light. Check every seam, screw hole, and joint for any sign of water intrusion. A single, tiny drip is all it takes to ruin your investment.
- Check the Bones: Is the frame solid? Are the metal panels fastened securely? There’s no point in insulating a shed that’s flimsy or structurally compromised.
- Find the Rust: Pinpoint every single rust spot, no matter how small. These areas must be treated before you cover them up. If you don’t, the corrosion will just keep eating away at the metal underneath your brand-new insulation.
Taking the time to get these foundational issues right is what separates a successful project from a costly failure. A clean, dry, and solid surface is the only way to ensure your insulation performs as it should for years to come.
Ultimately, this first phase sets the entire project up for success. It’s not just about making a hot space cooler; it’s about adding real, lasting value and utility to your property. Once you have a clear picture of your shed’s condition, you can move forward with confidence and finally reclaim that valuable square footage.
Choosing the Right Insulation to Beat the Humidity
When you’re figuring out how to insulate a tin shed in South Florida, one thing matters more than anything else: moisture resistance. Our humidity is relentless. It will find the tiniest weak spot in any material, and if you make the wrong choice, you’re looking at trapped moisture, rust, and a nasty mold problem. This decision isn’t just about R-value; it’s about picking a material that can defend against a constant onslaught of damp, heavy air.
This is where the real battle between insulation types begins. You need something that doesn’t just slow down heat transfer but also acts as a full-stop barrier against water vapor. Let’s walk through the top contenders for a Florida shed.
The Gold Standard: Closed-Cell Spray Foam
For a metal shed in a high-humidity zone like ours, closed-cell spray foam is the undisputed champion. It’s not just insulation; it’s armor. We spray it on as a liquid, and it expands to fill every single crack, seam, and screw hole, creating a rigid, waterproof shell.
The magic is in its structure. The cells are completely sealed and packed tightly together, making it impermeable to water. This means it’s an all-in-one solution.
- High R-Value: It packs a powerful thermal punch, offering one of the highest R-values per inch (around R-6 to R-7).
- True Vapor Barrier: It stops humid air dead in its tracks, preventing it from ever touching the cool metal and causing condensation.
- Structural Strength: You’d be surprised how much rigidity it adds to flimsy shed panels. It makes the whole structure feel more solid and even quiets the noise from rain and wind.
Because it bonds directly to the metal, there are zero gaps for moisture to sneak in and hide. This is critical for stopping that annoying “shed sweat”—the condensation that drips from the ceiling and can ruin your tools and anything else you have stored inside. To see a detailed comparison of its performance, check out our guide on the differences between spray foam and blown-in insulation.
Key Takeaway: Closed-cell spray foam is an investment in a permanent fix. It solves your heat, air leak, and moisture problems in a single, seamless application, making it the most effective way to protect your shed and its contents for the long haul.
This workflow diagram really drives home the point: you have to assess the situation before you start insulating. Don’t just cover up an existing problem.
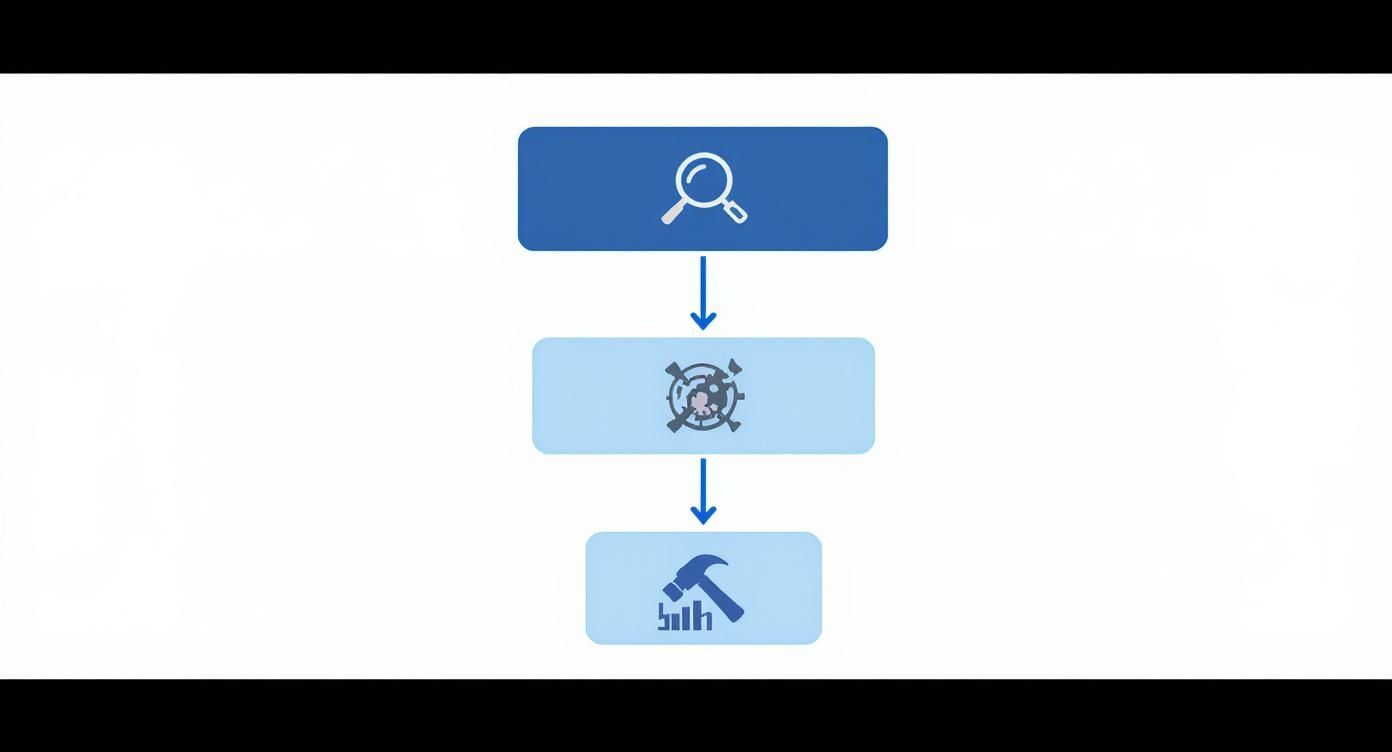
As you can see, a thorough check for leaks and rust is the essential first step. Overlooking these issues will cause any insulation—no matter how good—to eventually fail.
Here’s a quick breakdown of how the most common insulation types stack up for a metal shed in our climate.
Insulation Options for a South Florida Tin Shed
| Insulation Type | R-Value Per Inch | Moisture Resistance | Installation Method | Ideal Use Case |
|---|---|---|---|---|
| Closed-Cell Spray Foam | R-6 to R-7 | Excellent (Vapor Impermeable) | Professional Spray | Permanent, all-in-one solution for heat, air, and moisture. |
| Rigid Foam Board (XPS/Polyiso) | R-5 to R-6.5 | Good to Excellent | DIY or Professional | A solid DIY alternative when seams are meticulously taped. |
| Foil-Faced Bubble Wrap | Low (Primarily Radiant) | Fair | DIY Staple/Adhesive | Budget-friendly option focused on reflecting radiant heat. |
While spray foam is the clear winner for performance, there are other practical options if you’re on a different budget or timeline.
A Practical Alternative: Rigid Foam Boards
If a professional spray foam job isn’t in the budget, rigid foam boards are the next best thing and much more DIY-friendly. These are the large, stiff panels you see at the home improvement store, and they’re easy to cut and handle. The two you’ll usually find are Extruded Polystyrene (XPS) and Polyisocyanurate (Polyiso).
- XPS Foam Boards: These are typically pink or blue. XPS is highly resistant to moisture and gives you a solid R-5 per inch. It’s a great all-around choice for shed walls.
- Polyiso Foam Boards: Often faced with foil, Polyiso delivers a slightly higher R-value (around R-6.5 per inch). That foil facing also works as a radiant barrier, bouncing heat away from the shed.
When you’re installing foam boards, the goal is to get as close to the airtight seal of spray foam as you can. This means cutting each board meticulously to fit snugly between the shed’s framing. The most critical part? Sealing every single seam with specialized construction tape. Any gap is an open invitation for humid air to get in and cause trouble.
A Budget-Friendly Option: Foil-Faced Bubble Wrap
For those working with a tight budget, foil-faced bubble wrap can be an effective radiant barrier. Its main job is to reflect radiant heat—a huge source of heat gain for a metal shed sitting in the Florida sun.
It’s incredibly lightweight and easy to install with just a staple gun or some adhesive. While it won’t provide the same thermal insulation as foam, it makes a noticeable difference in blocking the sun’s intense heat. The biggest drawback is that it doesn’t create the robust vapor barrier that foam products do, so making sure every single leak in the shed is sealed beforehand is absolutely non-negotiable.
Preparing Your Shed for a Flawless Insulation Job

Think of your shed’s interior walls as a canvas. You wouldn’t start a painting on a dirty, damaged surface, and the same logic applies here. In my 25 years of experience, I’ve seen that proper preparation is the single most important factor in a successful insulation project.
Skipping these foundational steps all but guarantees failure, especially in Florida’s humid, rust-prone environment. Many people get excited about the final result—a cool, dry shed—and rush past the prep work. This is a costly mistake. Trapping dirt, oil, or moisture behind your insulation creates a perfect breeding ground for mold and aggressive rust, destroying both the shed and your investment.
Start With a Deep Clean
The interior panels of a metal shed are often coated with oils and residues from the manufacturing process, not to mention years of accumulated dust and grime. For any insulation to adhere properly—especially spray foam or the adhesives used for rigid boards—the surface must be impeccably clean.
First, empty the shed completely. Then, grab a heavy-duty degreaser and a stiff brush to scrub every square inch of the interior walls and ceiling. Don’t forget to get into those corrugated grooves and around the framing. Once you’re done scrubbing, rinse everything thoroughly and let the shed air out until it is bone dry. Rushing this drying process is a common error that traps moisture right from the start.
Seal Every Potential Leak Point
Your next mission is to make that shed as watertight as possible. Even a tiny pinhole leak can introduce enough moisture to compromise your entire insulation system over time. This step requires a bit of detective work and meticulous attention to detail.
- Inspect Every Fastener: Go over every screw and bolt holding the shed together. Over the years, their rubber washers degrade and crack. Tighten any loose ones and replace any that are rusted or have failed washers.
- Seal the Seams: Apply a high-quality, weatherproof metal sealant or caulk to all panel seams on the walls and the roof. Pay close attention to the corners and where the walls meet the roofline—these are common trouble spots.
- Address the Base: Look for gaps along the bottom of the shed where the walls meet the concrete slab or foundation. You’ll want to seal this entire perimeter to prevent water from splashing or seeping in from the ground.
This sealing process is your first line of defense against moisture intrusion. Think of it as creating a submarine-tight shell. It’s tedious work, but it pays massive dividends by ensuring the cavity you’re about to insulate remains perfectly dry.
With the shed clean and sealed, it’s time to confront the most destructive enemy of any tin shed: rust.
Confront and Eliminate Rust
Insulating over existing rust is like putting a bandage on a serious wound—it only hides the problem while it gets worse underneath. Trapped moisture will cause the corrosion to accelerate rapidly, eating away at the structural integrity of your shed.
First, identify every single rust spot, no matter how minor it seems. For light surface rust, a wire brush or sandpaper is usually enough to get back to clean, bare metal. If you’re dealing with more significant corrosion, you might need a grinder with a wire wheel attachment to remove all the flaky material. Always wear safety glasses and a mask during this part; rust dust is not something you want to be breathing.
Once the rusty areas are sanded down to shiny metal, immediately apply a rust-inhibiting primer. This specialized primer chemically bonds to the metal and creates a barrier that prevents oxygen and moisture from restarting the corrosion process. Don’t just use standard paint primer; it won’t provide the same level of protection. Give the primer plenty of time to cure completely according to the manufacturer’s instructions before moving on. Completing these prep steps sets the stage for a successful, long-lasting project.
The Installation: DIY Guide vs. Hiring a Professional
https://www.youtube.com/embed/1i_2Bk3j3q0
Okay, your shed is clean, sealed, and ready for its thermal upgrade. Now comes the biggest decision: do you tackle this yourself, or is it time to call in the pros?
Honestly, the right move depends entirely on the insulation you picked. If you went with foam boards or bubble wrap, this is a very doable weekend project. But if you’ve decided on spray foam, the game changes completely. This isn’t just about preference; it’s about safety, equipment, and getting the high-performance results you’re paying for.
Property owners everywhere are getting serious about energy efficiency. The global insulation market was valued at USD 65.78 billion in 2025 and is expected to rocket to USD 128.11 billion by 2034. That’s not just a statistic—it shows a massive shift in how we think about controlling our spaces, and it’s driven almost entirely by the building sector.
The DIY Path for Boards and Wraps
If you’re working with rigid foam boards or a foil-faced bubble wrap, you can definitely handle this yourself. Your success will come down to being patient and precise.
Installing Rigid Foam Boards
The goal here is simple: create an airtight seal. You’re trying to replicate the seamless barrier that spray foam provides, but with panels.
- Measure Twice, Cut Once: Get precise measurements for the spaces between your shed’s wall studs and roof rafters. Use a sharp utility knife against a straight edge to cut the foam boards. You’re aiming for a snug friction fit—tight enough to hold itself in place.
- Glue It Down: Grab a construction adhesive that’s rated for both foam board and metal. Apply it to the back of your panels and press them firmly into place, making sure you get solid contact with the shed’s interior metal wall.
- Seal Every Single Seam: I can’t stress this enough—this is where most DIY jobs fail. Use a quality construction tape (foil tape is perfect for this) to seal every single joint. That means where the boards meet each other and where they touch the wood or metal framing. Any gap is a welcome mat for humid Florida air.
Our Pro Tip: Don’t be stingy with the tape. Overlap it generously at every joint and corner. Taking your time here is what separates a decent DIY job from a great one. Meticulous sealing is your best defense against condensation.
Installing Foil-Faced Bubble Wrap
This is a bit more straightforward, but you still need to be thorough. You’re creating a radiant barrier to reflect heat.
- Cut your bubble wrap to length, leaving a little extra to avoid any gaps.
- Use a heavy-duty staple gun to attach it directly to the wood framing. If your shed has metal framing, you’ll need a strong, compatible adhesive.
- Just like with the foam boards, tape all the seams to form a continuous, unbroken barrier.
Why Spray Foam Is a Job for the Pros
You’ve probably seen DIY spray foam kits at the hardware store. Let me be clear: those are designed for tiny jobs, like sealing a small gap around a pipe. They are absolutely not meant for insulating an entire building. Trying to insulate a whole shed with those cans is a recipe for a messy, ineffective, and surprisingly expensive disaster.
Professional spray foam insulation is a different beast entirely. It’s a chemical process that demands specialized equipment, serious training, and non-negotiable safety protocols.
- The Equipment is Complex: We use high-pressure, high-temperature rigs that heat two chemical components and mix them perfectly at the tip of the spray gun. This is what ensures the foam expands correctly, bonds permanently to the metal, and delivers the R-value you paid for. A DIY kit just can’t do that.
- Safety is Non-Negotiable: When spray foam is applied, it releases chemical vapors that are hazardous to breathe. Our crews wear full-body protective suits and supplied-air respirators. This is far beyond what a simple dust mask can handle.
- Application is an Art: There’s a real technique to applying spray foam correctly. A seasoned installer knows how to build it up in even layers, or “lifts,” to achieve the right thickness without leaving any voids. Applying too much, too fast can actually warp thin metal panels from the heat of the chemical reaction.
When you hire a team like Airtight Spray Foam Insulation, you’re not just getting a product; you’re investing in expertise. We’ll mask off everything that needs protecting, set up proper ventilation, and apply a single, continuous layer of insulation that seals every last crack and crevice. The result is a seamless, high-performance barrier against heat and moisture that a DIY project simply cannot match. For a better look at what this involves, you can explore more about our spray foam insulation services.
Managing Ventilation to Prevent Condensation
So, you’ve meticulously sealed every seam and installed high-performance insulation. Your shed is now an airtight fortress against Florida’s brutal heat. But in creating that perfect seal, you’ve also inadvertently created a trap for humid air.
Without an escape route, all that moisture will condense on the cooler metal surfaces. That’s a recipe for musty smells, mildew, and potential damage to whatever you’re storing inside.
An insulated shed has to breathe. It sounds backward after all the work you put into sealing it up, but proper ventilation is the other half of the climate control equation. Insulation stops heat transfer, and ventilation manages moisture and air quality. You need both for a truly comfortable and healthy space.
It’s a principle understood worldwide. The demand for effective building insulation is booming, with the Asia Pacific region alone accounting for a 49.12% market share in 2023, according to Fortunebusinessinsights.com. This global trend is driven by stricter energy codes and large-scale construction, showing just how critical this stuff is.
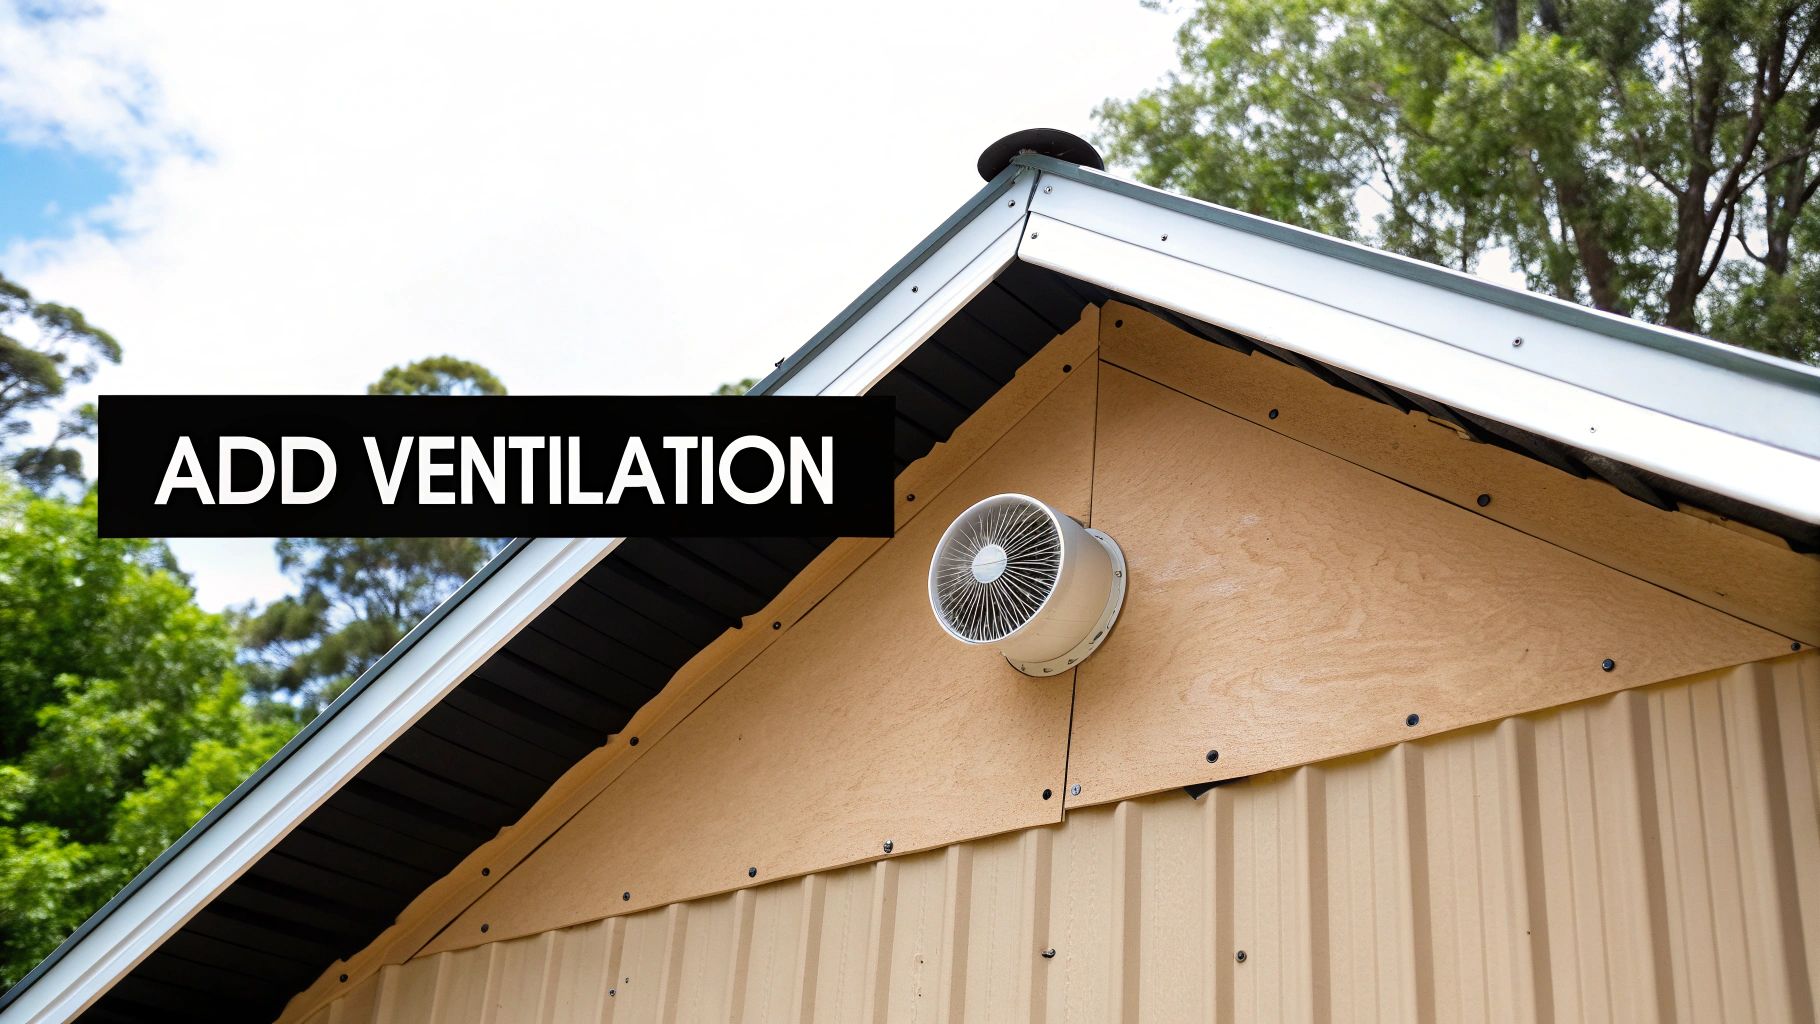
Creating Pathways for Airflow
The goal here is simple: create a gentle, consistent exchange of air. You want to push the stale, humid indoor air out while pulling fresh, drier air in. For a metal shed, a few key components do the job beautifully.
- Gable Vents: Installed high up in the peaks of the shed’s gables, these vents give hot, moist air—which naturally rises—an easy way out.
- Ridge Vents: This type of vent runs along the entire peak of the roof, providing a continuous and subtle exit point for rising warm air.
- Soffit Vents: When you pair soffit vents (installed under the eaves) with gable or ridge vents, you create a natural convection current. Cool air gets drawn in low, pushing hot air out high.
This whole strategy is called passive ventilation because it relies on natural airflow, not mechanical fans.
Key Takeaway: The “stack effect” is your best friend. By placing intake vents low and exhaust vents high, you let physics do the work of moving air through your shed. It’s a core principle of our Airtight Comfort System.
When You Need to Bring in a Fan
If you plan to use your shed as a workshop or will be in and out frequently, passive vents might not cut it. That’s when you need to step up to active ventilation.
A small, solar-powered exhaust fan is a fantastic, energy-efficient choice. When installed near the roof’s peak, it actively pulls hot, humid air out of the shed, which forces fresh air to be drawn in through your lower vents. This guarantees consistent airflow, even on those still, muggy days with no breeze.
The trick is to achieve cross-ventilation. Always try to place your vents on opposite sides of the shed. This ensures that fresh air moves across the entire space instead of just circulating in one corner, effectively clearing out moisture and eliminating stagnant air pockets.
Combining proper insulation with a smart ventilation strategy is the final, critical step in learning how to insulate a tin shed for real, year-round comfort.
What’s This Going to Cost? A Look at Long-Term Value
Before jumping into a project like this, it’s smart to understand the numbers. But I always tell homeowners to think of insulating their shed as a long-term investment, not just another Saturday expense.
A properly insulated shed isn’t just a shed anymore. It becomes a functional workshop, a secure storage space, or even a backyard office you can actually use year-round. More importantly, it protects your expensive tools, lawn equipment, and stored valuables from the brutal heat and rust-causing humidity we deal with here in South Florida. It’s about protecting your assets.
The final price tag really comes down to two things: the material you choose and whether you do it yourself or bring in a pro. It’s all a balancing act between the upfront cost and the long-term performance you’ll get out of it.
Comparing Insulation Costs
Let’s break down what you can expect to pay for materials. These are ballpark figures, per square foot, for the materials alone.
- Foil-Faced Bubble Wrap: This is your most basic, budget-friendly option, running somewhere between $0.50 and $1.00 per square foot. Keep in mind, it’s really just a radiant barrier, not a true insulator.
- Rigid Foam Boards (XPS/Polyiso): A solid middle-of-the-road choice. These panels typically cost $1.50 to $3.00 per square foot, with the price depending on thickness and R-value.
- Professional Closed-Cell Spray Foam: This is the premium, high-performance solution. Expect to invest $2.00 to $4.00 or more per square foot. That price includes professional installation, which is the only way this should be done.
While spray foam has the highest initial cost, its ability to act as an all-in-one insulator, air sealant, and moisture barrier delivers the best long-term value. It’s the only solution that truly stops the moisture and condensation that leads to rust and rot down the road.
Factoring in DIY vs. Professional Installation
Going the DIY route with foam boards can definitely save you money on labor, but don’t forget to budget for the extra supplies. You’ll need a good utility knife, a construction adhesive that’s rated for metal, and specialty foil tape to seal the seams properly. Those items can easily add another $50 to $100 to your project total.
When you hire a professional for spray foam, the quoted price includes everything—labor, equipment, and all the necessary safety gear. For most people, the peace of mind that comes with a guaranteed, perfectly sealed application is well worth it.
One last thing: before you start, give your local municipality a call to ask about permits. You usually don’t need one for just insulation, but if you’re adding electrical for lights or outlets, you almost certainly will. A little forethought here ensures your new space is both safe and up to code.
Of course. Here is the rewritten section, crafted to sound like an experienced human expert and match the provided examples.
Your Top Questions About Insulating a Tin Shed
Even with a solid plan, you’re bound to have questions. It’s smart to get them answered before you start. Over the years, we’ve heard just about everything, so let’s walk through some of the most common concerns we see from homeowners.
Can I Just Insulate Over Rusty Spots in My Shed?
We get this question a lot, and the answer is always a hard no. Insulating over rust is like putting a lid on a pot of boiling water—it traps moisture right up against the metal, which will supercharge the corrosion process. Before you know it, you’ll have a weakened shed structure and failing insulation.
Do the prep work. It’s not the fun part, but it’s critical. You need to sand down every bit of rust until you’re looking at clean, shiny metal. Once that’s done, treat the area with a quality rust-inhibiting primer. Only then should you even think about applying insulation.
Is a DIY Spray Foam Kit a Good Idea for My Shed?
While those DIY kits at the hardware store might seem tempting for a weekend project, they’re really only built for tiny jobs—think sealing a small gap around a pipe. If you try to insulate an entire shed with one, you’re in for a frustrating, messy experience that results in an uneven application and won’t create the airtight seal you need.
Professional installation isn’t just easier; it’s the only way to guarantee a proper, long-lasting thermal seal for an entire shed. We use specialized equipment to apply the foam at the perfect temperature and thickness. Plus, we come equipped with the right safety gear, like respirators and protective suits, to handle the chemicals safely. It’s just not worth the risk or the poor results to do it yourself.
Will Insulation Make My Tin Shed Soundproof?
It’s going to make a world of difference, but “soundproof” is a strong word. One of the best—and often unexpected—perks of insulating a metal shed is how much quieter it becomes. That deafening roar of a heavy Florida downpour hitting the roof? It’ll turn into a much more tolerable, muffled sound.
Closed-cell spray foam is fantastic for this because its dense, rigid structure is a natural at absorbing sound waves. If your goal is true soundproofing, though, you’d need to go a step further by adding specialized materials like mass-loaded vinyl or a layer of drywall over the foam.
Ready to turn that hot, noisy shed into a genuinely usable space? The team at Airtight Spray Foam Insulation has the hands-on experience and professional equipment to create a perfect, seamless seal that stands up to Florida’s heat and humidity. Request your free quote today and let’s talk about protecting your property the right way.
Tin sheds in Palm Beach Gardens, FL heat up quickly in the Florida sun, making proper insulation essential for storage, workshops, and outdoor spaces. We help PBG homeowners choose the right materials to keep sheds cooler and moisture-free.
👉 Learn more about our Palm Beach Gardens services:
https://yourwebsite.com/spray-foam-insulation-palm-beach-gardens/